overlay.yml under group_vars/all/
To manage the overlay pieces, you will create a file that contains the VRFs and Networks variable data. This data will be used to create the VRF and Network objects in NDFC but the actual configuration will not be deployed to the devices until the deploy role is executed.
all
This data file is stored in the group_vars/all directory and is used to define variables that are common to all devices in your staging-fabric and will also later be used in your production-fabric.
Using the all directory and/or file name is a specially reserved name in Ansible.
touch ~/workspace/ndfclab/ansible/group_vars/all/overlay.yml
cat << EOF > ~/workspace/ndfclab/ansible/group_vars/all/overlay.yml
---
vrfs:
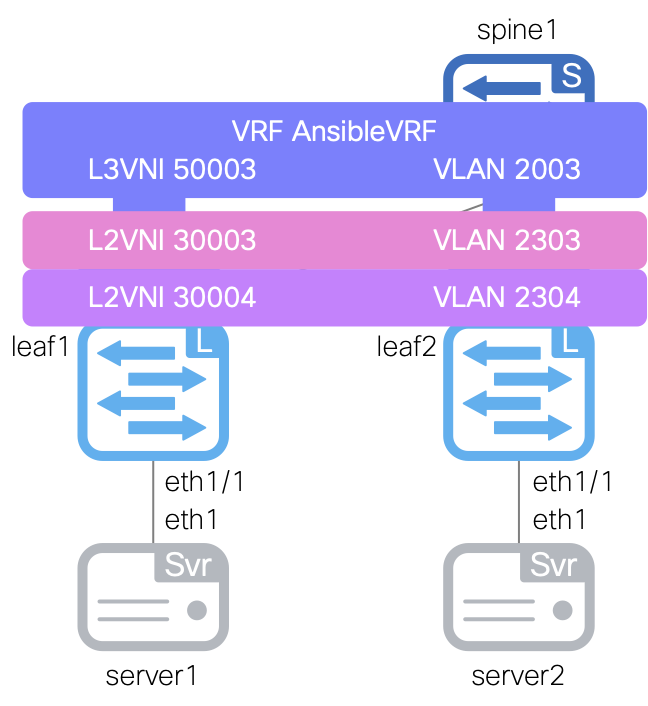
- vrf_name: &refvrf_ansible AnsibleVRF
vrf_id: 50003
vlan_id: 2003
attach_group: all_leaf
deploy: false
networks:
- net_name: AnsibleNet1
vrf_name: *refvrf_ansible
net_id: 30003
vlan_id: 2303
vlan_name: AnsibleNet1_vlan2303
gw_ip_subnet: "10.3.1.1/24"
attach_group: esxi
deploy: false
- net_name: AnsibleNet2
vrf_name: *refvrf_ansible
net_id: 30004
vlan_id: 2304
vlan_name: AnsibleNet2_vlan2304
gw_ip_subnet: "10.3.2.1/24"
attach_group: esxi
deploy: false
EOF
In the file to the left for your overlay variable data, there might be an unfamiliar concept with the & and the * characters.
These are called YAML Anchors and Aliases.
In short, the & is used to create an anchor and the * is used to reference the anchor so that you do not have to repeat portions of your data or configuration.
Staging FabricThis file contains the overlay specific variables for attaching VRF(s) to your border leaf switch in your staging fabric.
stage
This data file is going back to being stored in the group_vars/stage directory like previous sections as it is specific data configuration for your staging or test fabric.
When it comes to your production fabric, similar data specific to your production fabric will be stored in the group_vars/prod directory.
touch ~/workspace/ndfclab/ansible/group_vars/stage/overlay.yml
cat << EOF > ~/workspace/ndfclab/ansible/group_vars/stage/overlay.yml
---

vrf_attach_group:
  all_leaf:
    - ip_address: 10.15.5.12
    - ip_address: 10.15.5.13

net_attach_group:
  esxi:
    - ip_address: 10.15.5.12
      ports: [Ethernet1/1]
    - ip_address: 10.15.5.13
      ports: [Ethernet1/1]
EOF
For the overlay role tasks, ensure you are in your VSCode Terminal and open the main.yml file found in roles/manage_overlay/tasks/ using the VSCode code keyword as before.
code-server -r ~/workspace/ndfclab/ansible/roles/manage_overlay/tasks/main.yml
Copy the below tasks into the roles/manage_overlay/tasks/main.yml file that uses Ansible's block keyword. The block keyword is used to group tasks together.
The first tasks use Ansible's built-in ansible.builtin.template module to generate the payload to a file that would be found in the files directory of the role.
Then the ansible.builtin.set_fact task is used to set a variable called vrf_config from the created file that will be used in the cisco.dcnm.dcnm_vrf module to create the VRF objects in NDFC.
The same style of tasks is used to create the network configuration where the cisco.dcnm.dcnm_network module is used to create the network objects in NDFC.
Also note, the tags parameter is used to tag the tasks so that you can run only the tasks you want to run such as only VRFs or only Networks.
- name: Role Entry Point - [manage_overlay]
  ansible.builtin.debug:
    msg:
      - "----------------------------------------------------------------"
      - "+             Calling Role - [manage_overlay]                  +"
      - "----------------------------------------------------------------"
  tags:
    - mo_vrfs_nets
    - mo_vrfs
    - mo_networks
    - mo_all

# -------------------
# CREATE VRF SECTION
# -------------------

- name: Generate and Manage NDFC Fabric VRFs
  tags:
    - mo_vrfs_nets
    - mo_vrfs
    - mo_all
  block:
    # --------------------------------------------------------------------
    # Generate VRF Configuration for NDFC
    # --------------------------------------------------------------------
    - name: Create file to hold rendered VRF information
      ansible.builtin.template:
        src: attach_vrfs.j2
        dest: "{{ role_path }}/files/attach_vrfs.yml"
        mode: preserve

    - name: Create and store generated VRF configuration
      ansible.builtin.set_fact:
        vrf_config: "{{ lookup('file', 'attach_vrfs.yml') | from_yaml }}"

    # --------------------------------------------------------------------
    # Manage VRF Configuration on NDFC
    # --------------------------------------------------------------------
    - name: Manage NDFC Fabric VRFs
      cisco.dcnm.dcnm_vrf:
        fabric: "{{ fabric_settings.FABRIC_NAME }}"
        config: "{{ vrf_config }}"
        state: replaced

# -----------------------
# CREATE NETWORK SECTION
# -----------------------

- name: Generate and Manage NDFC Fabric Networks
  tags:
    - mo_vrfs_nets
    - mo_vrfs
    - mo_all
  block:
    # --------------------------------------------------------------------
    # Generate Network Configuration for NDFC
    # --------------------------------------------------------------------
    - name: Create file to hold rendered Network information
      ansible.builtin.template:
        src: attach_networks.j2
        dest: "{{ role_path }}/files/attach_nets.yml"
        mode: preserve

    - name: Create and store generated Network configuration
      ansible.builtin.set_fact:
        net_config: "{{ lookup('file', 'attach_nets.yml') | from_yaml }}"

    # --------------------------------------------------------------------
    # Manage Network Configuration on NDFC
    # --------------------------------------------------------------------
    - name: Manage NDFC Fabric Networks
      cisco.dcnm.dcnm_network:
        fabric: "{{ fabric_settings.FABRIC_NAME }}"
        config: "{{ net_config }}"
        state: replaced
templates and files directories under the manage_overlay role
In this part of the lab, you are going to be using a new method to work with Jinja2 templates.
Earlier in the lab you created inline Jinja2 templates directly in the Ansible tasks.
In this section you will use a different approach.
You will create two new directories in the manage_overlay role directory to store the Jinja2 templates and rendered configuration files.
This use of Jinja2 templates makes roles highly reusable and allows for the separation of configuration data from the actual configuration files. This is a best practice in Ansible development.
mkdir -p ~/workspace/ndfclab/ansible/roles/manage_overlay/templates
mkdir -p ~/workspace/ndfclab/ansible/roles/manage_overlay/files
roles/manage_overlay/templates - This directory will store the Jinja2 templatesroles/manage_overlay/files - This directory will store the rendered configuration filesThe diagram below demonstrates how the main playbook tasks will call the Jinja2 templates to render the configuration files that will be used to deploy the VRFs and Networks to the fabric.
ansible.builtin.template moduleroles/manage_overlay/templates/attach_vrfs.j2 Jinja2 templateroles/manage_overlay/files/attach_vrfs.yml using the VRF variable data defined in group_vars/all/overlay.ymlvrf_config which is then passed to the cisco.dcnm.dcnm_vrf module to create the VRF objects in NDFC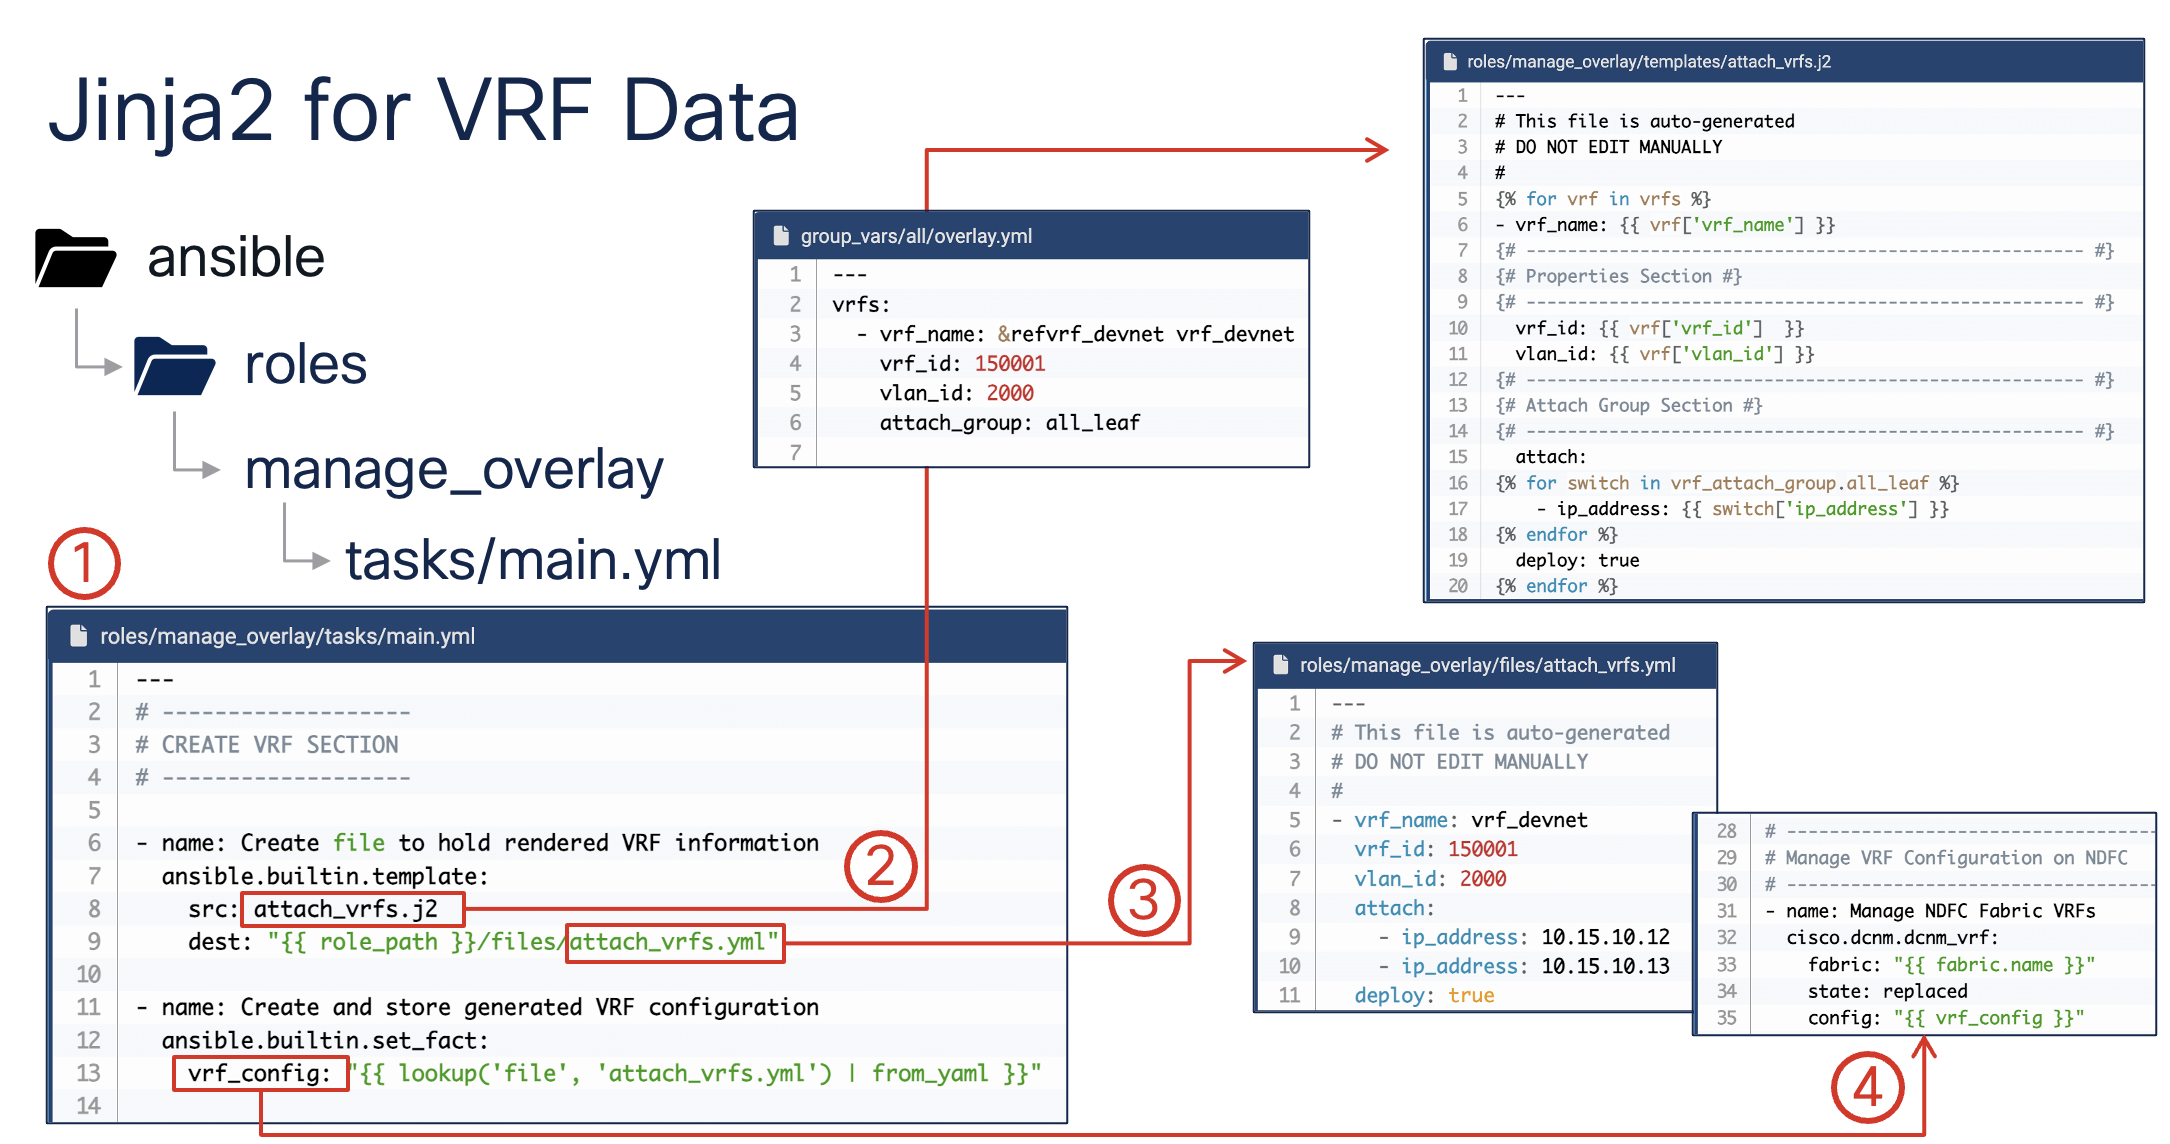
This step will create the Jinja2 templates that will be used to render the VRF and Network configuration files.
touch ~/workspace/ndfclab/ansible/roles/manage_overlay/templates/attach_vrfs.j2
cat << EOF > ~/workspace/ndfclab/ansible/roles/manage_overlay/templates/attach_vrfs.j2
---
# This file is auto-generated
# DO NOT EDIT MANUALLY
#
{% for vrf in vrfs %}
- vrf_name: {{ vrf['vrf_name'] }}
{# ------------------------------------------------------ #}
{# Properties Section #}
{# ------------------------------------------------------ #}
  vrf_id: {{ vrf['vrf_id']  }}
  vlan_id: {{ vrf['vlan_id'] }}
{# ------------------------------------------------------ #}
{# Attach Group Section #}
{# ------------------------------------------------------ #}
  attach:
{% for switch in vrf_attach_group.all_leaf %}
    - ip_address: {{ switch['ip_address'] }}
{% endfor %}
  deploy: false
{% endfor %}
EOF

touch ~/workspace/ndfclab/ansible/roles/manage_overlay/templates/attach_networks.j2
cat << EOF > ~/workspace/ndfclab/ansible/roles/manage_overlay/templates/attach_networks.j2
---
# This file is auto-generated
# DO NOT EDIT MANUALLY
#
{% for net in networks %}
- net_name: {{ net['net_name'] }}
{# ------------------------------------------------------ #}
{# Properties Section #}
{# ------------------------------------------------------ #}
  vrf_name: {{ net['vrf_name'] }}
  net_id: {{ net['net_id'] }}
  vlan_id: {{ net['vlan_id'] }}
  vlan_name: {{ net['vlan_name'] }}
  gw_ip_subnet: {{ net['gw_ip_subnet'] }}
{# ------------------------------------------------------ #}
{# Attach Group Section #}
{# ------------------------------------------------------ #}
  attach:
{% for switch in net_attach_group.esxi %}
    - ip_address: {{ switch['ip_address'] }}
      ports: {{ switch['ports'] }}
{% endfor %}
  deploy: false
{% endfor %}
EOF
fabric.yml Ansible PlaybookNavigate back to your fabric.yml file by using the VSCode code command:
code-server -r ~/workspace/ndfclab/ansible/fabric.yml
manage_overlay role under the roles: section of the playbook
Your fabric.yml file should already be populated from the previous section. With the file open, you only need to add the highlighted line, which should be line number 12
in your file. You can do this by highlighting the text in the lab guide and copying then pasting in your file or typing the line in your file. After one of those actions, press the
return key such that there is a new line after where you entered - manage_overlay.
- manage_overlay
---
# This is the top level build playbook that runs the various
# Ansible roles that will be used to build out the fabric

- name: Build VXLAN EVPN Fabric on NDFC
  hosts: ndfc
  gather_facts: false

  roles:
    - create_fabric
    - add_inventory
    - manage_overlay # Add this line under the add_inventory role from the previous section
Make sure you are in the root Ansible directory
cd ~/workspace/ndfclab/ansible
From the root ansible project directory execute the following command.
ansible-playbook -i hosts.stage.yml fabric.yml --tags mo_vrfs_nets
Upon a successful run of the playbook your output should look as follows:
  PLAY [Build VXLAN EVPN Fabric on NDFC] **********************************************************************************************************************************

  TASK [manage_overlay : Role Entry Point - [manage_overlay]] *************************************************************************************************************
  ok: [10.15.0.23] => {
      "msg": [
          "----------------------------------------------------------------",
          "+             Calling Role - [manage_overlay]                     +",
          "----------------------------------------------------------------"
      ]
  }

  TASK [manage_overlay : Create file to hold rendered VRF information] ****************************************************************************************************
  changed: [10.15.0.23]

  TASK [manage_overlay : Create and store generated VRF configuration] ****************************************************************************************************
  ok: [10.15.0.23]

  TASK [manage_overlay : Manage NDFC Fabric VRFs] *************************************************************************************************************************
  changed: [10.15.0.23]

  TASK [manage_overlay : Create file to hold rendered Network information] ************************************************************************************************
  changed: [10.15.0.23]

  TASK [manage_overlay : Create and store generated Network configuration] ************************************************************************************************
  ok: [10.15.0.23]

  TASK [manage_overlay : Manage NDFC Fabric Networks] *********************************************************************************************************************
  changed: [10.15.0.23]

  PLAY RECAP **************************************************************************************************************************************************************
  10.15.0.23                 : ok=7    changed=4    unreachable=0    failed=0    skipped=0    rescued=0    ignored=0
Return to your NDFC browser where you should be sitting on the Interfaces tab
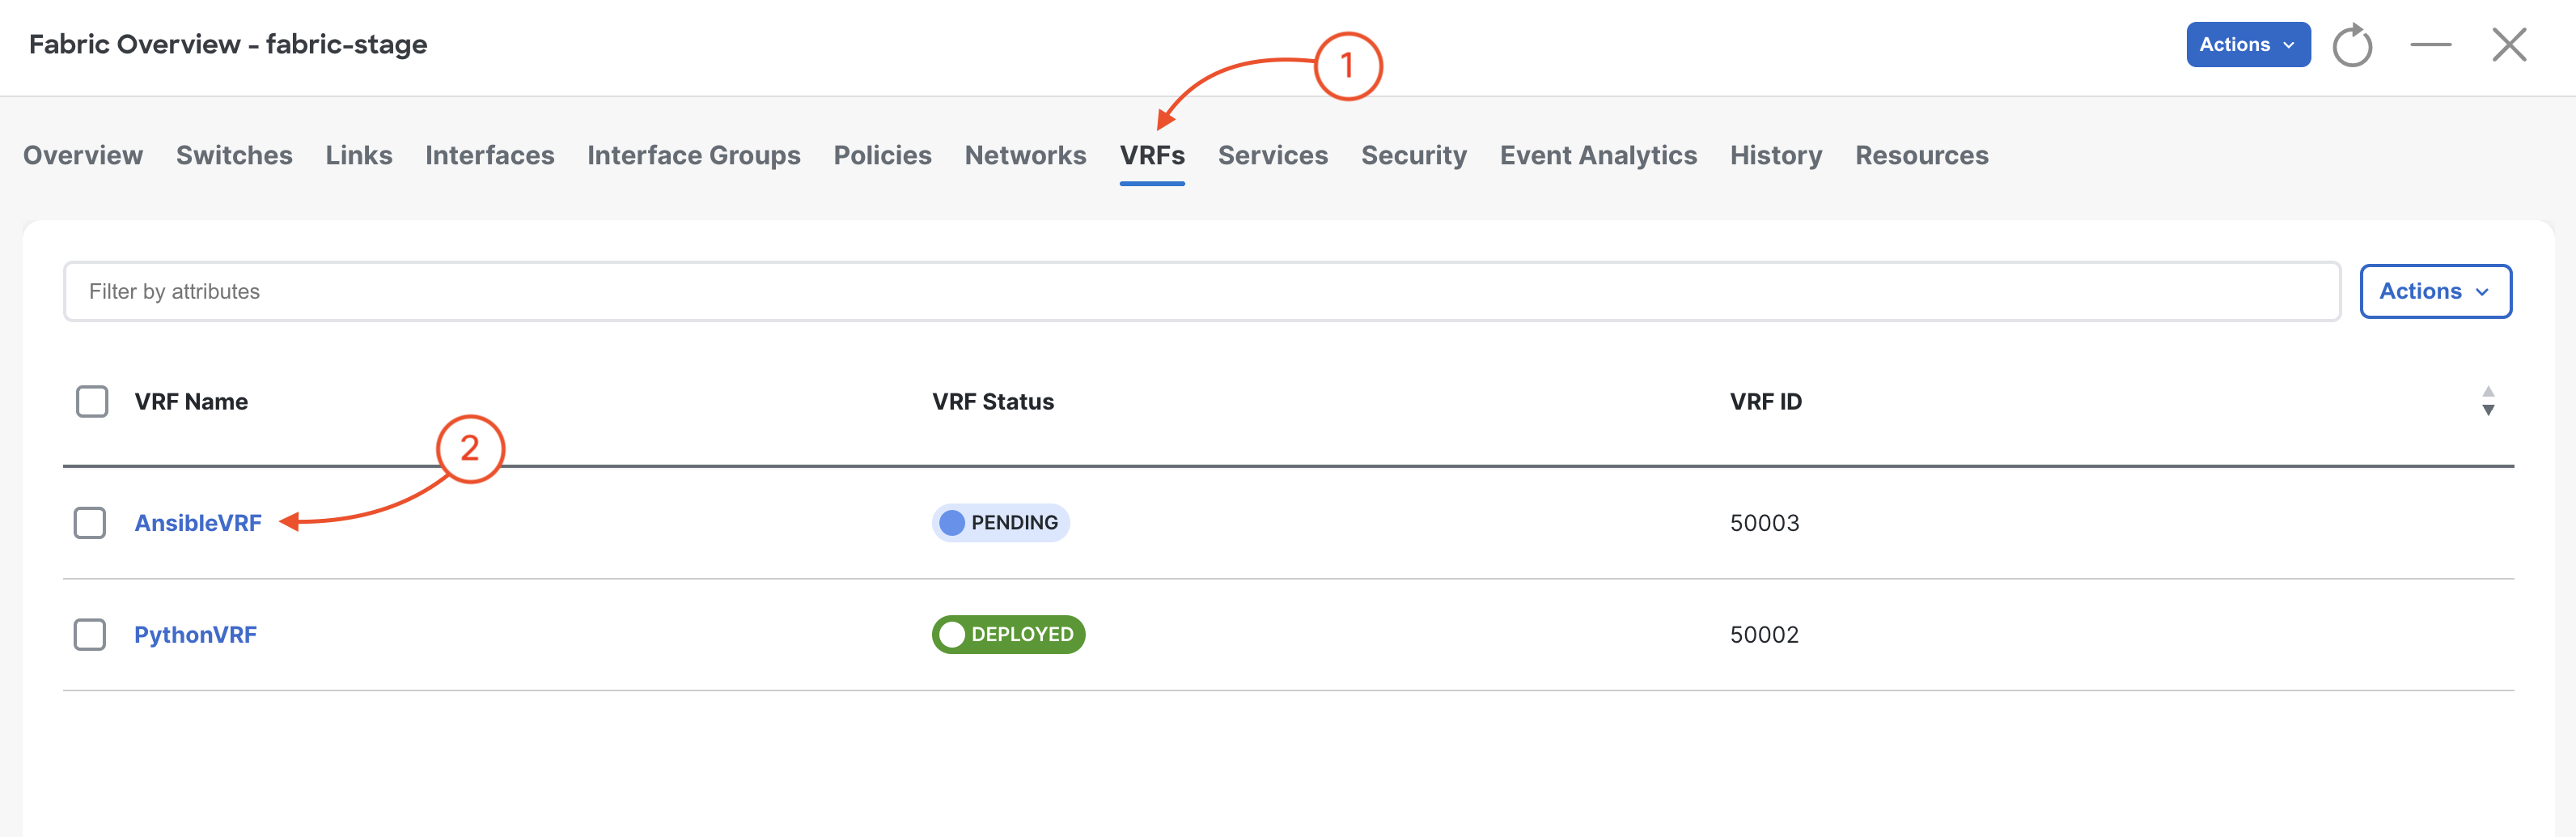
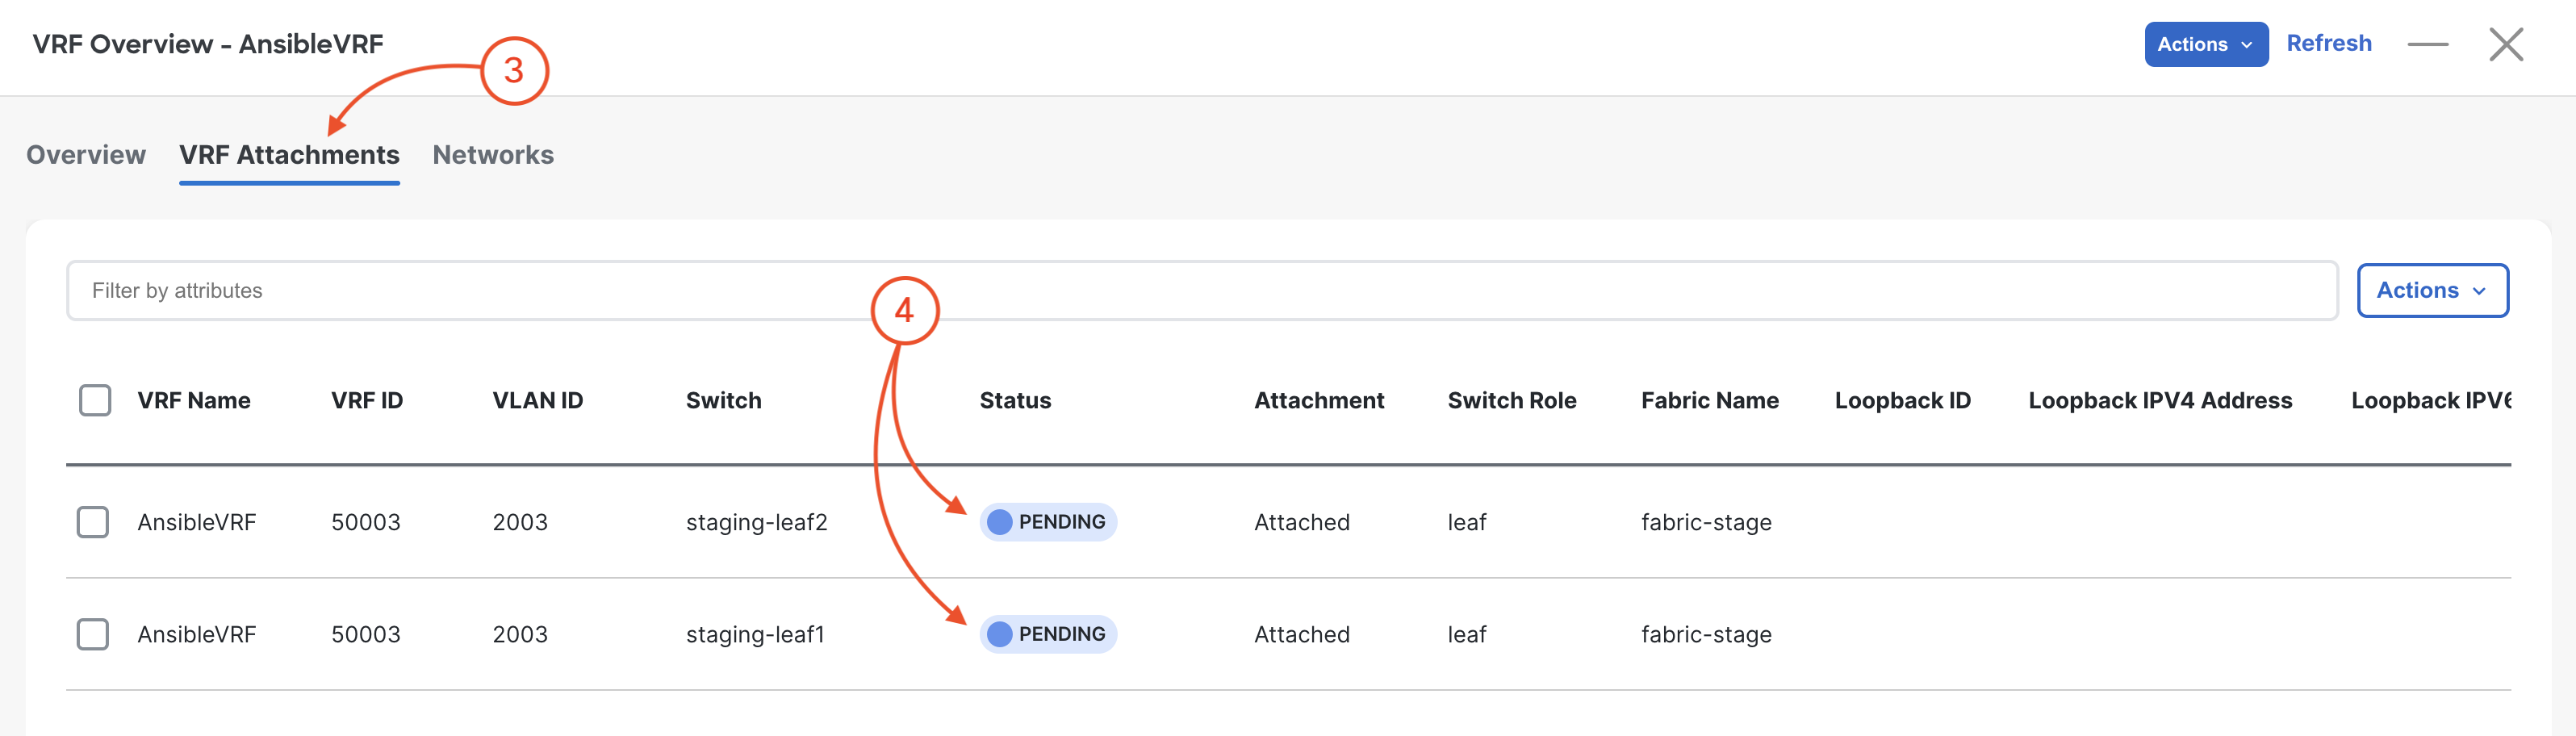
Verify you see the VRF AnsibleVRF that was created by your Ansible playbook.
Like previous sections, when reviewing the VRFs tab, it is expected to see VRFs in the Pending status since a deployment has not taken place yet.
Again, you will deploy to your switches in the deploy role. Following the remaining steps to verify the interface configuration is pre-staged in NDFC.
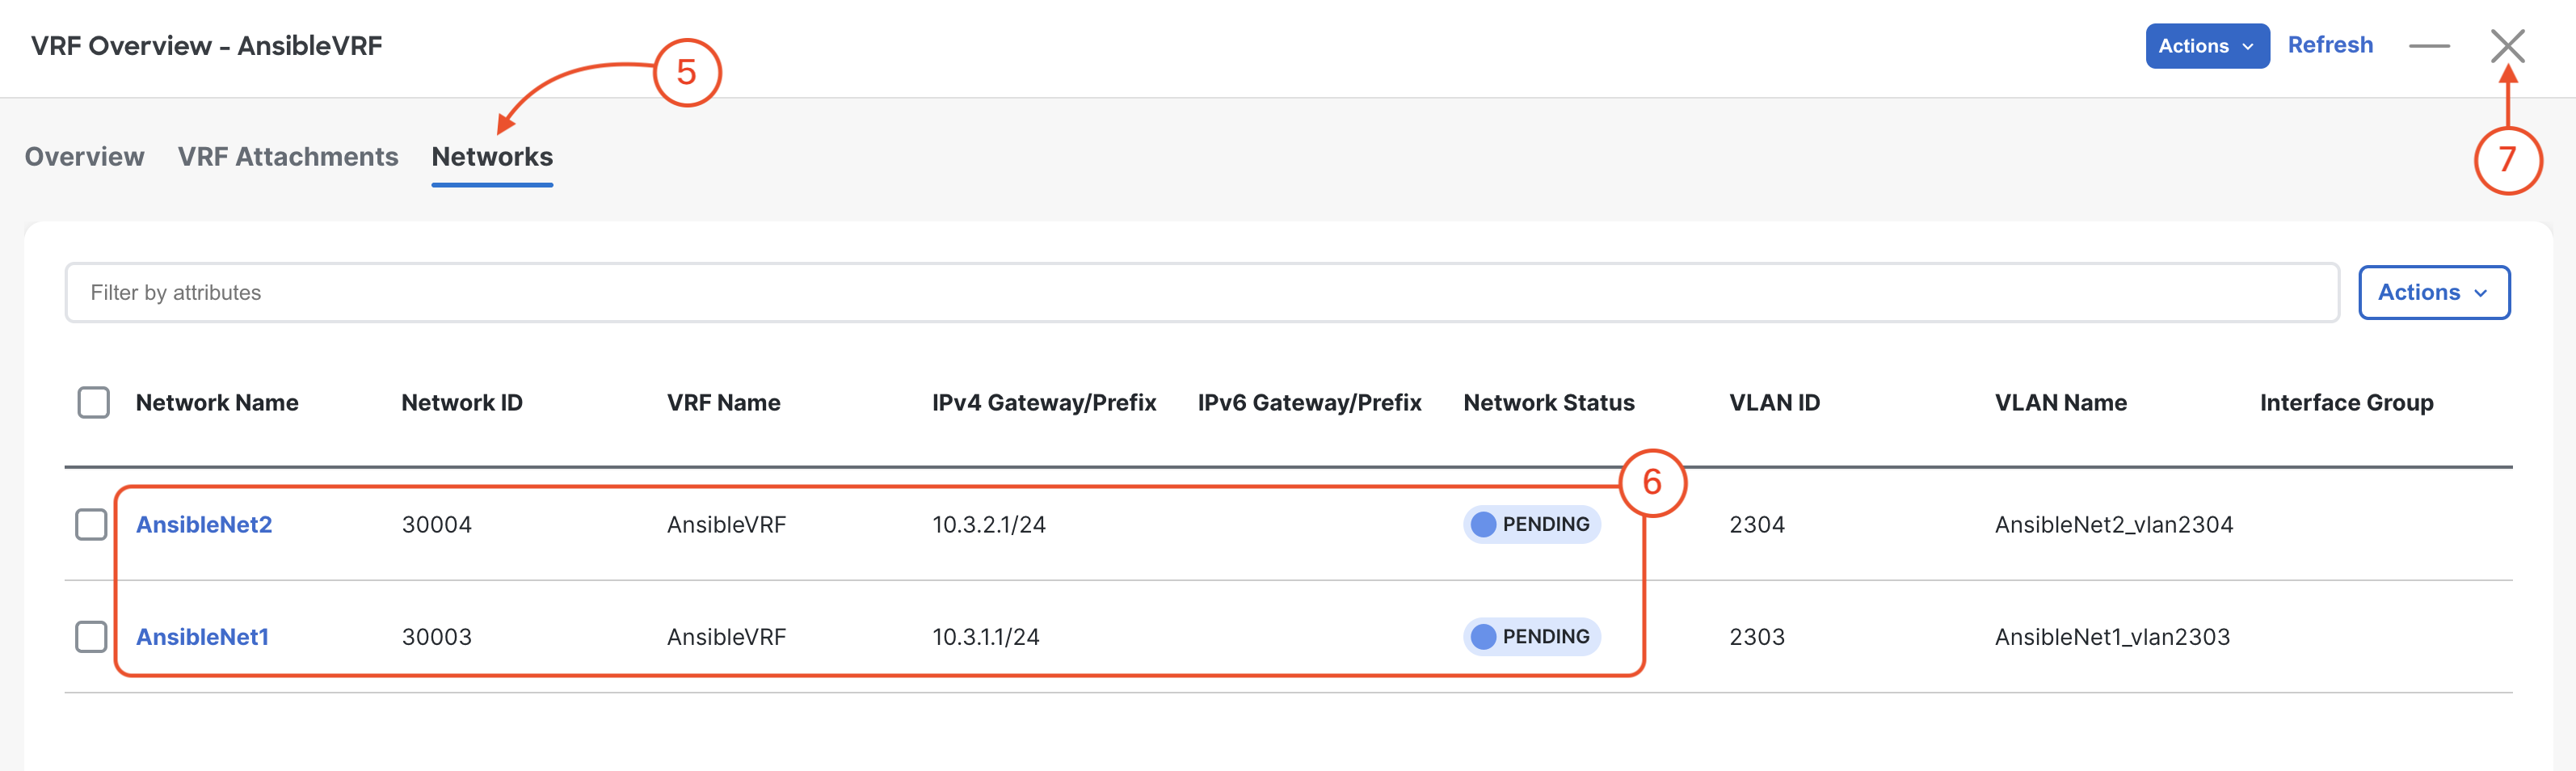
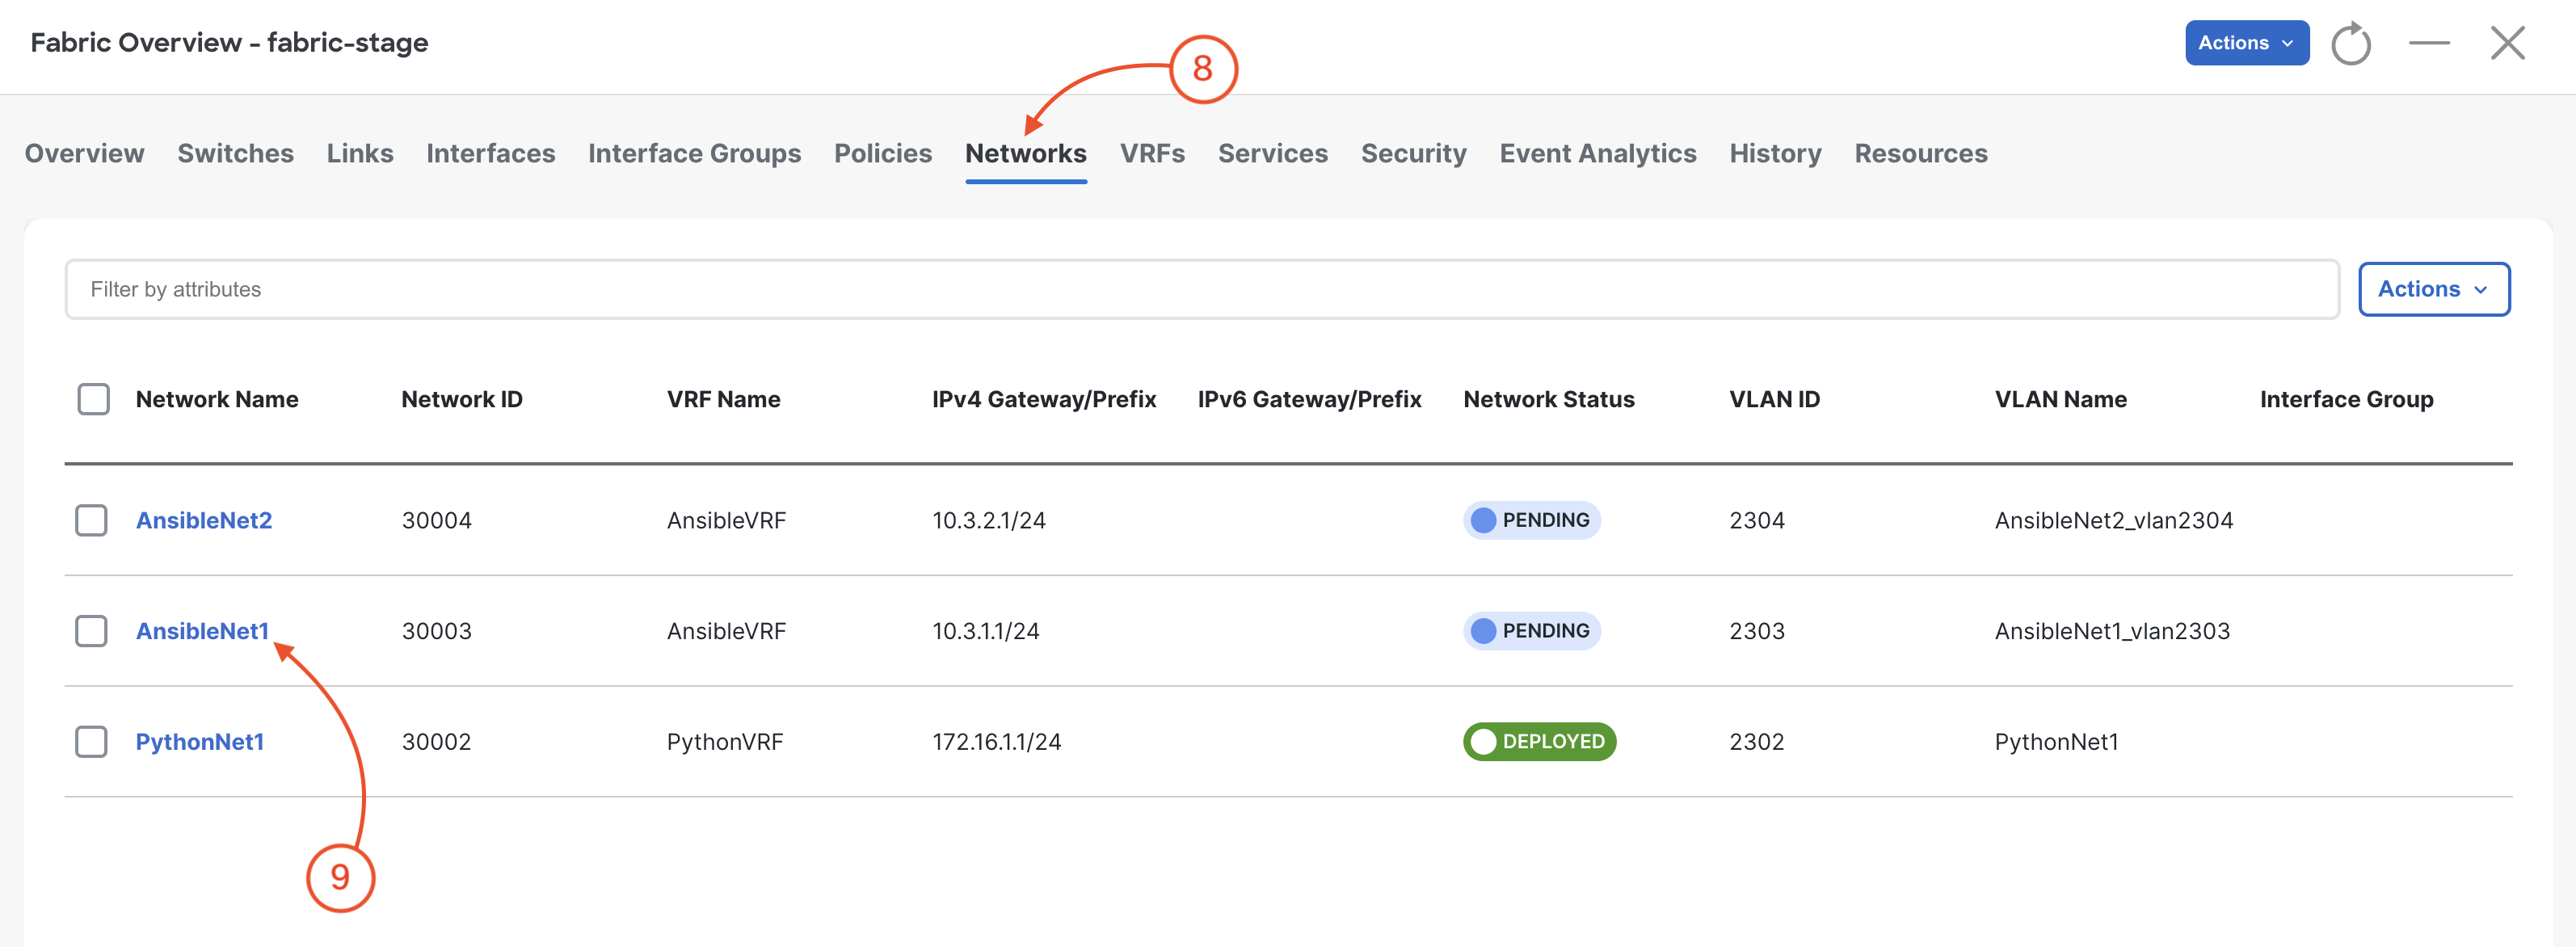
Verify you see the Networks AnsibleNet1 and AnsibleNet2 that was created by your Ansible playbook.
Like previous sections, when reviewing the Networks tab, it is expected to see VRFs in the Pending status since a deployment has not taken place yet.
Again, you will deploy to your switches in the deploy role. Following the remaining steps to verify the interface configuration is pre-staged in NDFC.
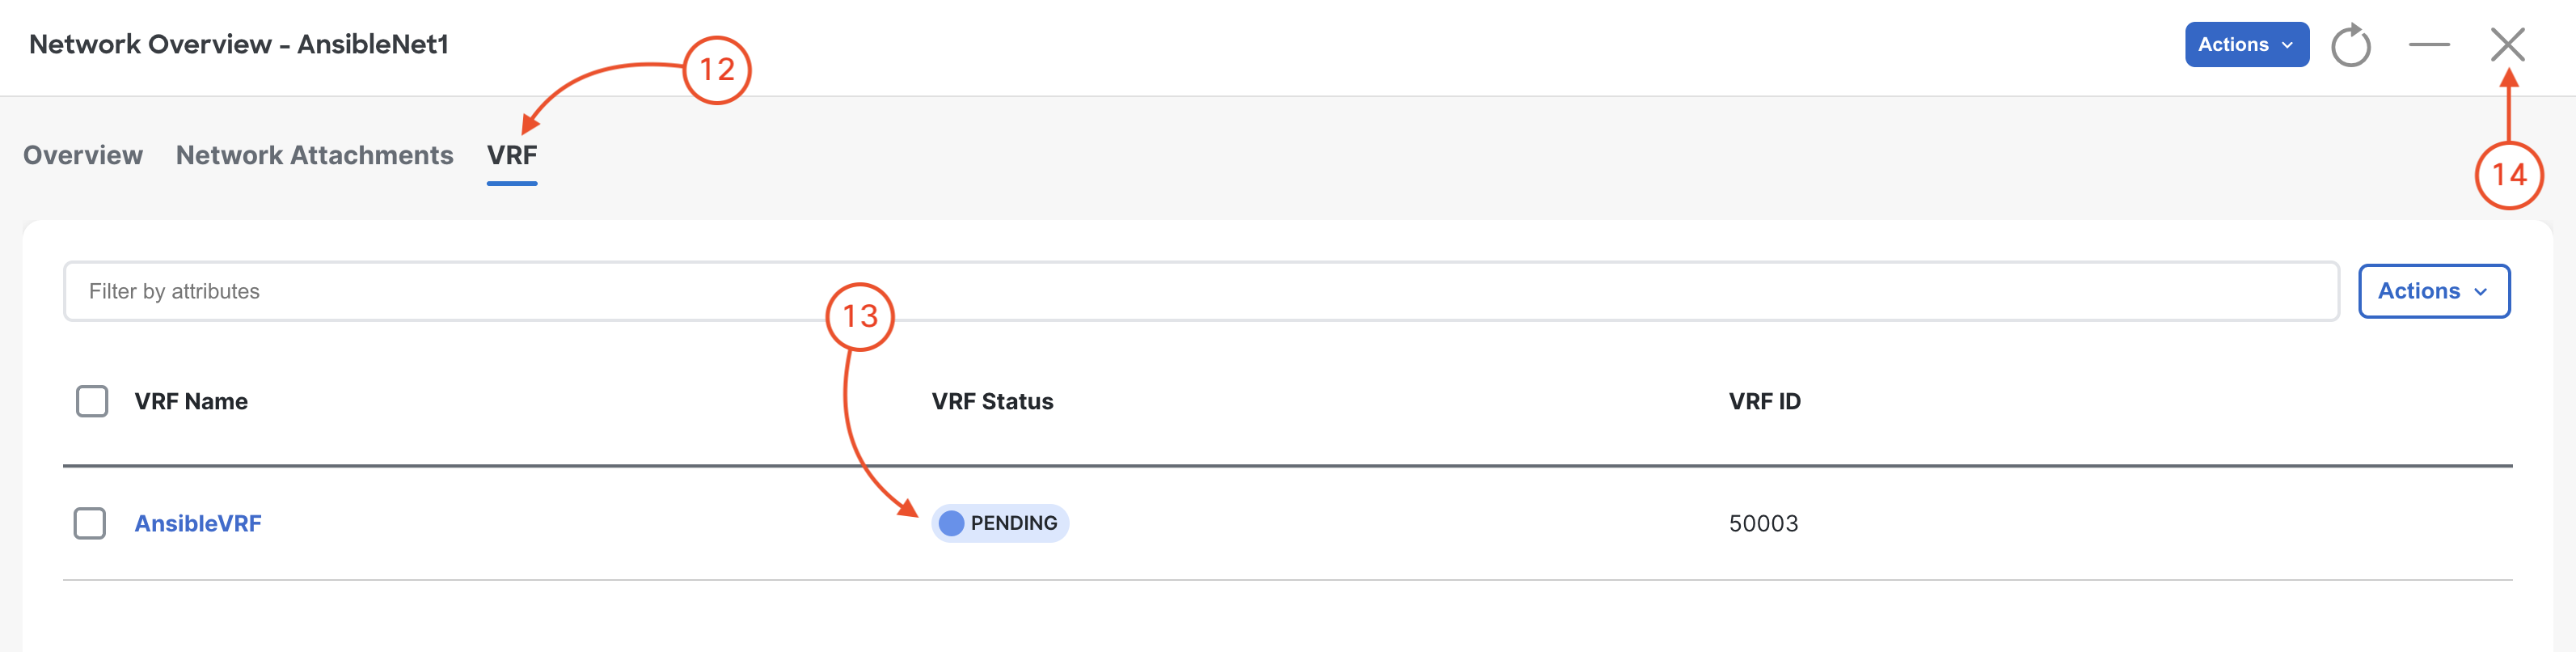
On the keyword press Ctrl + K + W. This should close all open tabs to clear your workspace for the next section.
Continue to the next section to populate the deploy role with the necessary tasks to deploy all of your configuration to your staging fabric.