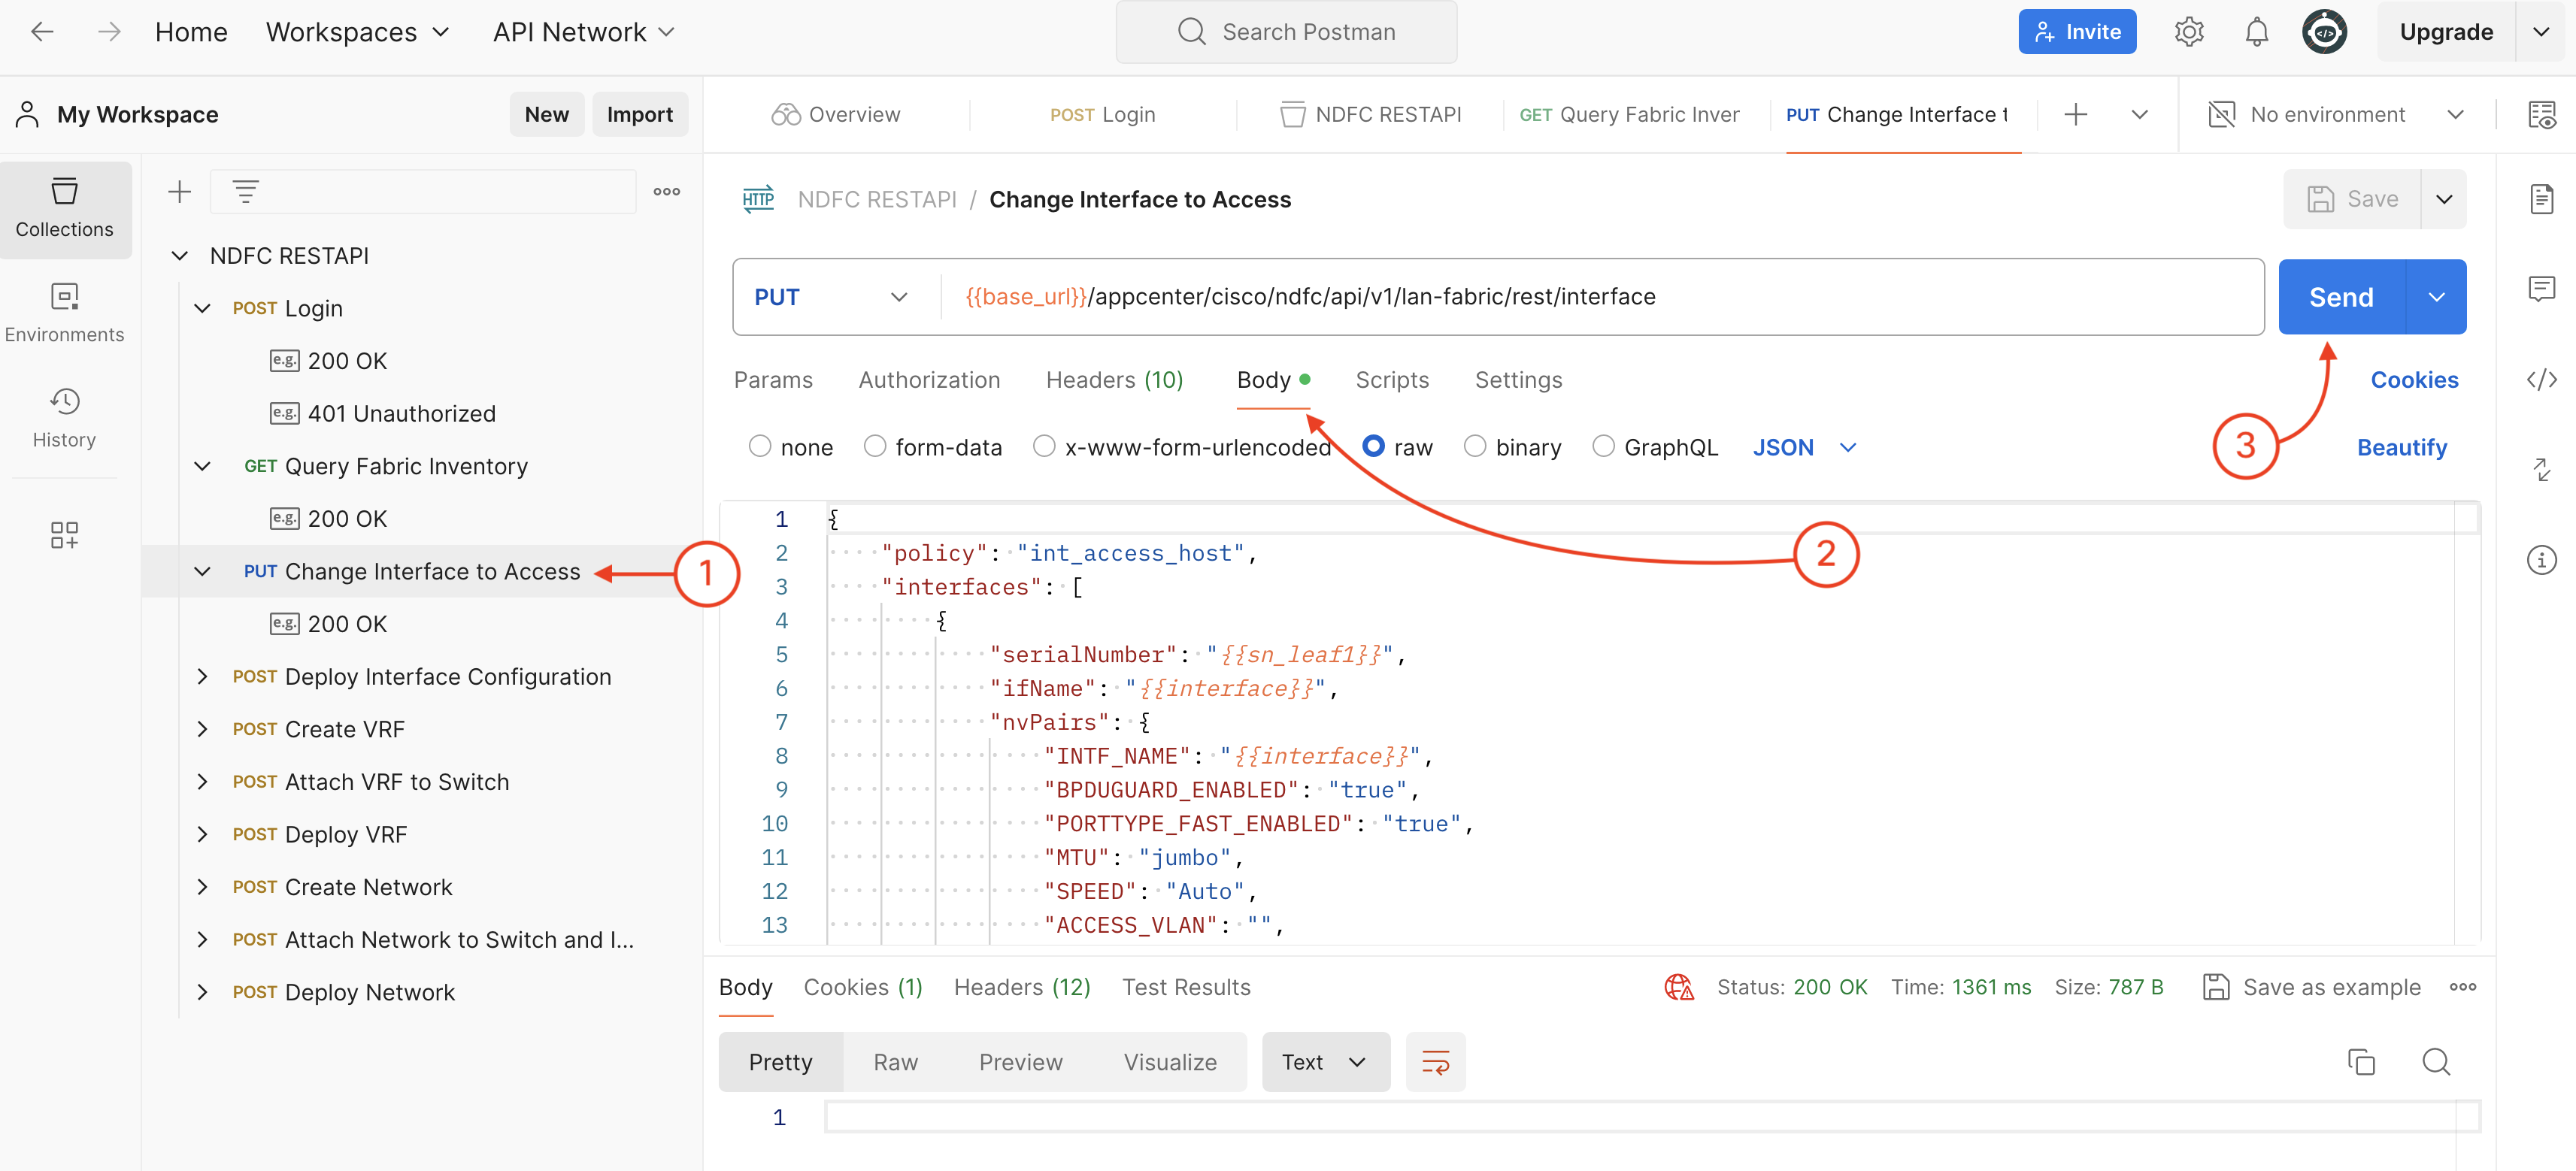
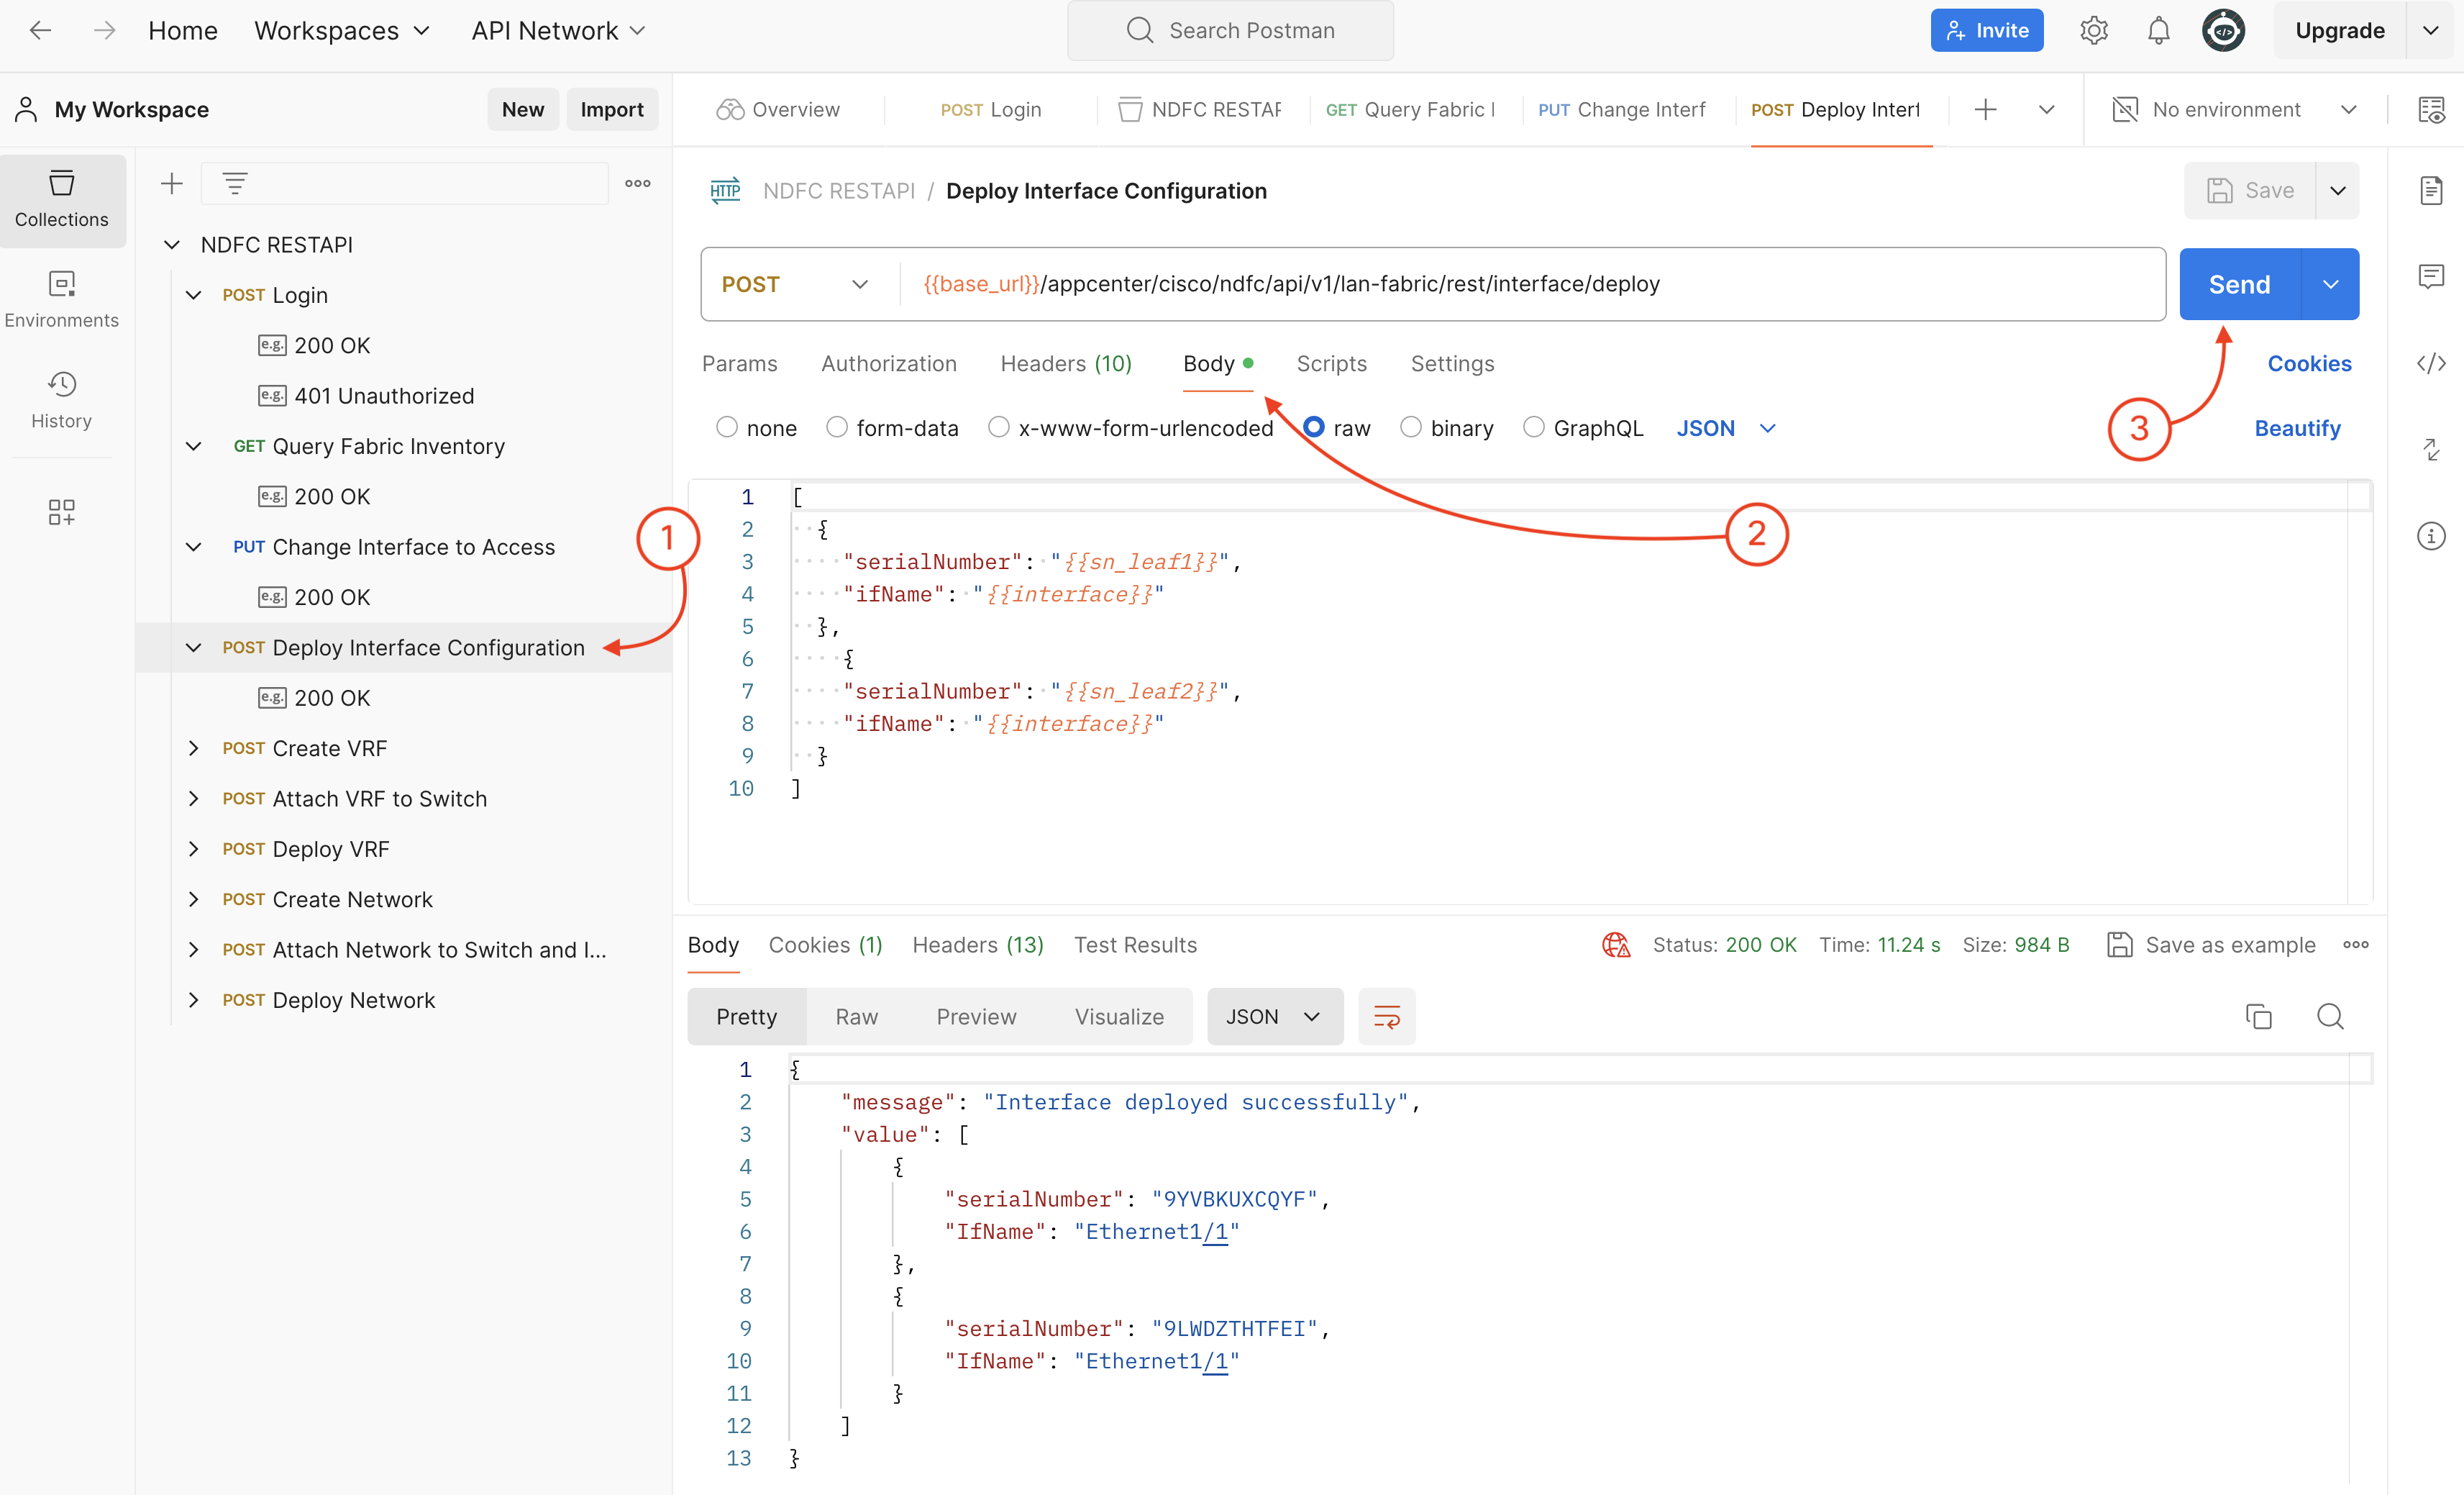
In this section, we will use the Collection imported to modify interface Ethernet1/1 on both leaf switches of fabric fabric-terraform and create one VRF and one Network in the same fabric.
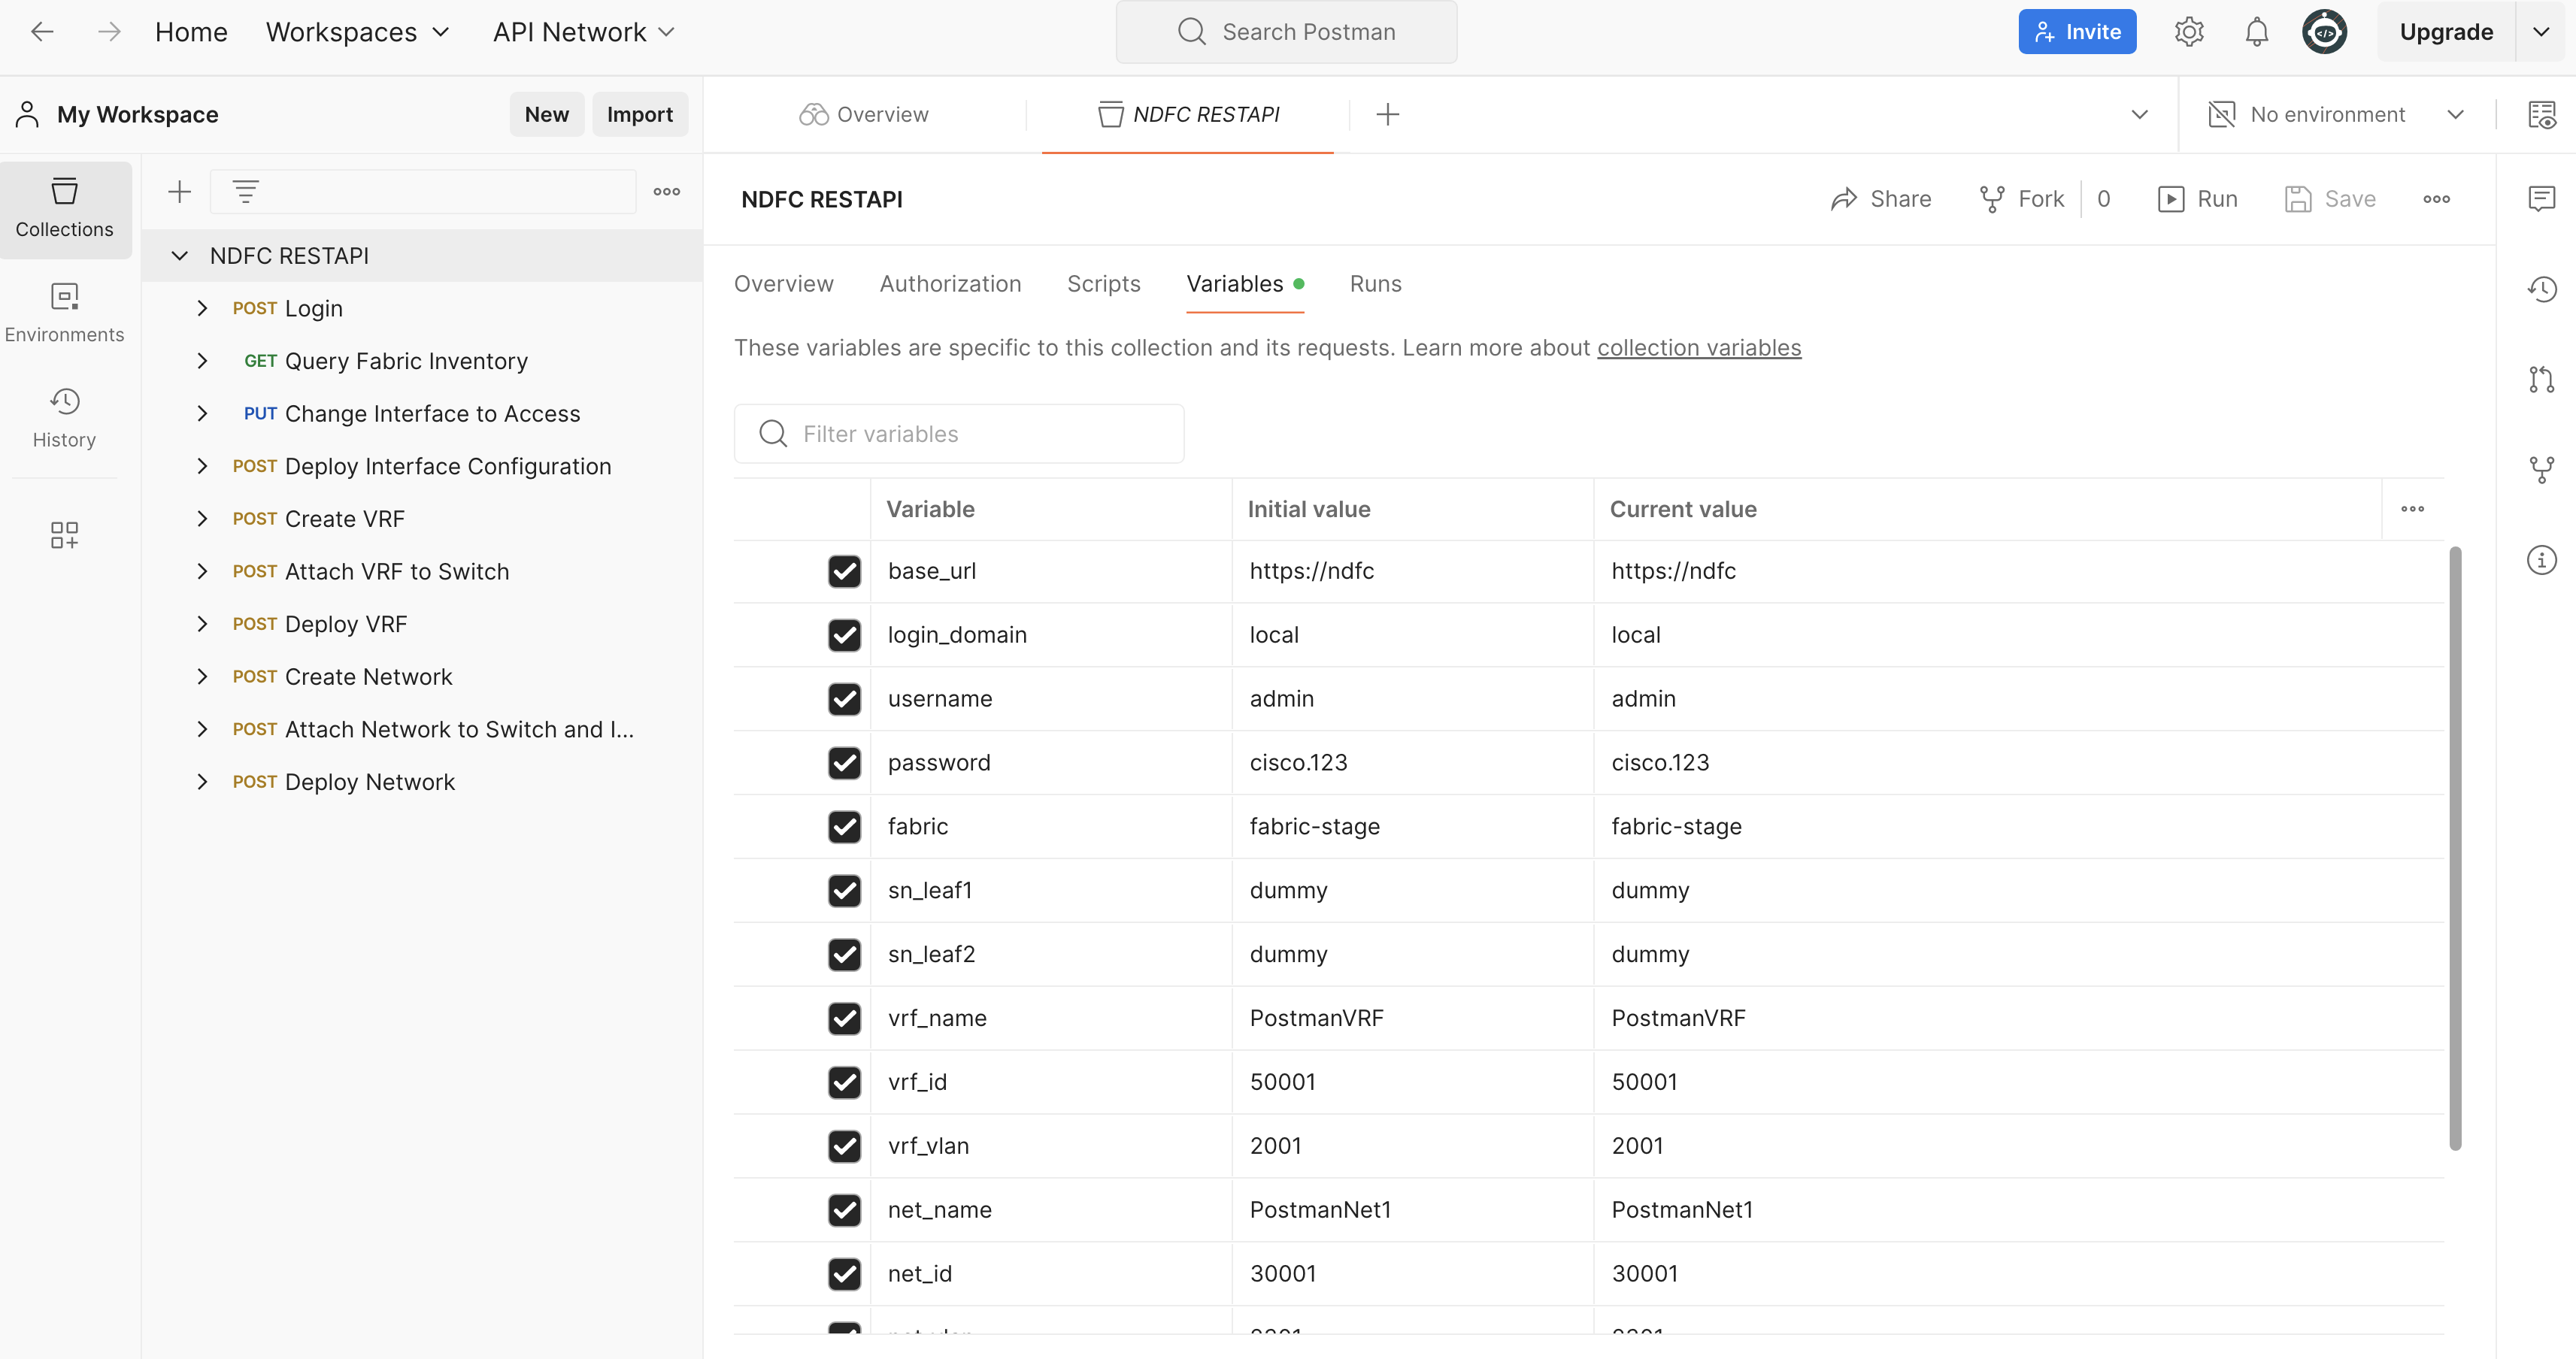
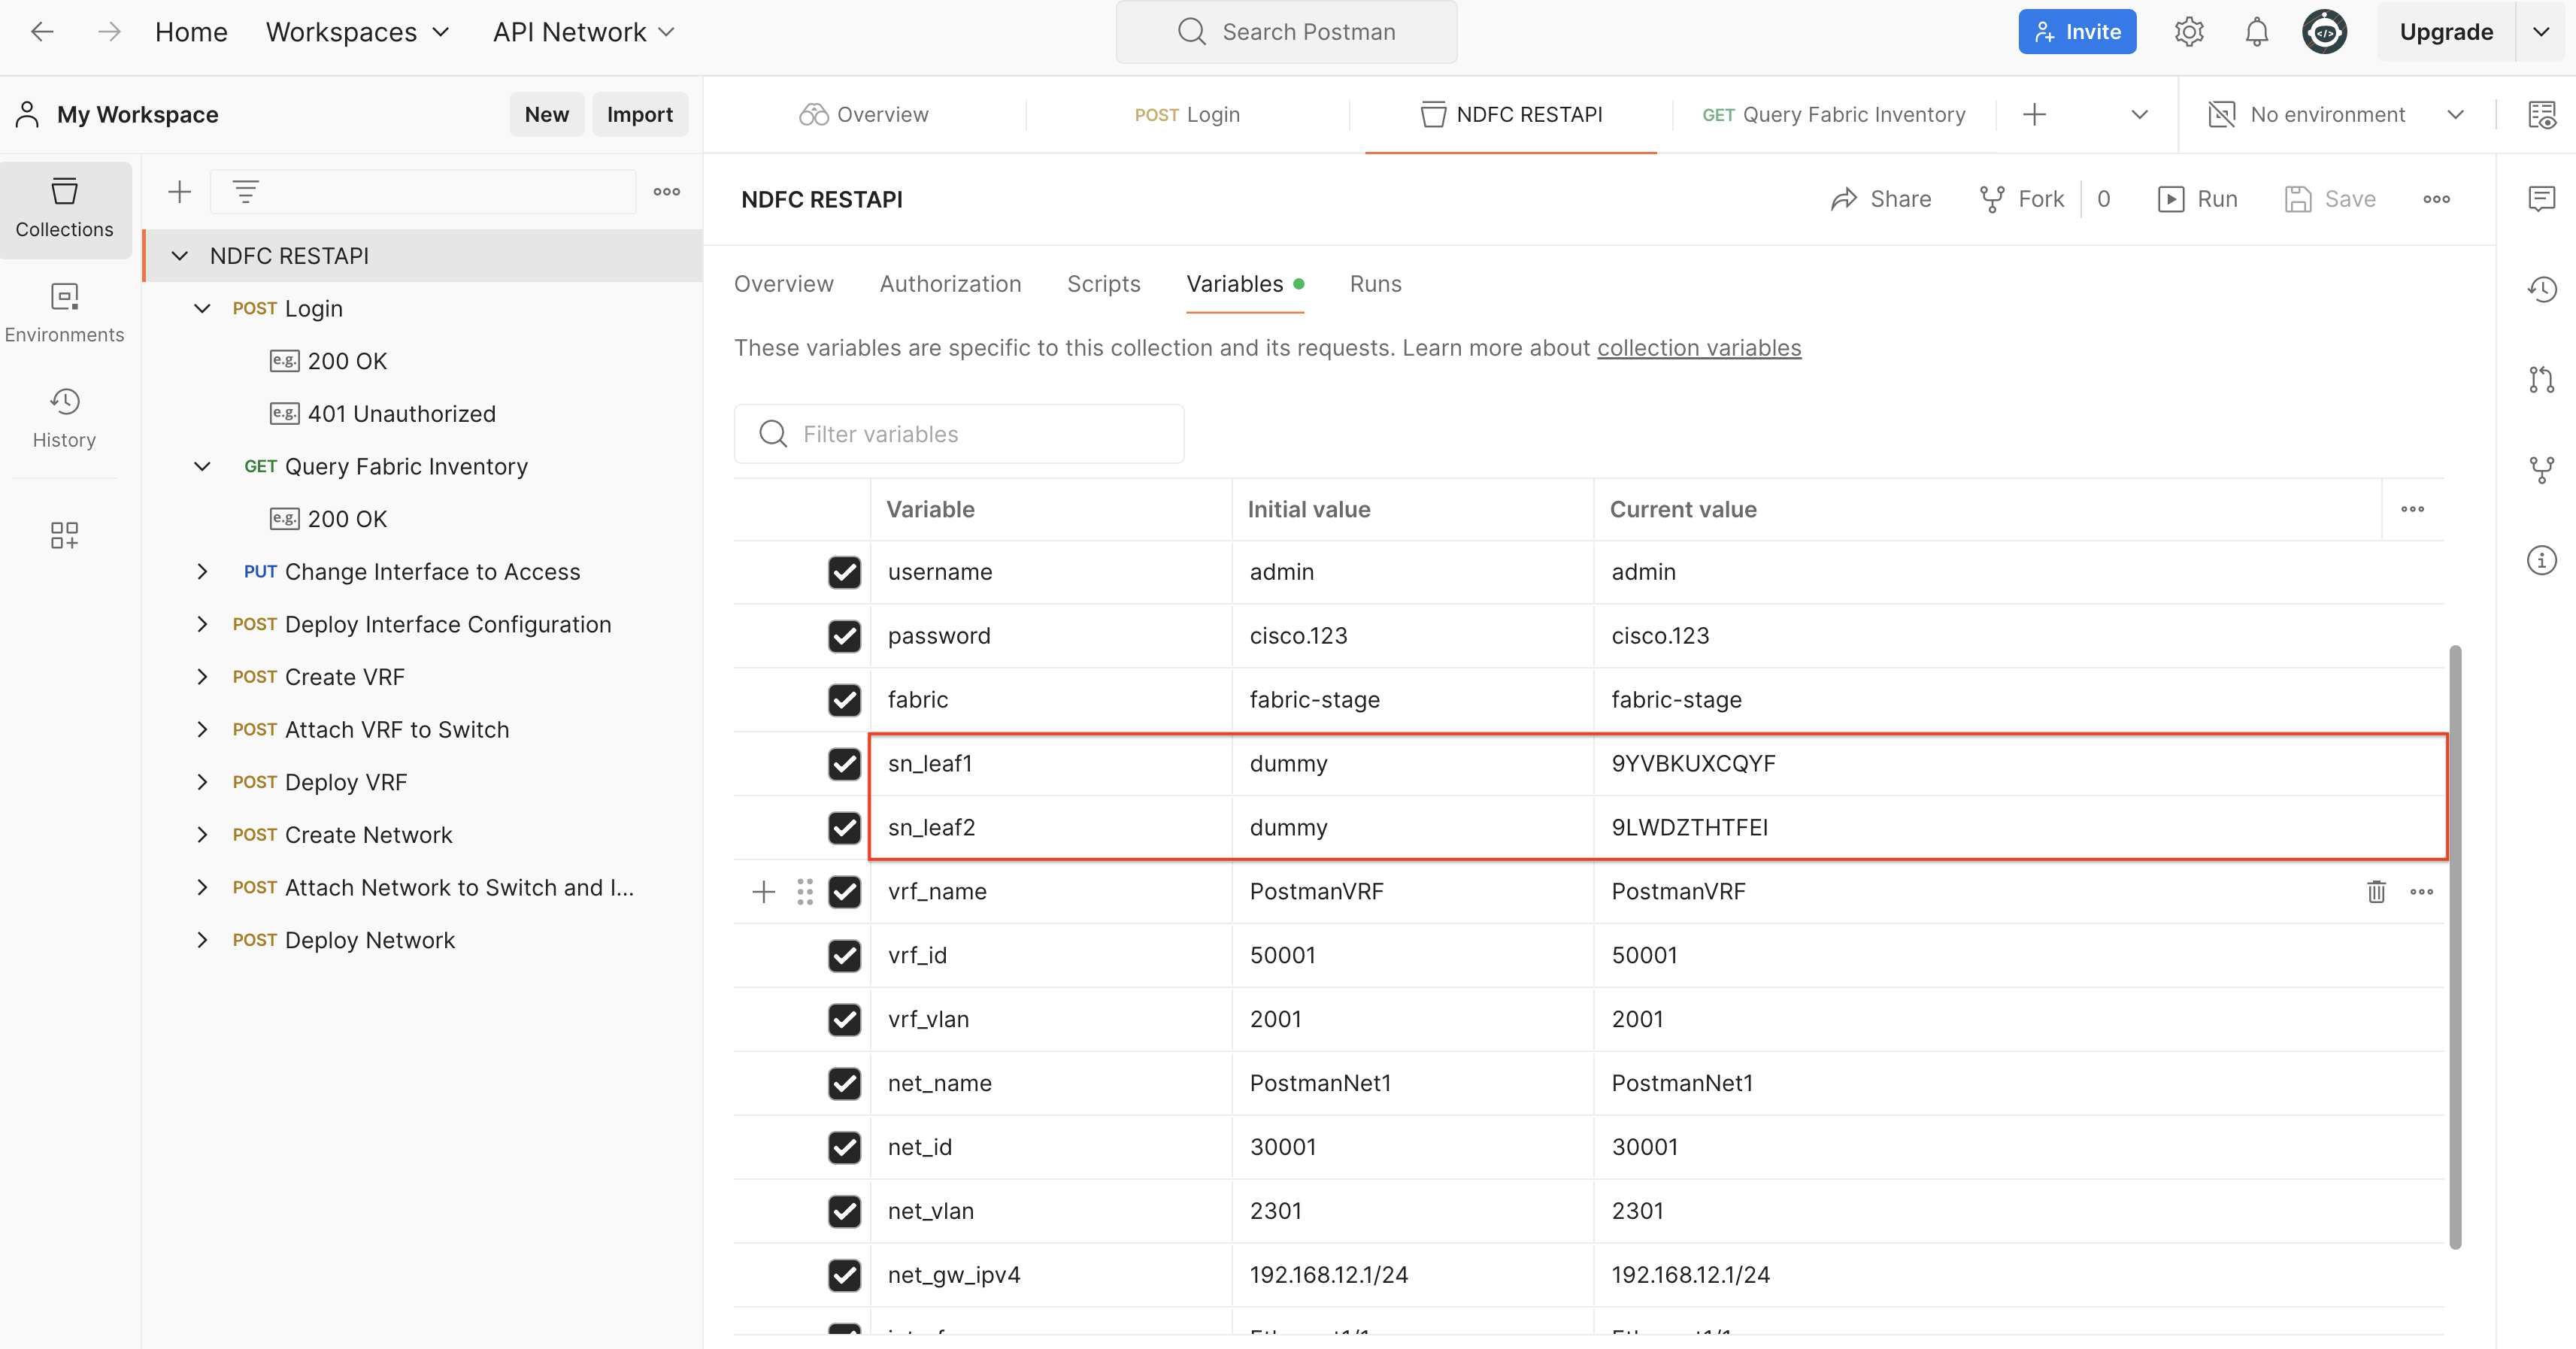
For the sake of time, requests in this section of the lab use pre-set collection variables. These will be used in the API endpoint URLs and/or in the API endpoint body (payload). For reference, you can find the preset values in the screenshot below:
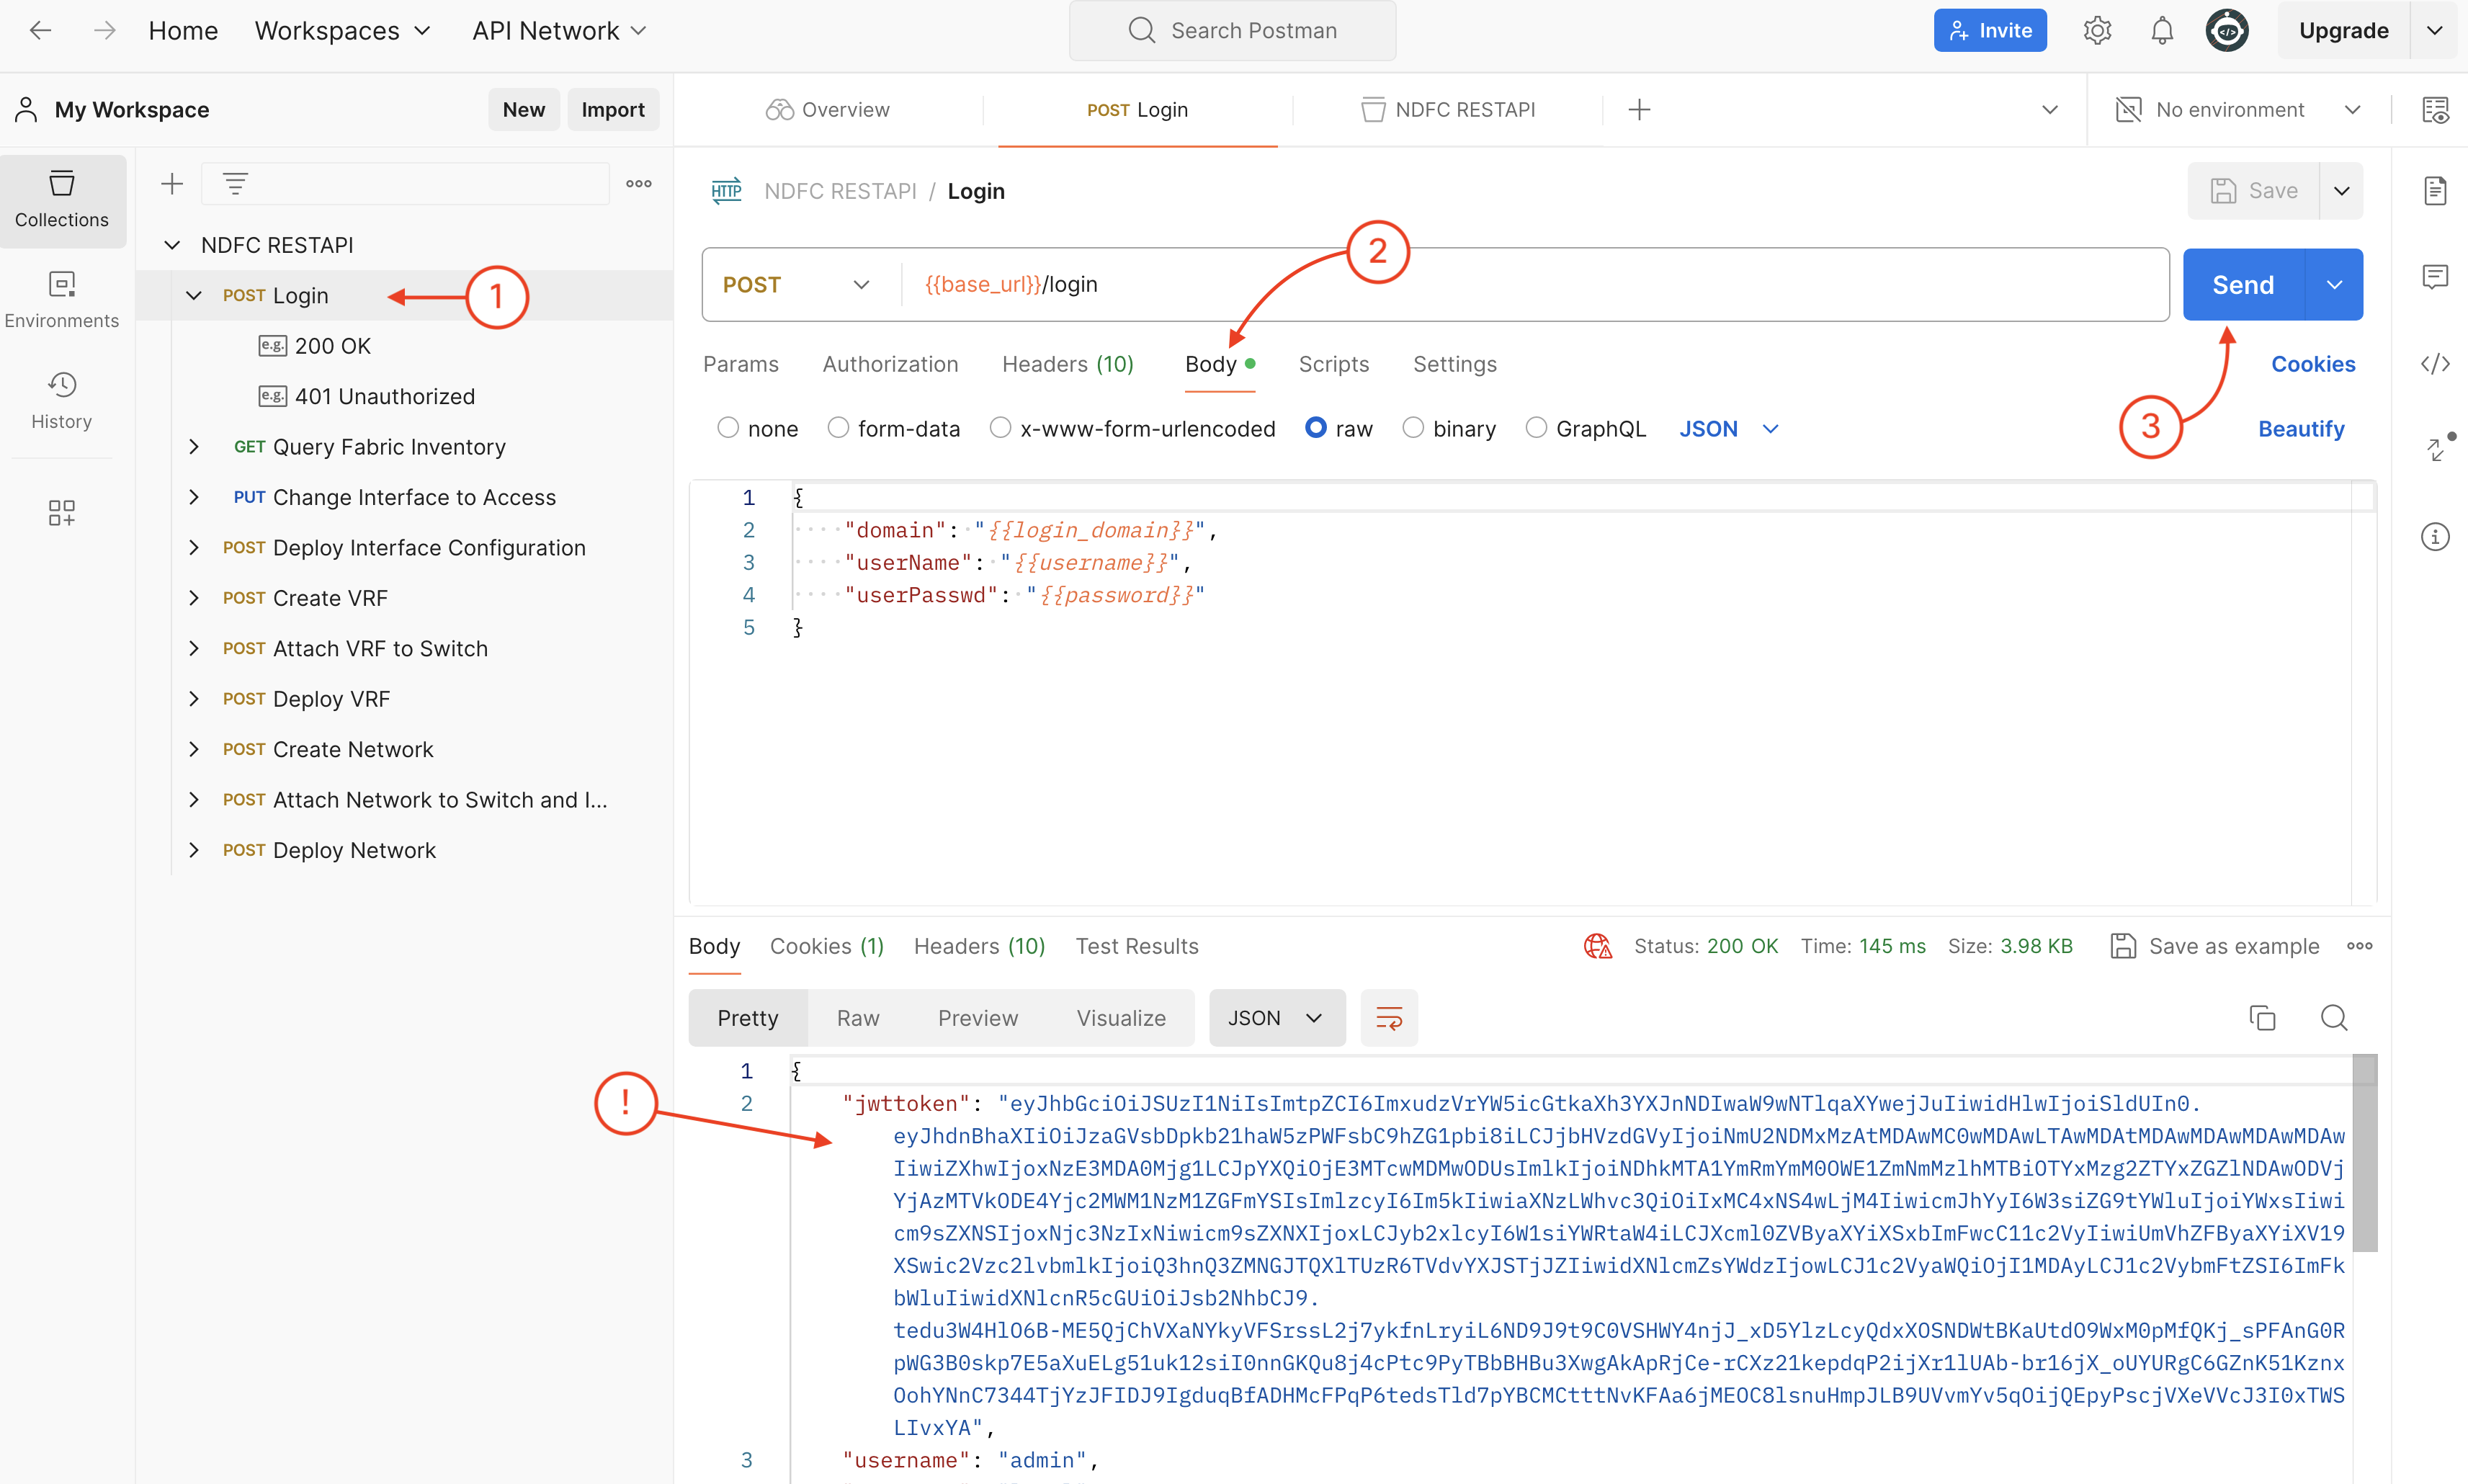
Example of Response:
    {
        "jwttoken": "eyJhbGciOiJSUzI1NiIsImtpZCI6Ijdjc3ZqYjltZDBzcTl6ODI4c2o1Nm9rcHZ3eWpuOGp3IiwidHlwIjoiSldUIn0.eyJhdnBhaXIiOiJzaGVsbDpkb21haW5zPWFsbC9hZG1pbi8iLCJjbHVzdGVyIjoiNGU0NDJkMzEtMDAwMC0wMDAwLTAwMDAtMDAwMDAwMDAwMDAwIiwiZXhwIjoxNjg1NDAwNzY1LCJpYXQiOjE2ODUzOTk1NjUsImlkIjoiNDhkMTA1YmRmYmM0OWE1ZmNmMzlhMTBiOTYxMzg2ZTYxZGZlNDAwODVjYjAzMTVkODE4Yjc2MWM1NzM1ZGFmYSIsImlzcyI6Im5kIiwiaXNzLWhvc3QiOiIxMC4xNS4wLjExIiwicmJhYyI6W3siZG9tYWluIjoiYWxsIiwicm9sZXNSIjoxNjc3NzIxNiwicm9sZXNXIjoxLCJyb2xlcyI6W1siYWRtaW4iLCJXcml0ZVByaXYiXSxbImFwcC11c2VyIiwiUmVhZFByaXYiXV19XSwic2Vzc2lvbmlkIjoiZVV4Q1ZSRldZMHdGZTZWNVJFaU5sWkw3IiwidXNlcmZsYWdzIjowLCJ1c2VyaWQiOjI1MDAyLCJ1c2VybmFtZSI6ImFkbWluIiwidXNlcnR5cGUiOiJsb2NhbCJ9.VqBXcix8hLOjO79UhFCEkQb2rcoEA5LhcT32DpIwER8gxWoeggDj19v3elfG_BL1GiAMxfaBmtDTR1v7K1QGaaxRccFDGxJzoiDJGKMbpDQj-IrUsX7Y0_zq-fp2tTQSKshD39VnW-iwLvsvAyzZP9kbqbO9qkFkQVOfUISq6tNulwDpUkXTfh81sVl0E1n6kzdKj9q9kcGwX_3VHXSLdewzl9a22i3VT-YkYvZvSFG4ze8TYqxDtfkAd-Cs8z3hnIkpPxd_X7-kABEE_hBJ81CJh5VIlEdqht2R3xcqyAC9R3nWYrD02IcP27Y8Z4jCSfQN14XAGhZud5MLCOSrpQ",
        "username": "admin",
        "usertype": "local",
        "rbac": "[{\"domain\":\"all\",\"rolesR\":16777216,\"rolesW\":1,\"roles\":[[\"admin\",\"WritePriv\"],[\"app-user\",\"ReadPriv\"]]}]",
        "statusCode": 200,
        "token": "eyJhbGciOiJSUzI1NiIsImtpZCI6Ijdjc3ZqYjltZDBzcTl6ODI4c2o1Nm9rcHZ3eWpuOGp3IiwidHlwIjoiSldUIn0.eyJhdnBhaXIiOiJzaGVsbDpkb21haW5zPWFsbC9hZG1pbi8iLCJjbHVzdGVyIjoiNGU0NDJkMzEtMDAwMC0wMDAwLTAwMDAtMDAwMDAwMDAwMDAwIiwiZXhwIjoxNjg1NDAwNzY1LCJpYXQiOjE2ODUzOTk1NjUsImlkIjoiNDhkMTA1YmRmYmM0OWE1ZmNmMzlhMTBiOTYxMzg2ZTYxZGZlNDAwODVjYjAzMTVkODE4Yjc2MWM1NzM1ZGFmYSIsImlzcyI6Im5kIiwiaXNzLWhvc3QiOiIxMC4xNS4wLjExIiwicmJhYyI6W3siZG9tYWluIjoiYWxsIiwicm9sZXNSIjoxNjc3NzIxNiwicm9sZXNXIjoxLCJyb2xlcyI6W1siYWRtaW4iLCJXcml0ZVByaXYiXSxbImFwcC11c2VyIiwiUmVhZFByaXYiXV19XSwic2Vzc2lvbmlkIjoiZVV4Q1ZSRldZMHdGZTZWNVJFaU5sWkw3IiwidXNlcmZsYWdzIjowLCJ1c2VyaWQiOjI1MDAyLCJ1c2VybmFtZSI6ImFkbWluIiwidXNlcnR5cGUiOiJsb2NhbCJ9.VqBXcix8hLOjO79UhFCEkQb2rcoEA5LhcT32DpIwER8gxWoeggDj19v3elfG_BL1GiAMxfaBmtDTR1v7K1QGaaxRccFDGxJzoiDJGKMbpDQj-IrUsX7Y0_zq-fp2tTQSKshD39VnW-iwLvsvAyzZP9kbqbO9qkFkQVOfUISq6tNulwDpUkXTfh81sVl0E1n6kzdKj9q9kcGwX_3VHXSLdewzl9a22i3VT-YkYvZvSFG4ze8TYqxDtfkAd-Cs8z3hnIkpPxd_X7-kABEE_hBJ81CJh5VIlEdqht2R3xcqyAC9R3nWYrD02IcP27Y8Z4jCSfQN14XAGhZud5MLCOSrpQ"
    }
Postman will use the cookie received from Nexus Dasboard automatically for any subsequent requests in the same collection:
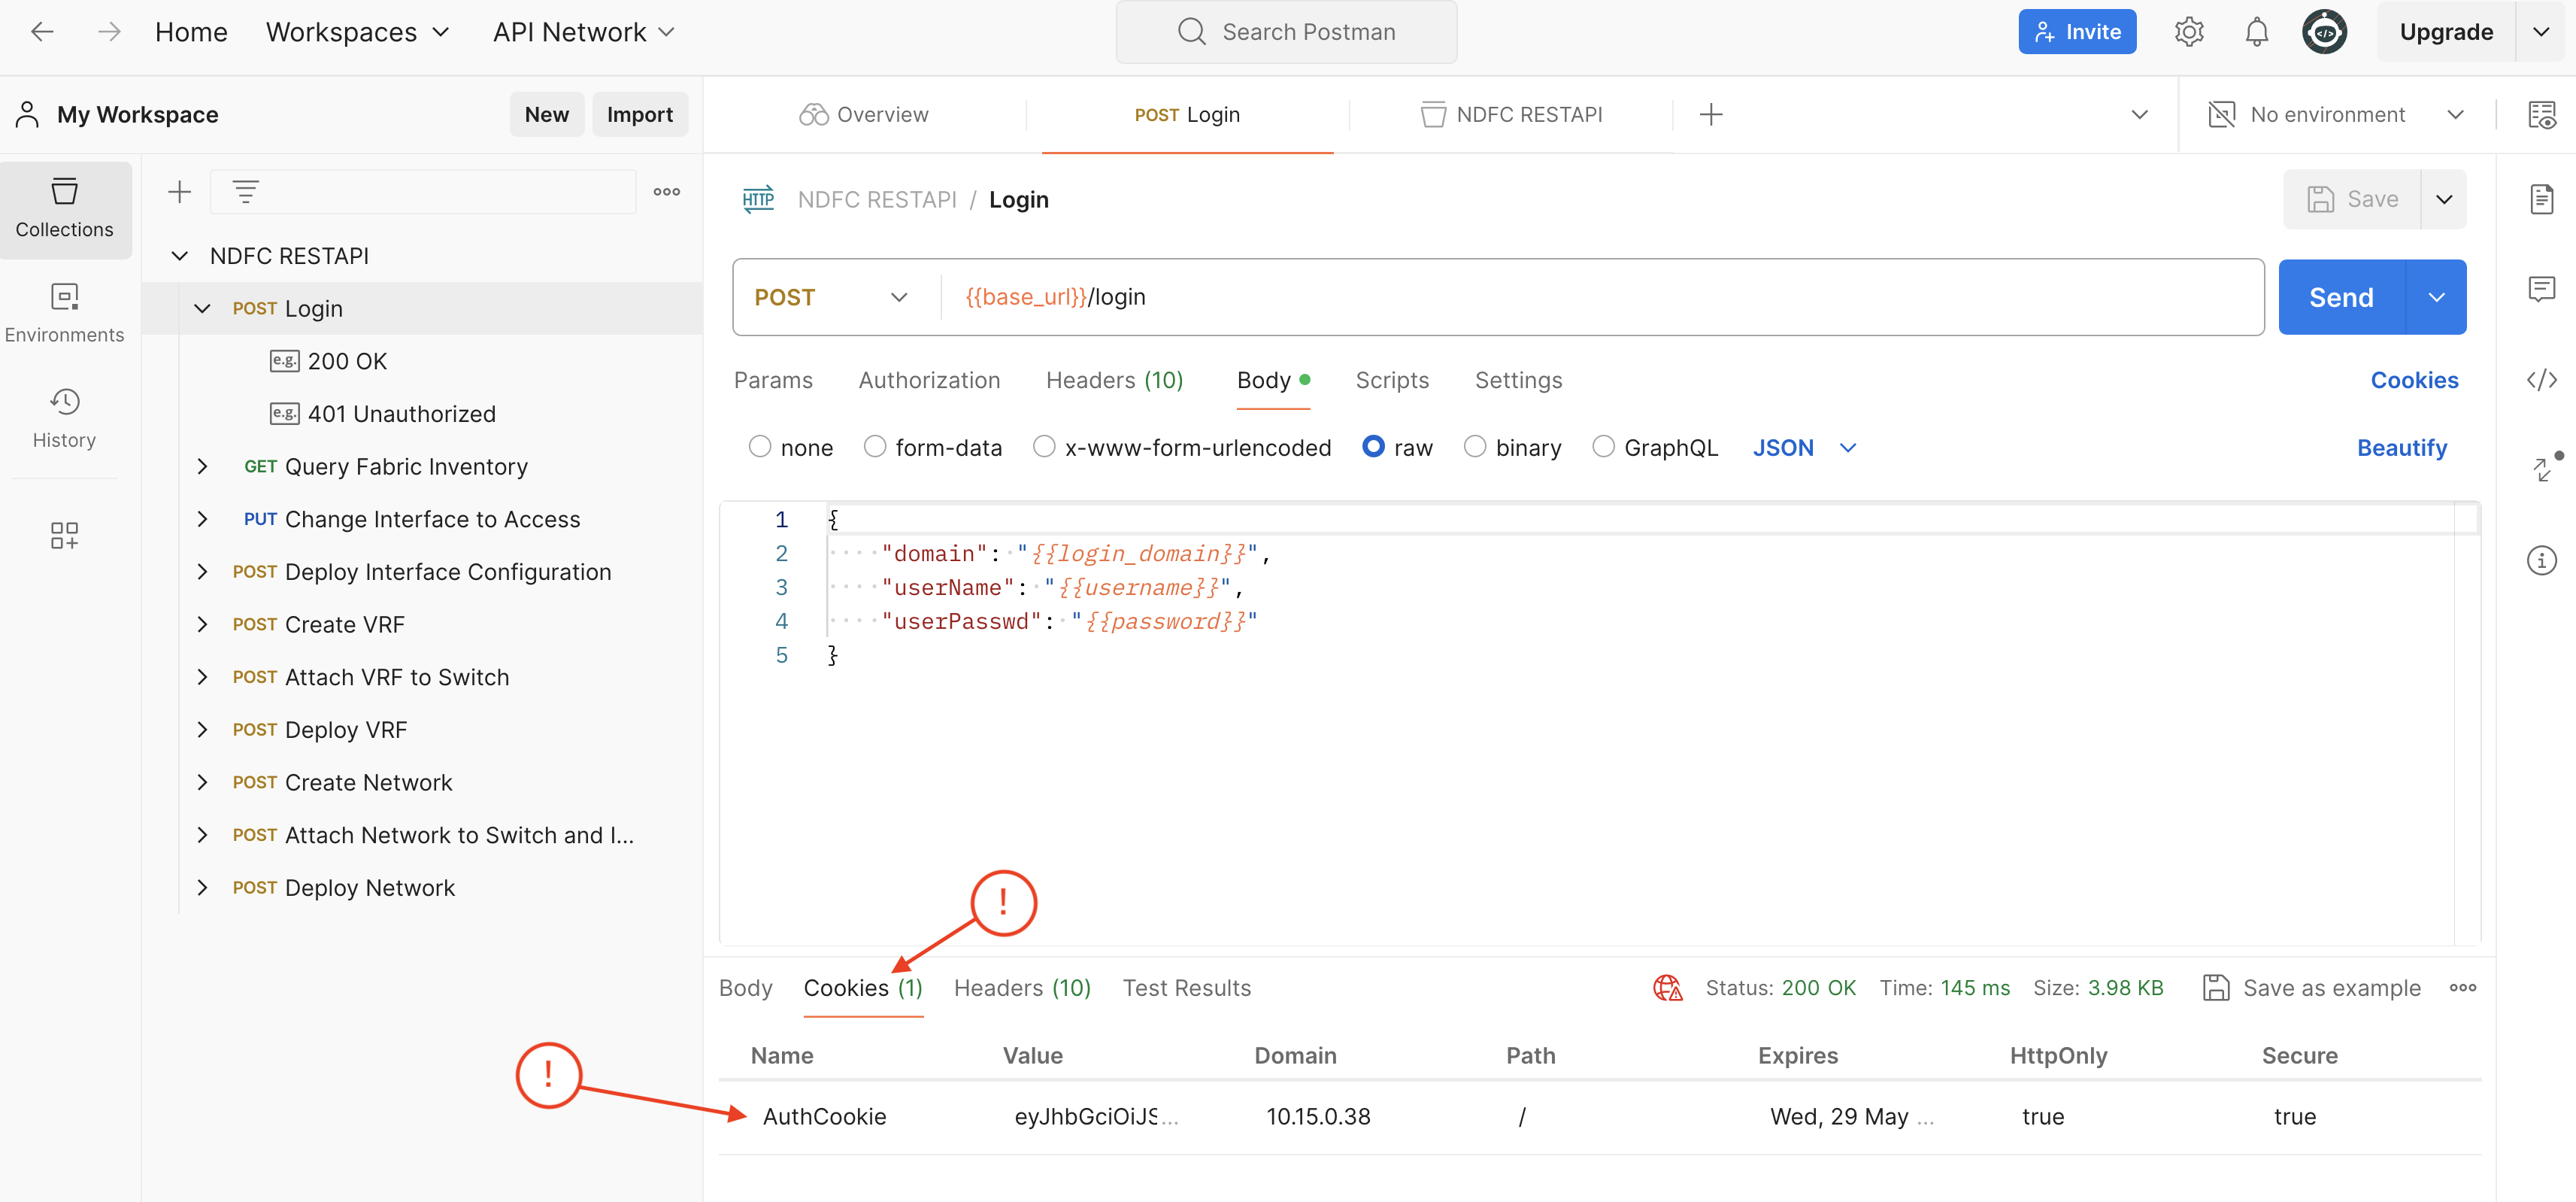
As mentioned in previous sections, the token is valid for 20 minutes by default.
If any of the following steps fail with 401 Unauthorized error, just re-send the Login request again to acquire a new token.
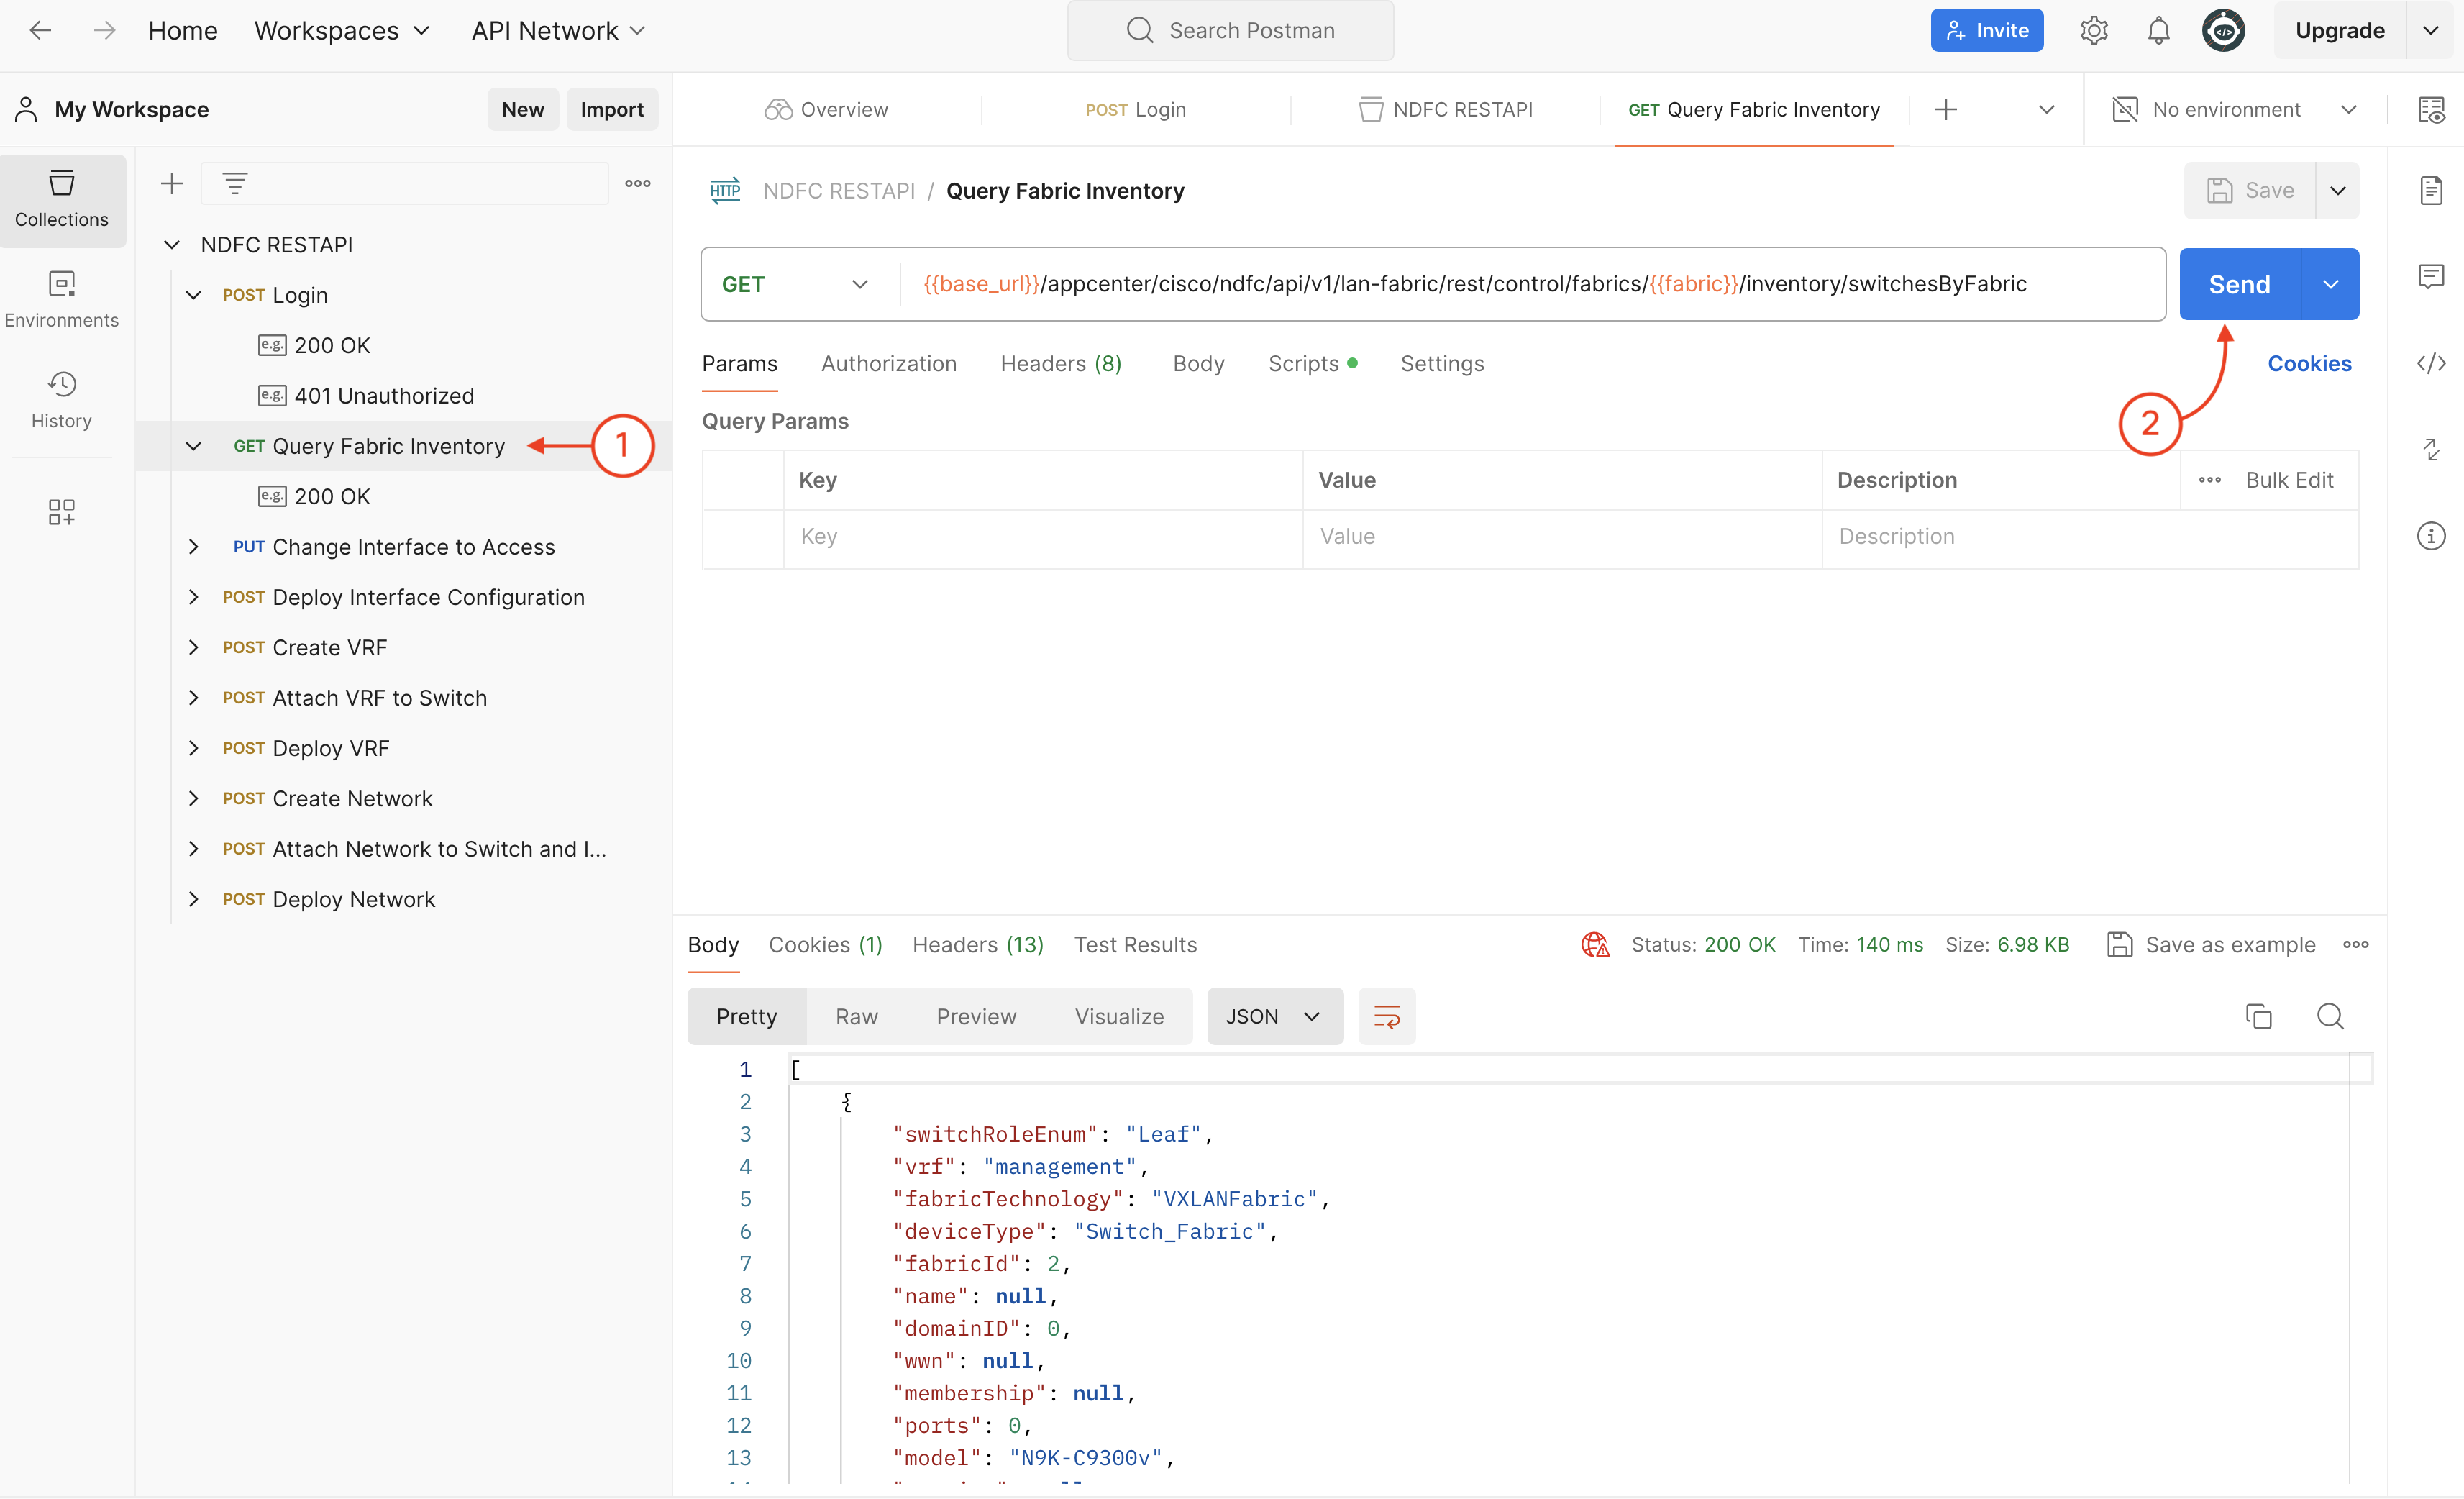
The majority of the APIs that are related to switches will use the Serial Number as the key to identify the switch you would like to operate on since the Serial Number is unique. The application you created usually will ask for user input and the Serial Number is not easy to use. Usually, the application should use fabric name + hostname/ip address to programmatically identify the switch and find the correct serial number for subsequence requests. For example, in the Ansible NDFC collection, the user will use the IP address of the switch in the playbook instead of the Serial Number. To get the inventory detail of a given fabric:
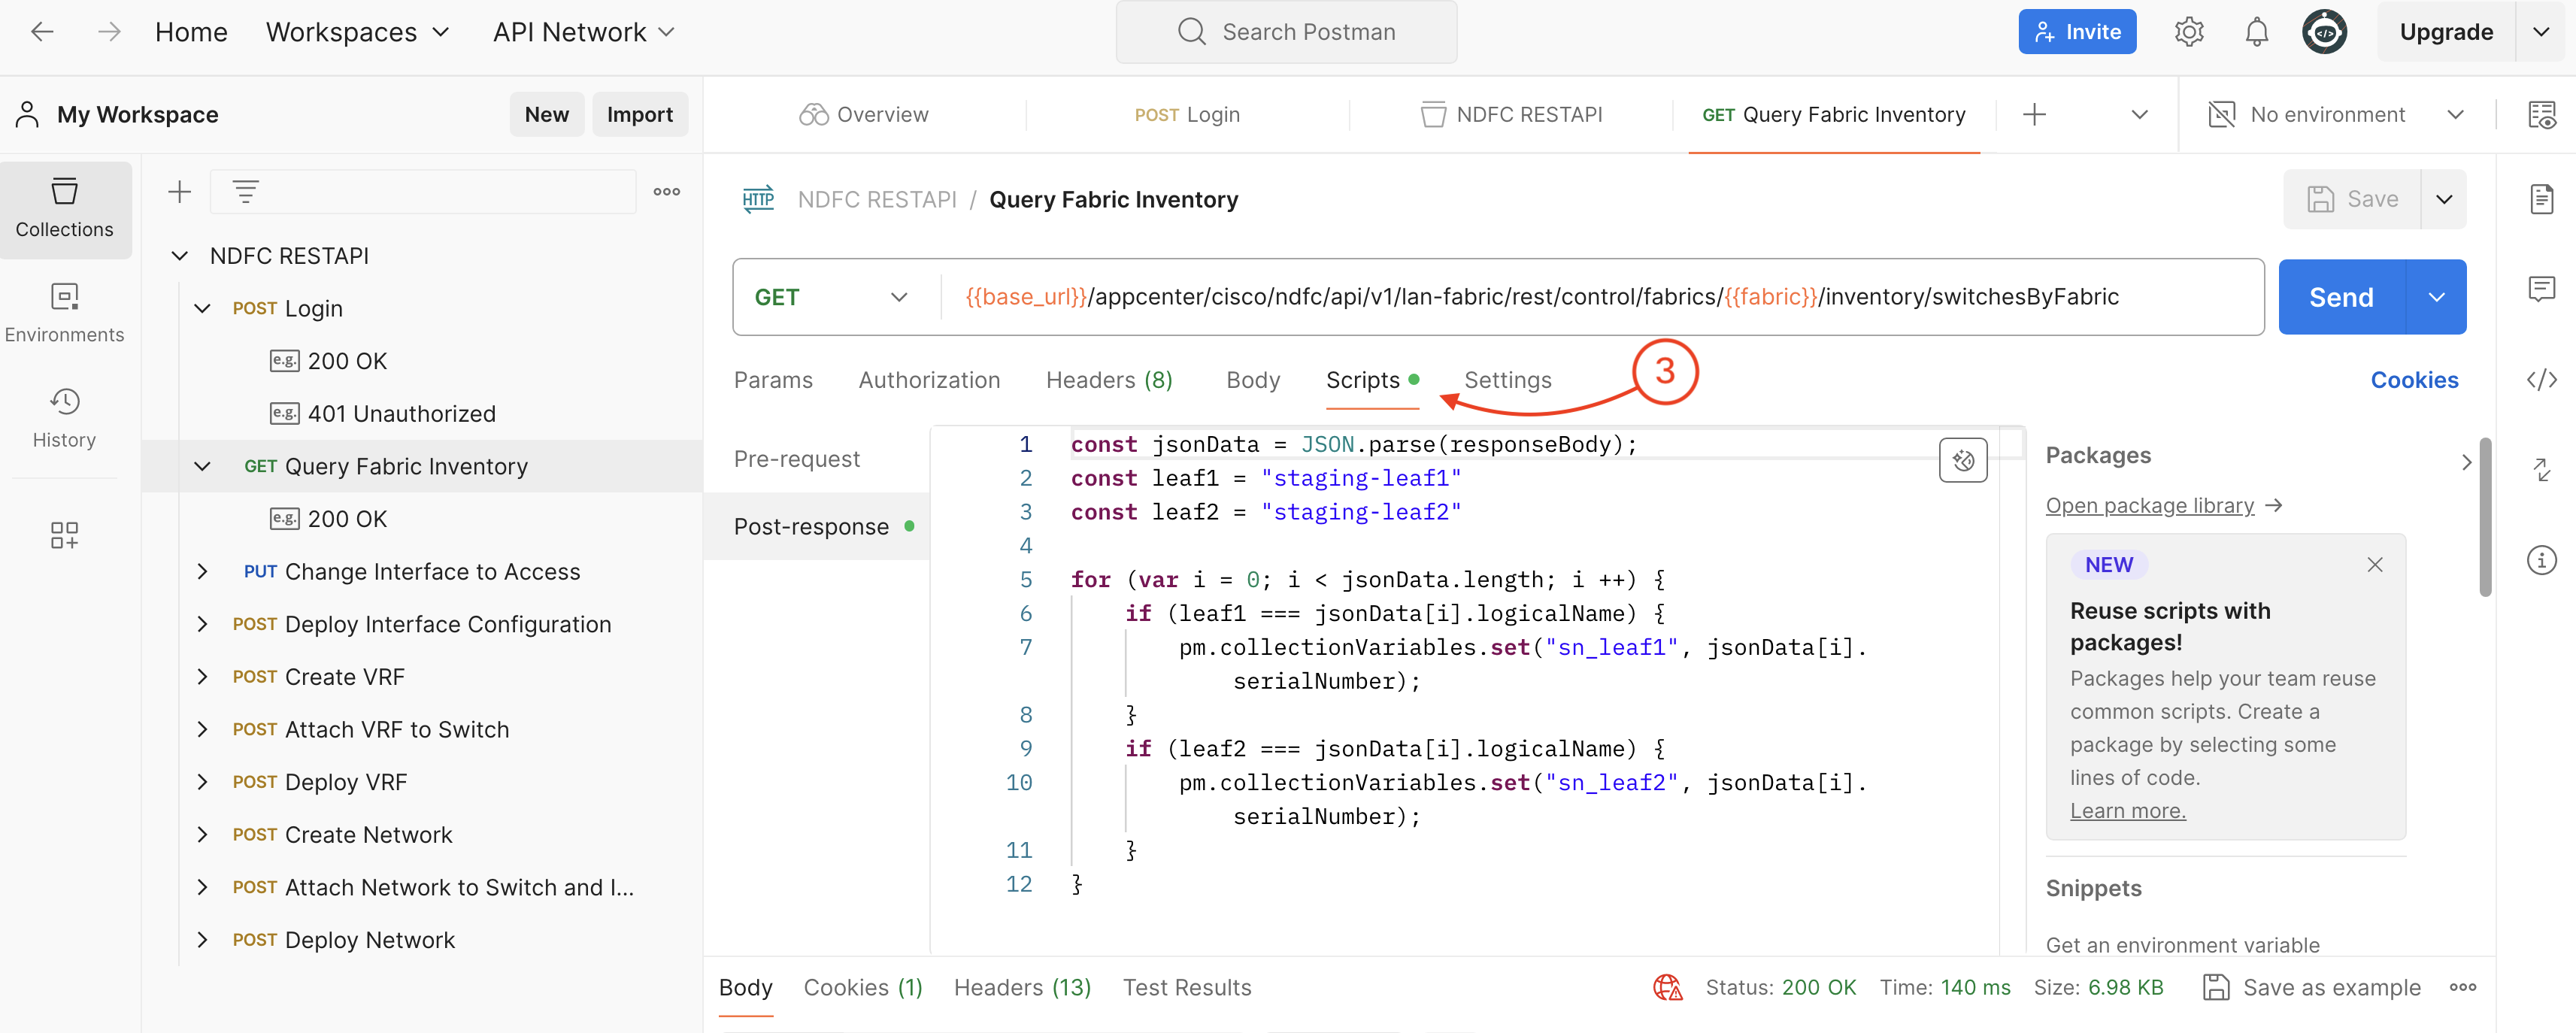
    const jsonData = JSON.parse(responseBody);
    const leaf1 = "staging-leaf1"
    const leaf2 = "staging-leaf2"

    for (var i = 0; i < jsonData.length; i ++) {
        if (leaf1 === jsonData[i].logicalName) {
            pm.collectionVariables.set("sn_leaf1", jsonData[i].serialNumber);
        }
        if (leaf2 === jsonData[i].logicalName) {
            pm.collectionVariables.set("sn_leaf2", jsonData[i].serialNumber);
        }
    }
sn_leaf1 and sn_leaf2 variables now look something like the below screenshot:
The remaining steps in this section will make modifications using Postman to your NDFC fabric called fabric-terraform
You will verify these changes in the next section of the lab.
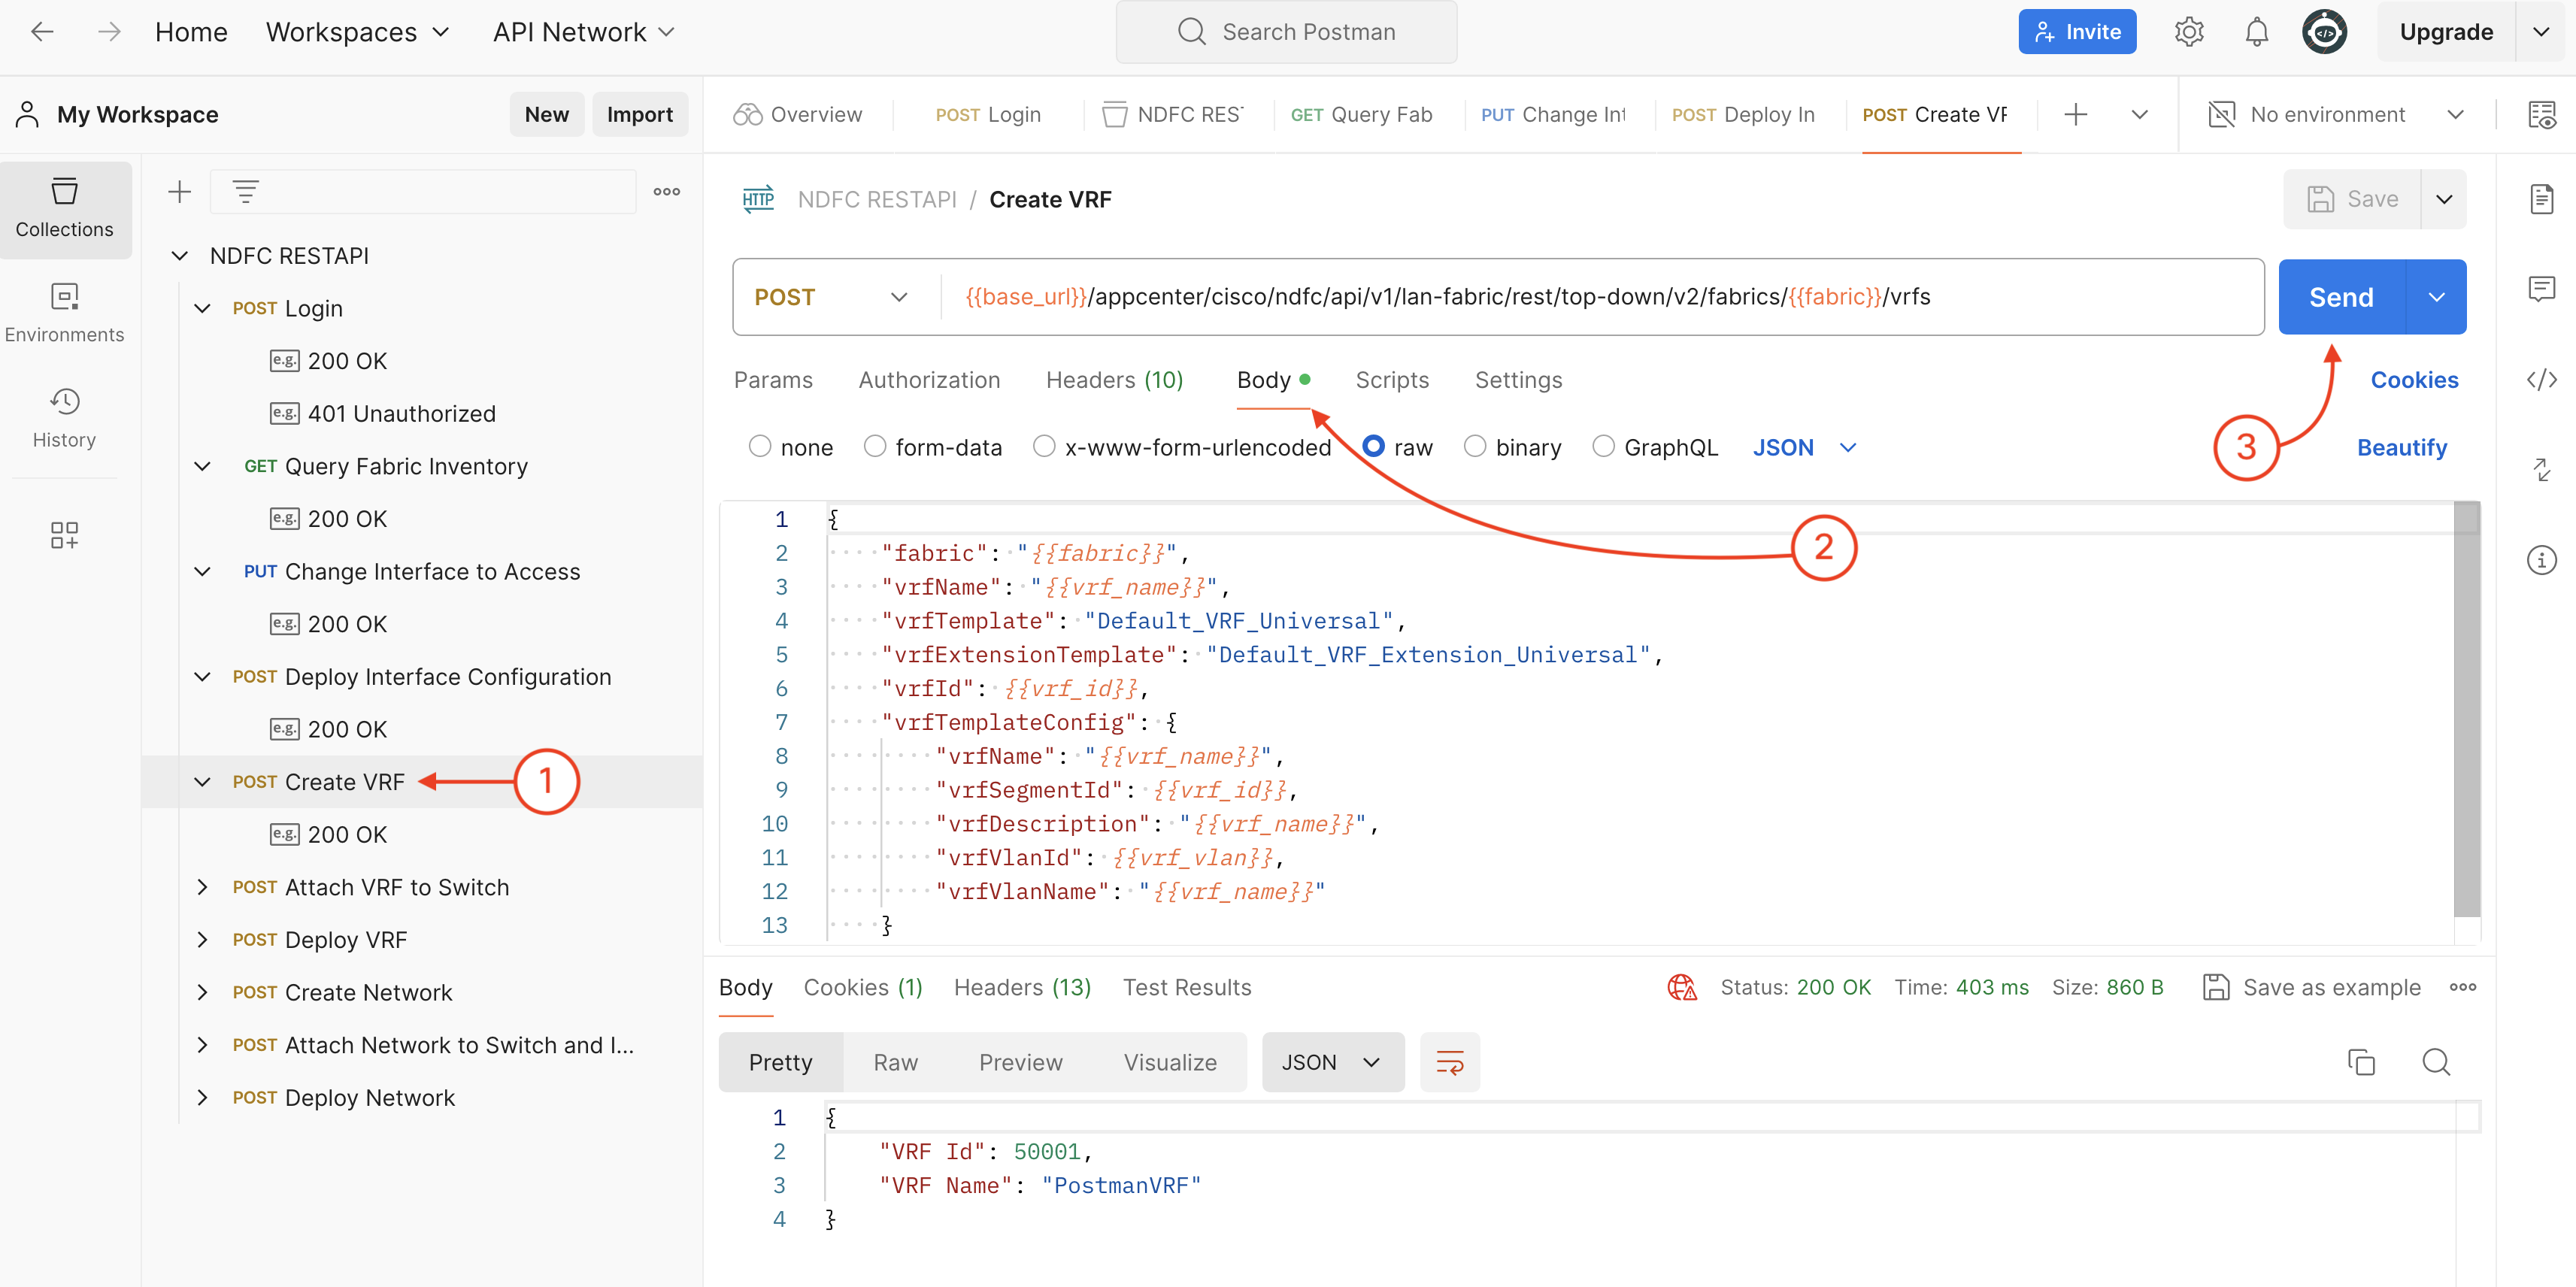
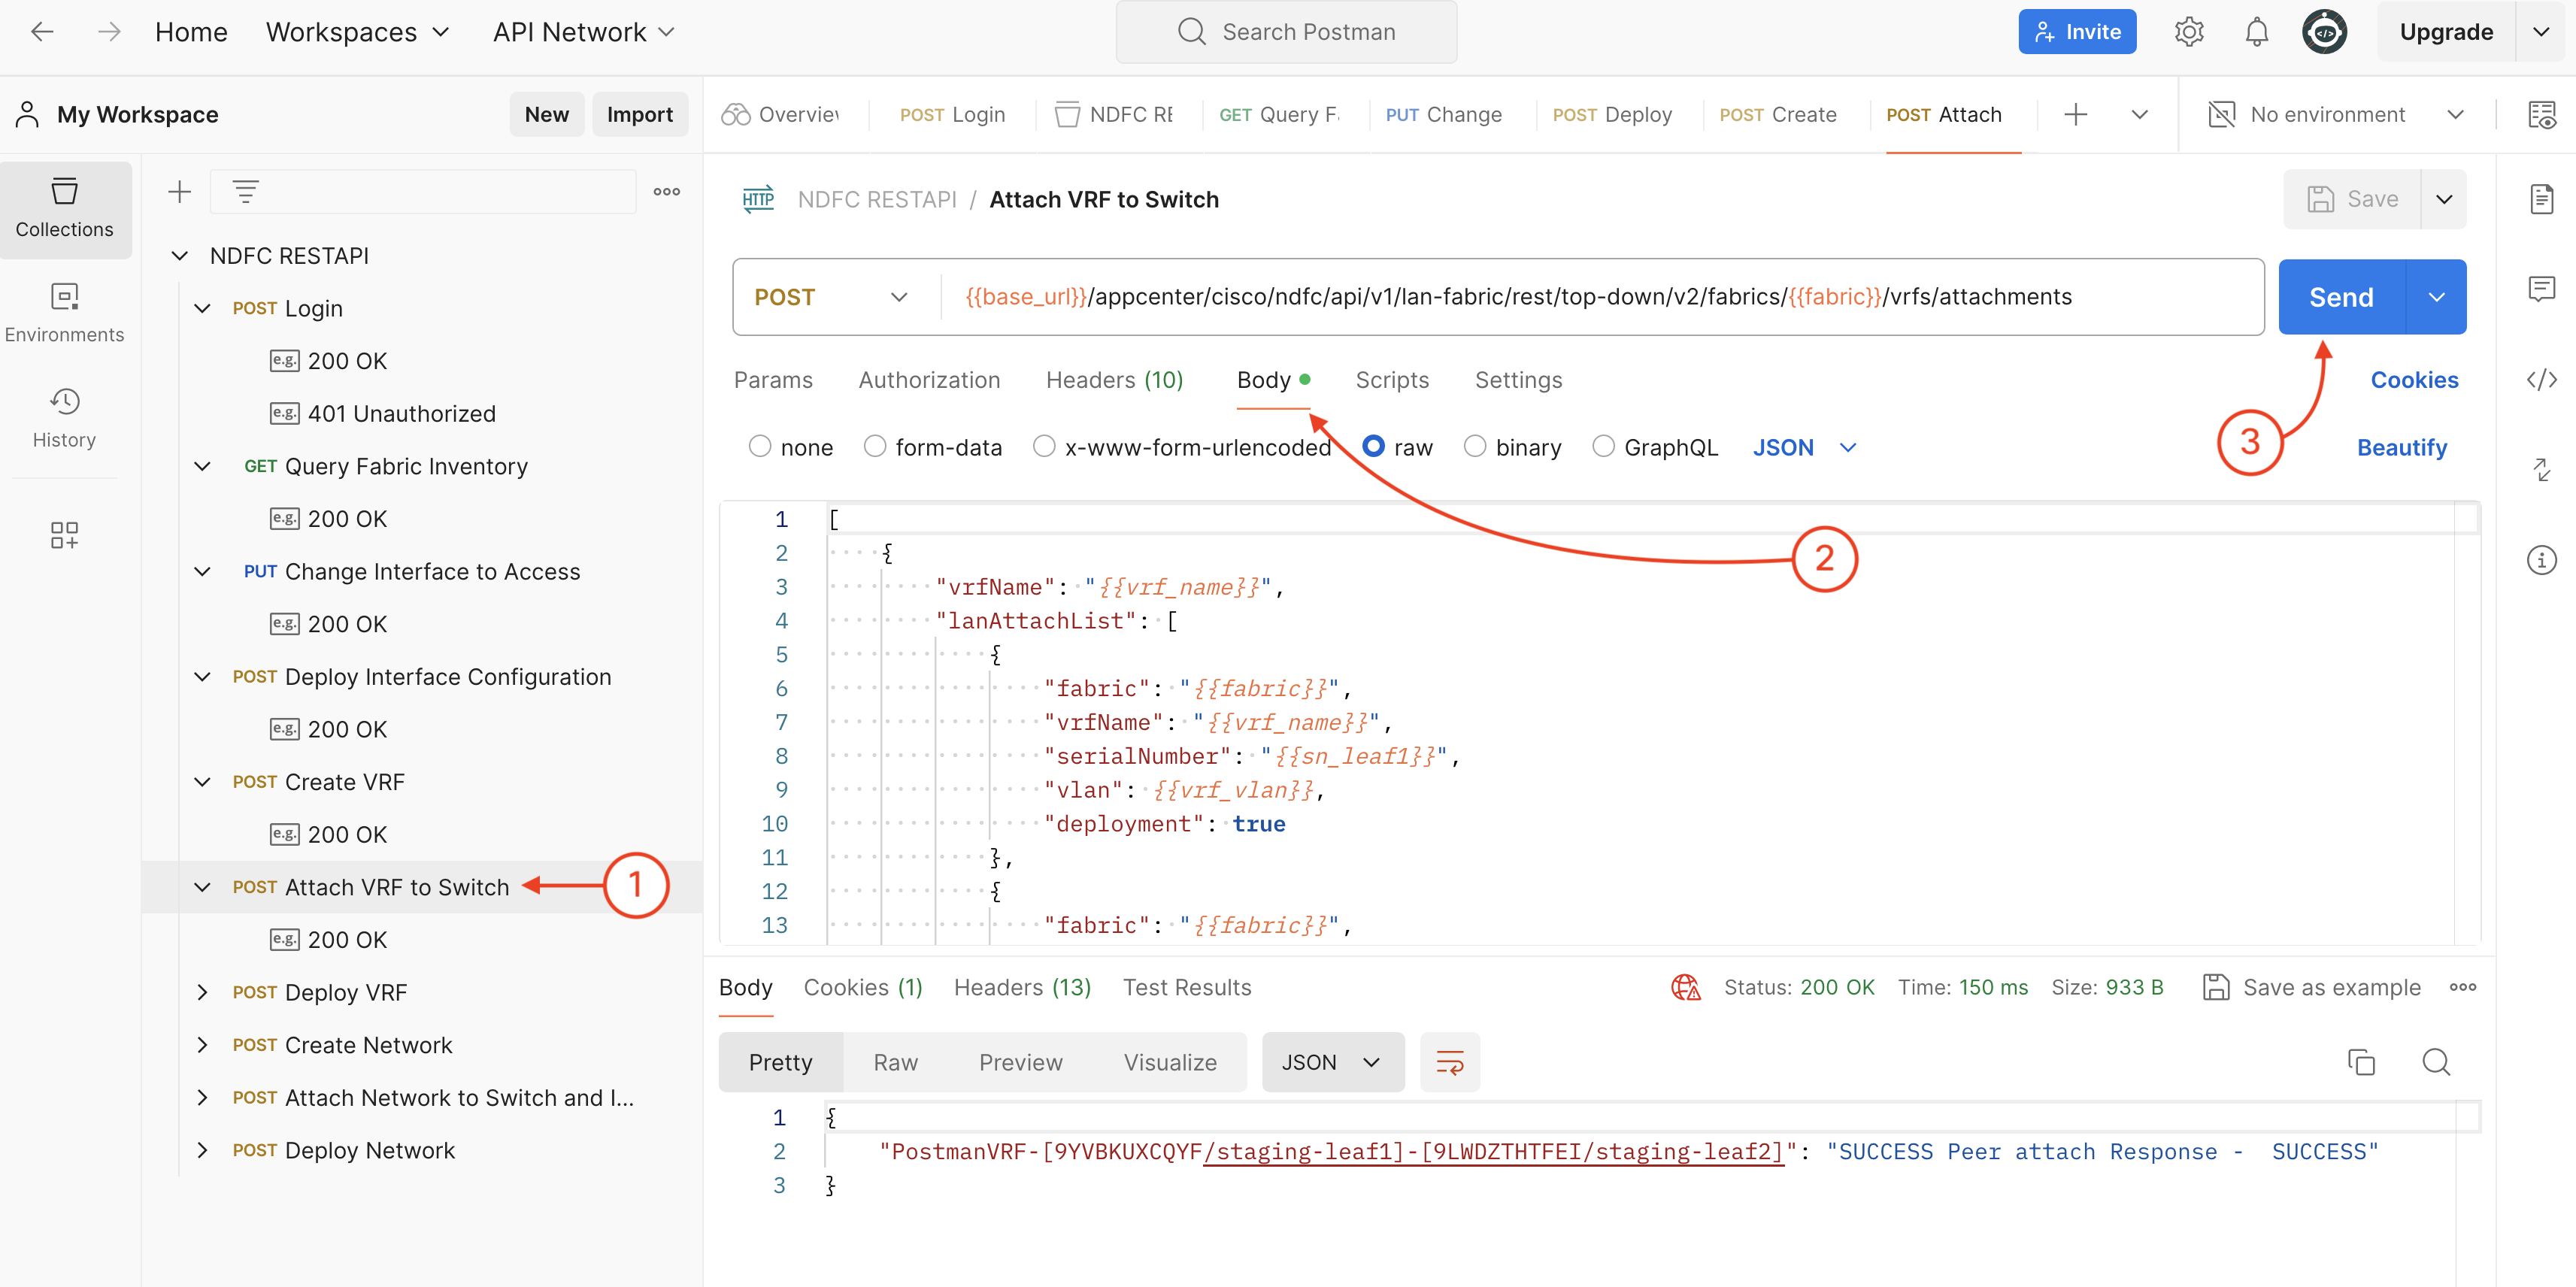
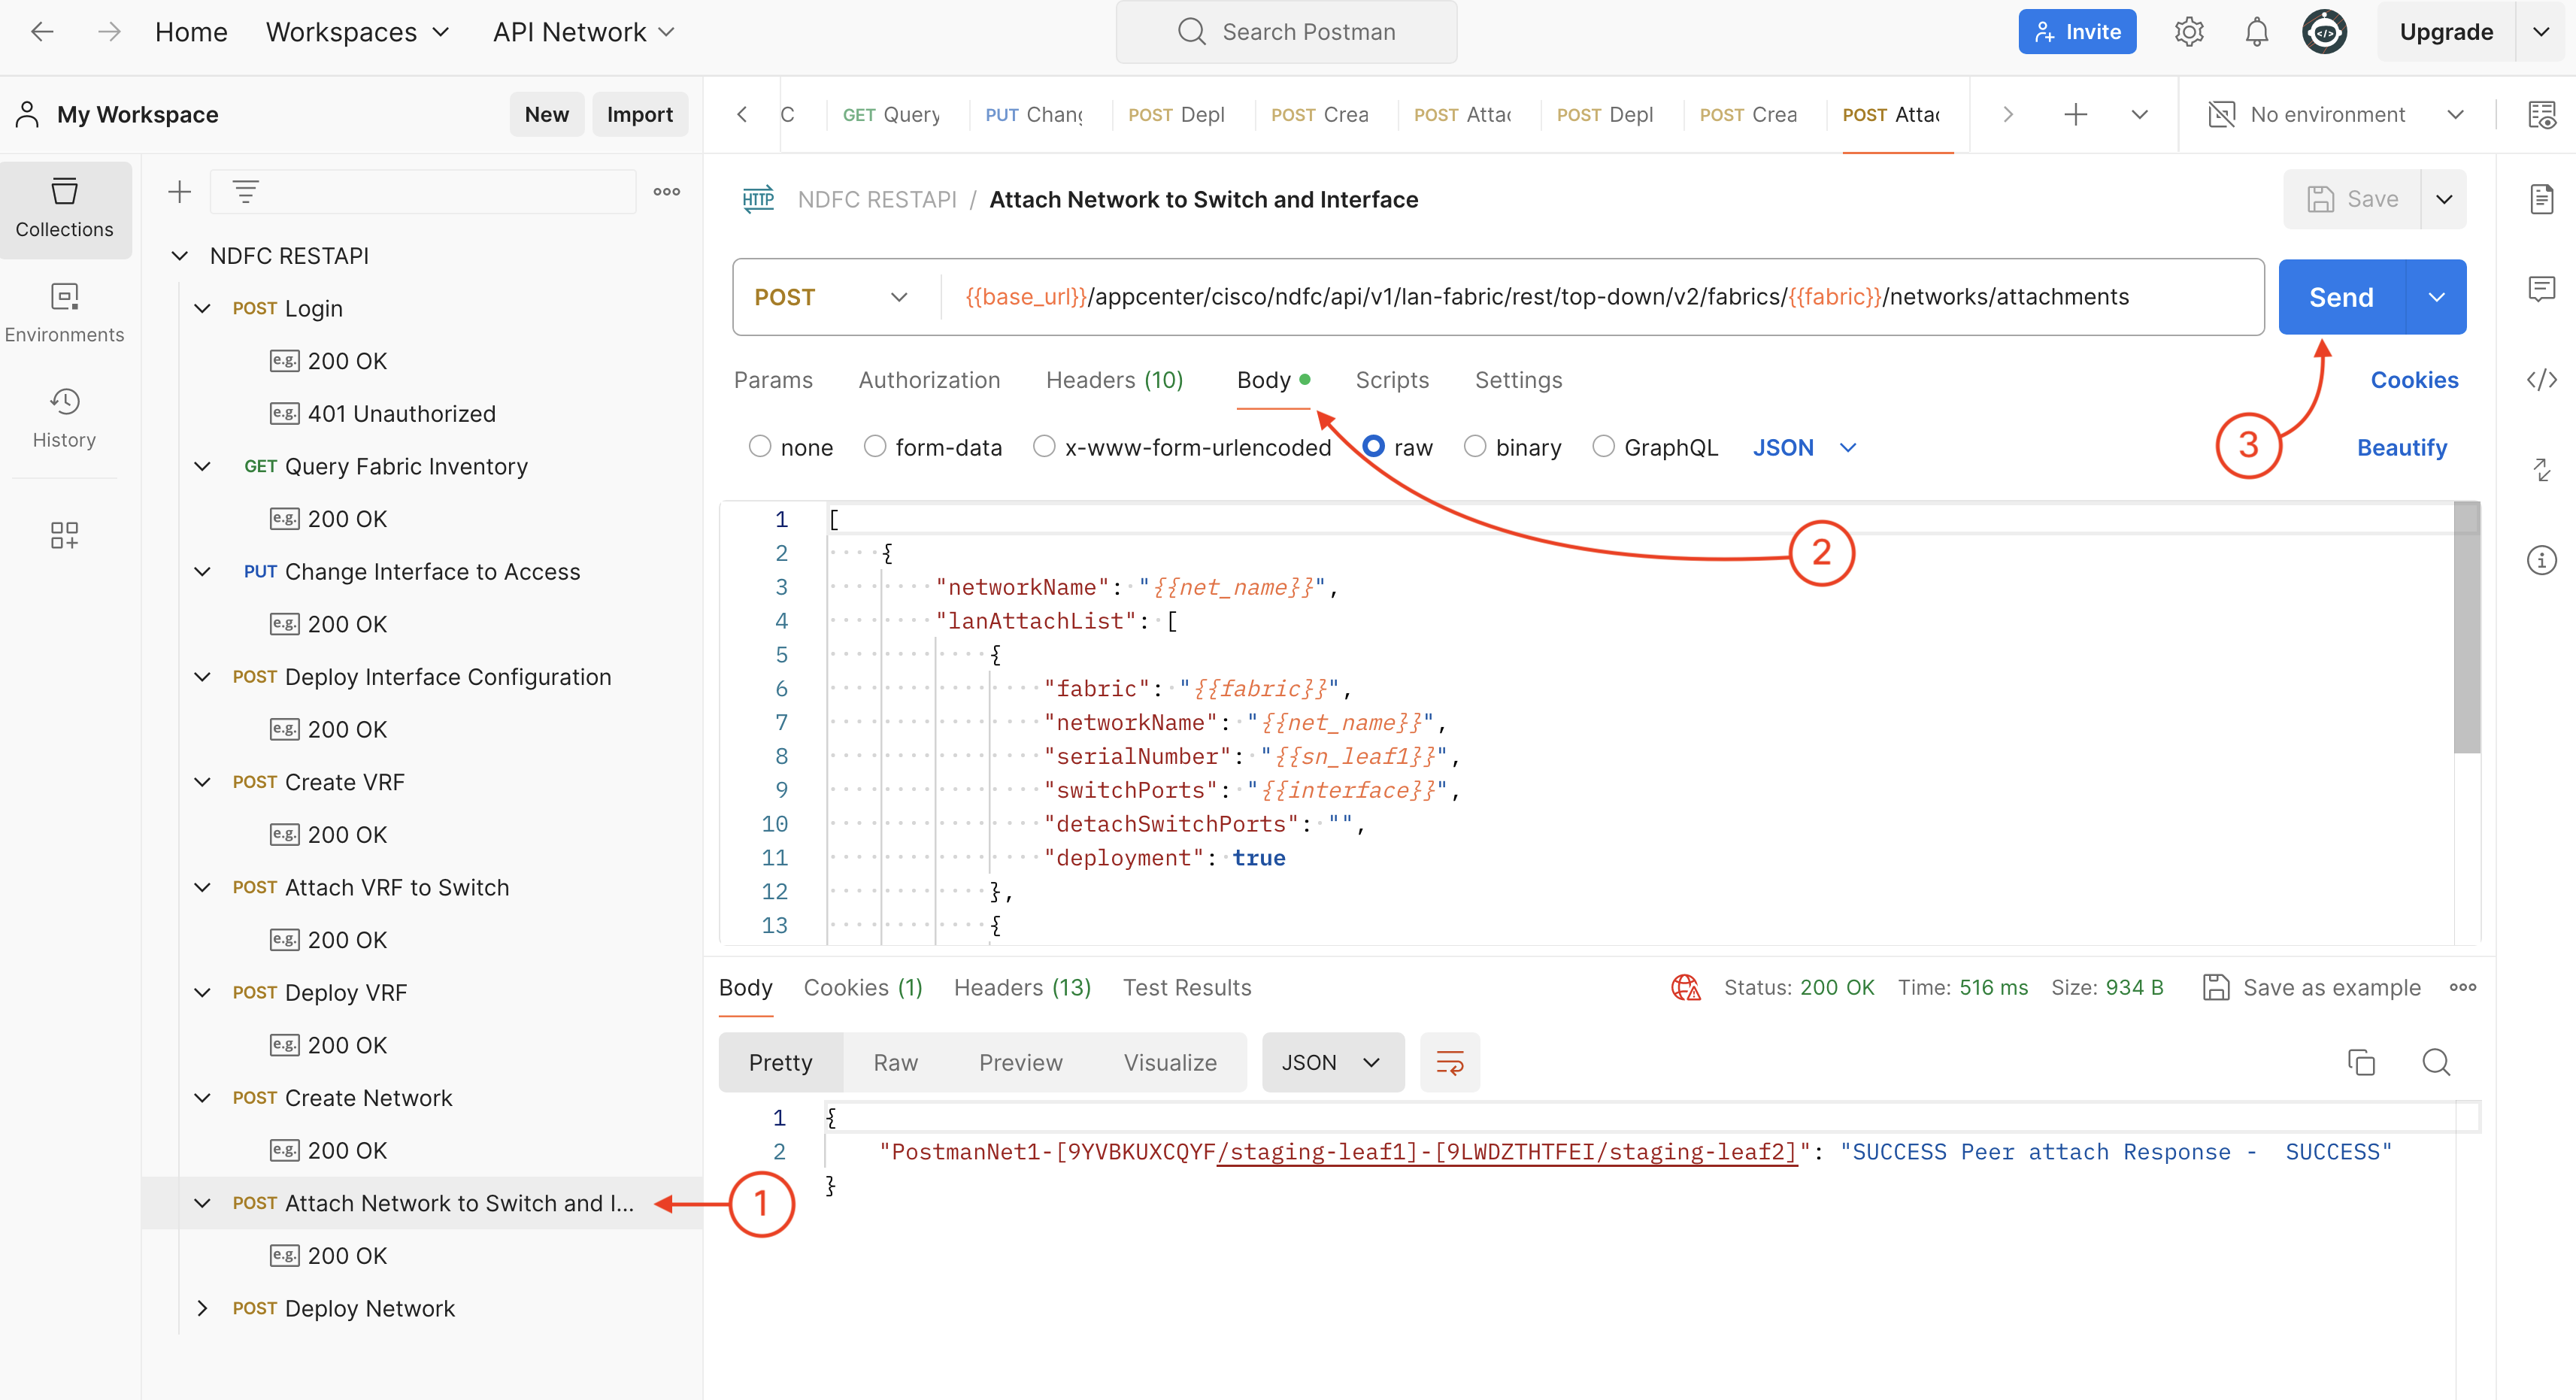
If you have gone through the basic GUI workflow of NDFC, you might have noticed that we didn't attach the VRF to switches manually, it is attached along with the Network automatically. However, when we automate the NDFC configuration, it will be a good idea to make sure the result is deterministic. So we would suggest making sure the VRF is attached to the switches by calling the attachment API.
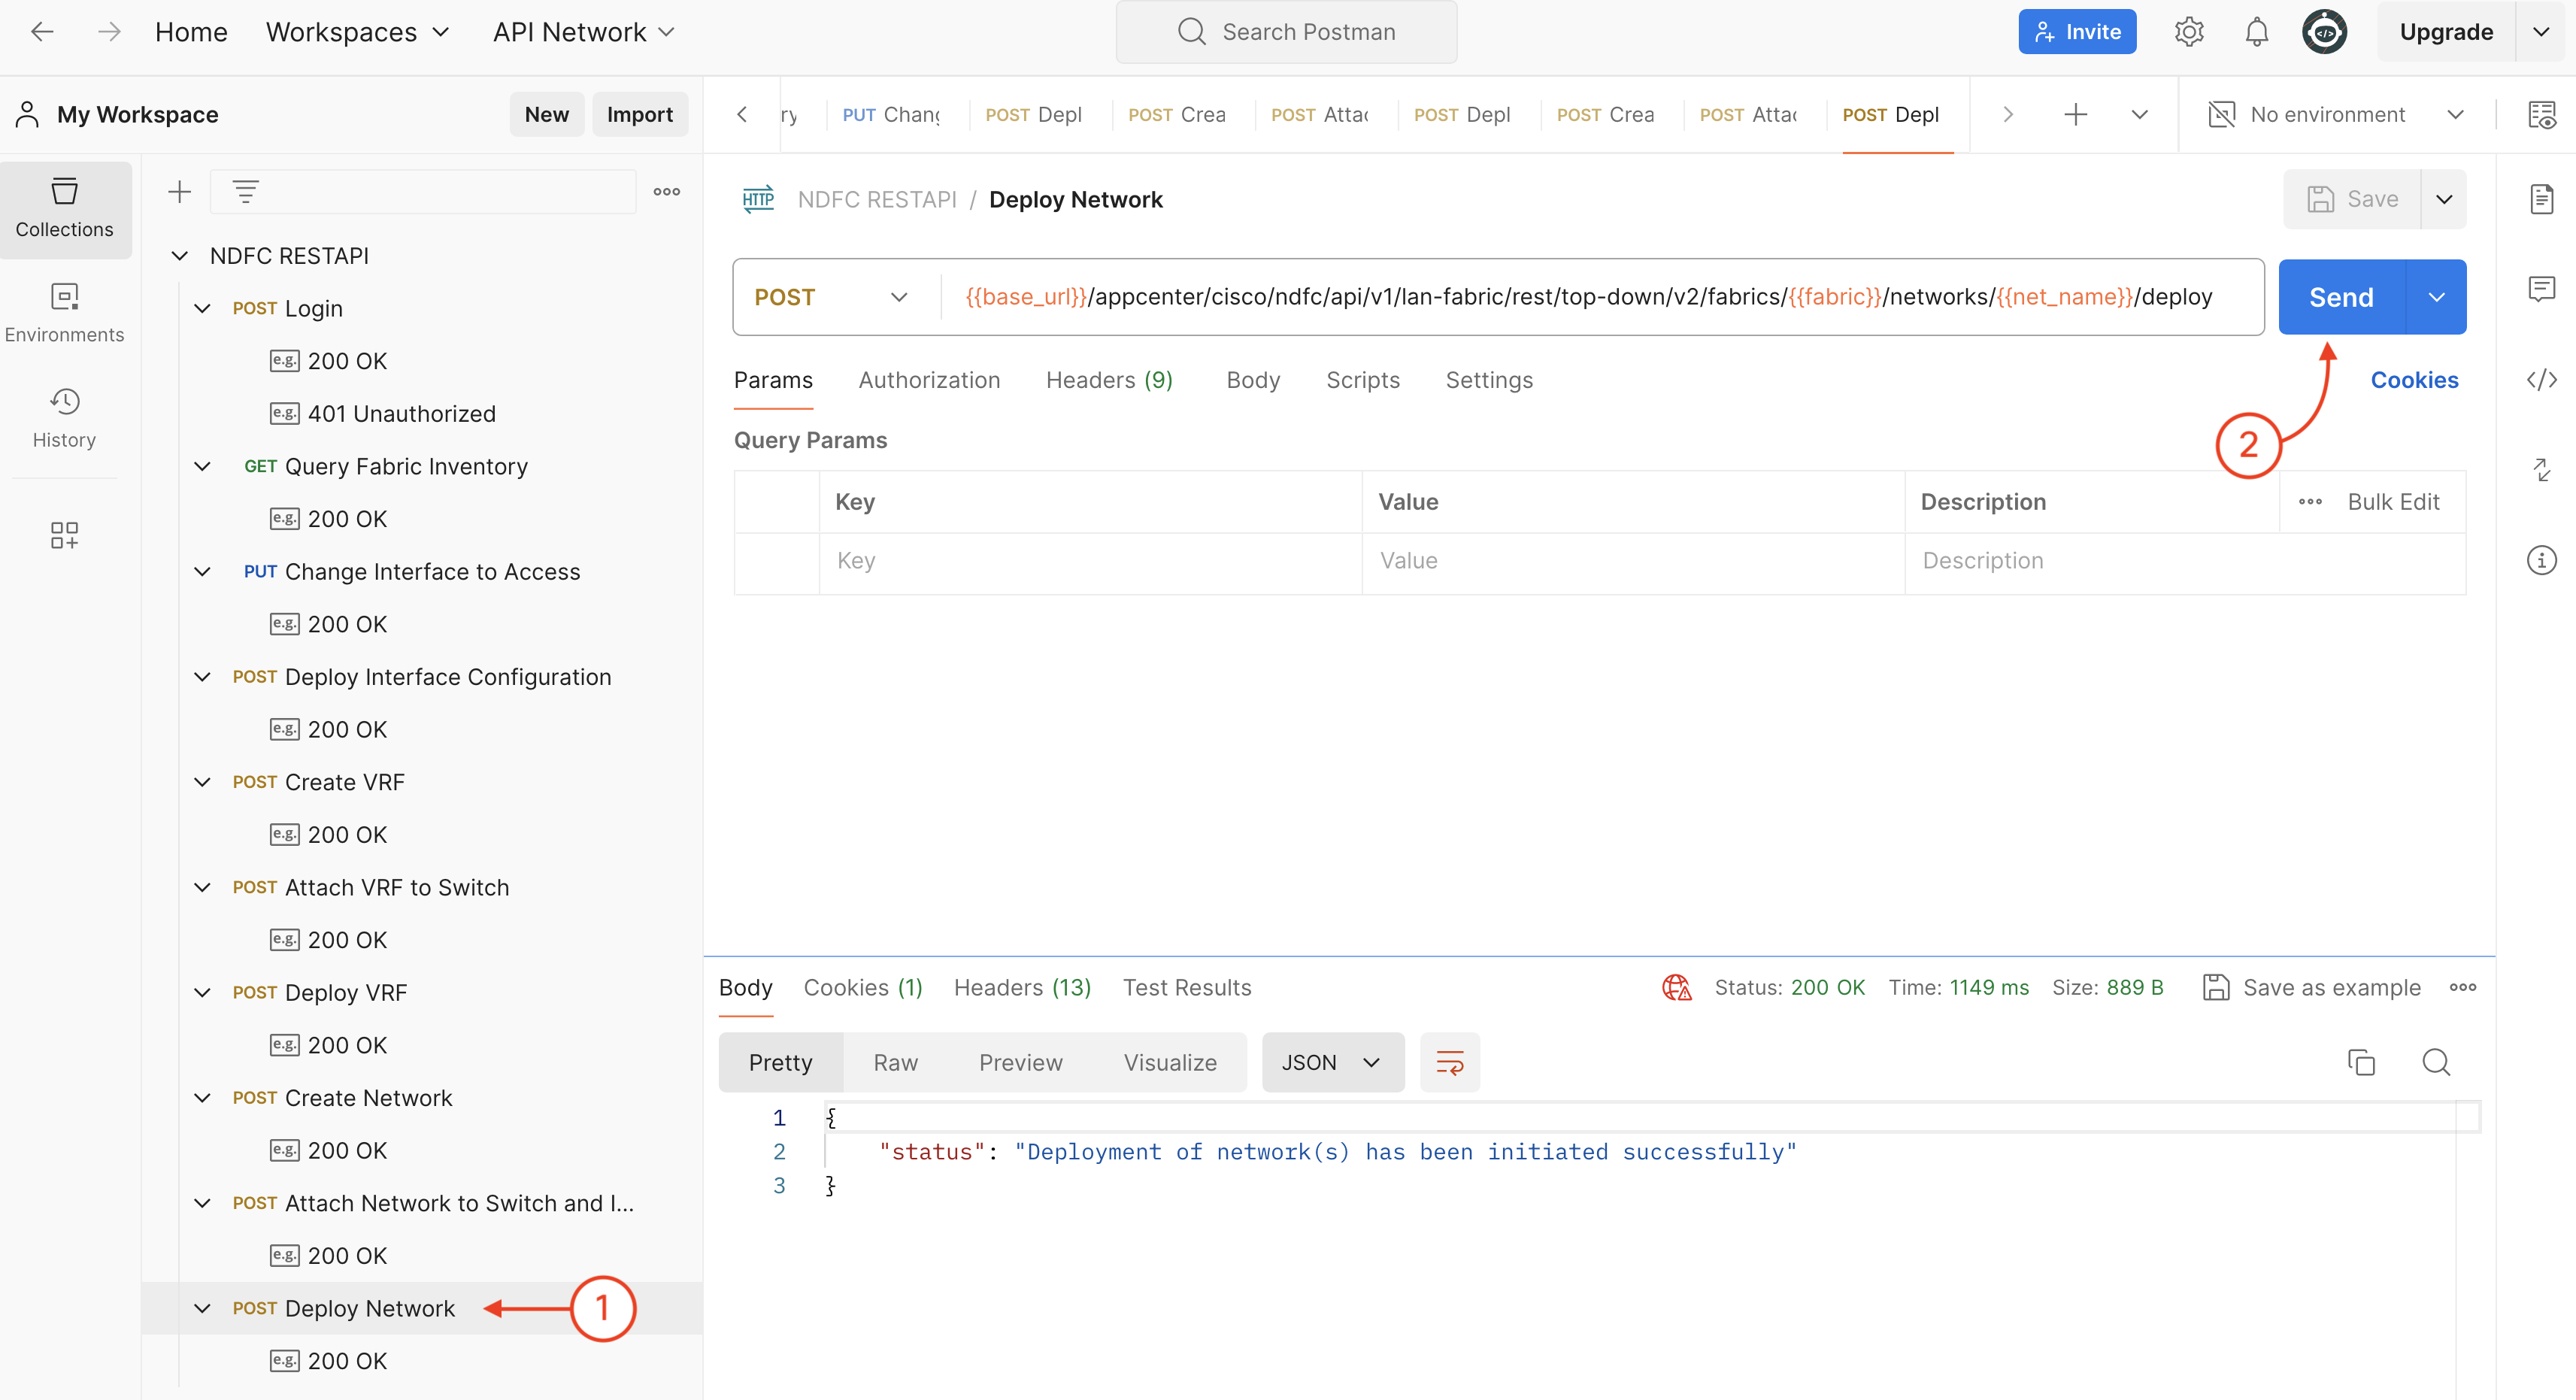
Continue to the next section to verify what you have created with Postman requests in NDFC.