Once your fabric has been created, with the correct type and global settings; You can start to add switches to the fabric.
In this step you will create a new file named topology.nac.yml to define the switches that will be added to the fabric including their roles and management IP addresses.
touch ~/workspace/ndfclab/nac/host_vars/fabric-stage/topology.nac.yml
code-server -r ~/workspace/ndfclab/nac/host_vars/fabric-stage/topology.nac.yml
---

vxlan:
  topology:
    switches:
      - name: staging-spine1
        serial_number: READ_TIMEOUT
        role: spine
        management:
          management_ipv4_address: 10.15.6.11
          default_gateway_v4: 10.15.6.1
      - name: staging-leaf1
        serial_number: READ_TIMEOUT
        role: leaf
        management:
          management_ipv4_address: 10.15.6.12
          default_gateway_v4: 10.15.6.1
      - name: staging-leaf2
        serial_number: READ_TIMEOUT
        role: leaf
        management:
          management_ipv4_address: 10.15.6.13
          default_gateway_v4: 10.15.6.1
Make sure you are in your root Ansible directory
cd ~/workspace/ndfclab/nac
From the root Ansible project directory execute the following command:
ansible-playbook -i hosts.stage.yml vxlan.yml --tags cr_manage_switches
Again, the actual configuration deployment will not take place yet, but this add_inventory role is doing the following:
Later in the lab you will deploy the configuration to the switches all at once which will take a little bit longer to:
Go ahead and move to the next step while the Ansible playbook is running so you can see the switches getting added into NDFC.
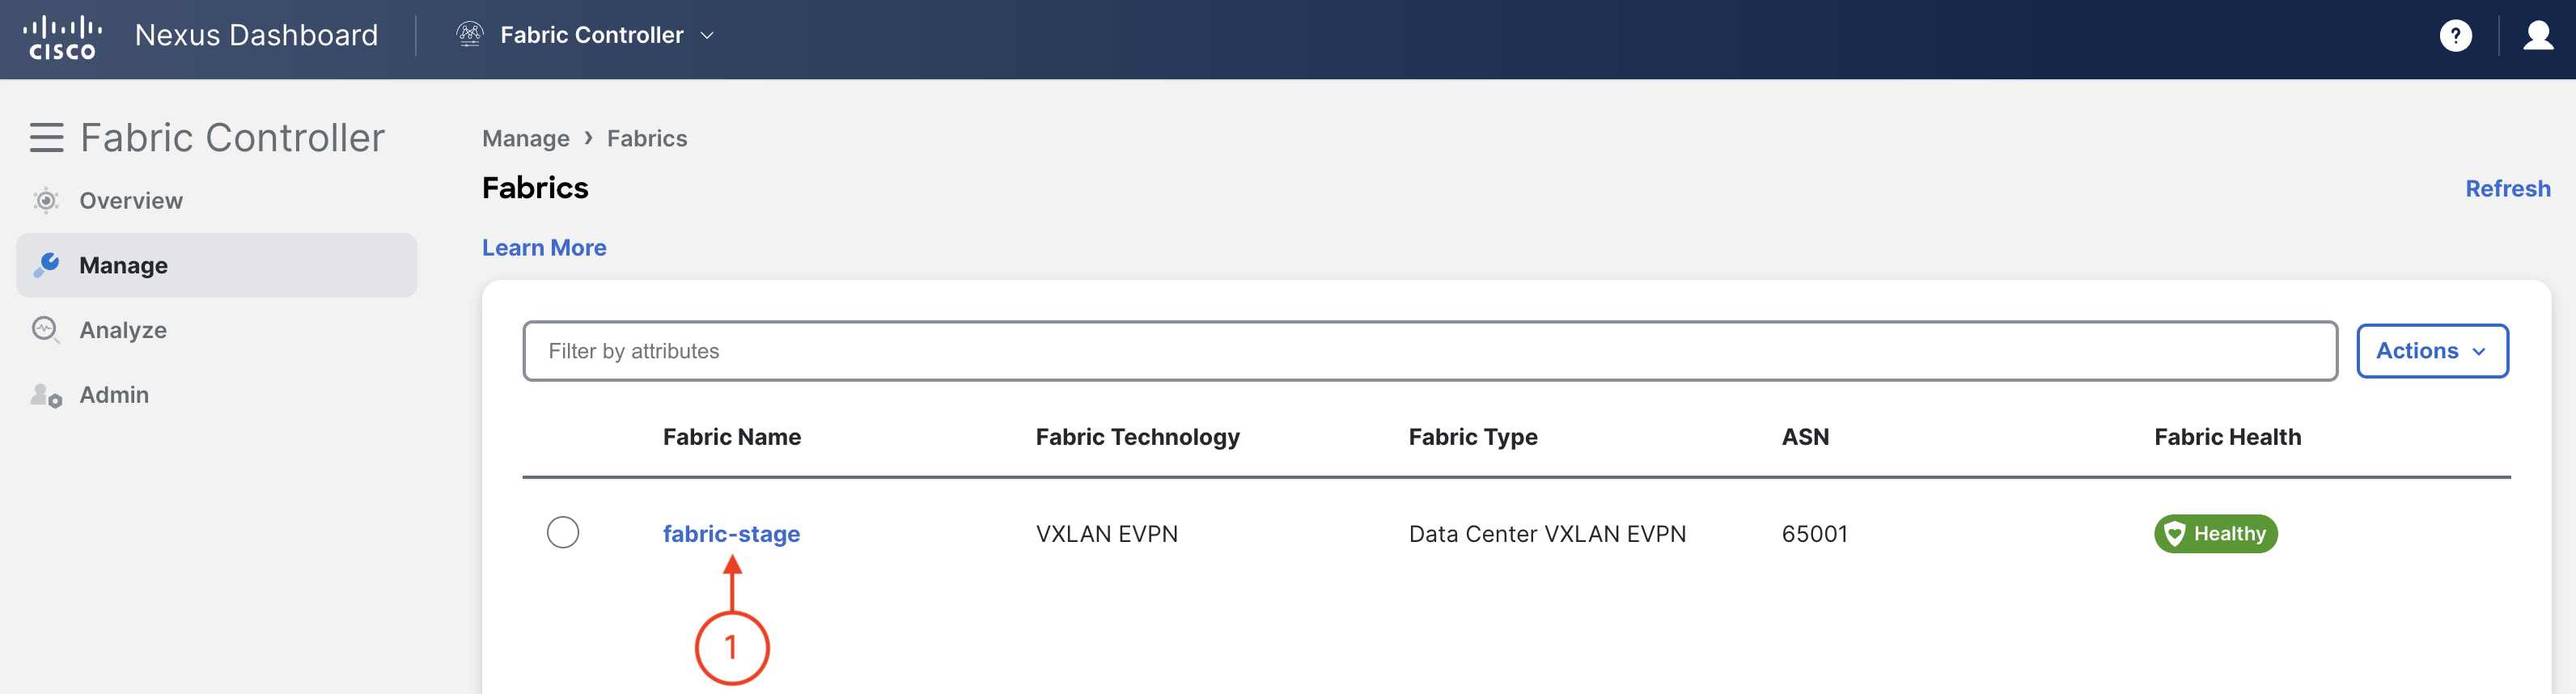
In your NDFC browser, access fabric-stage and navigate to the switches view.
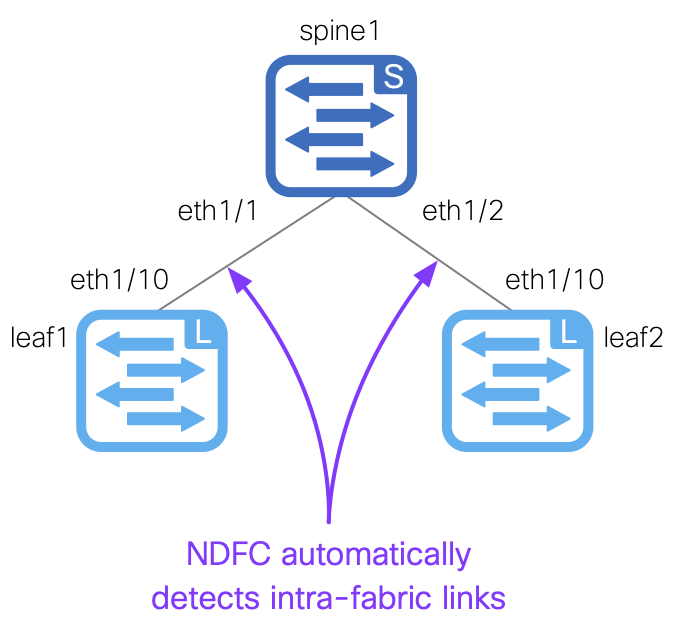
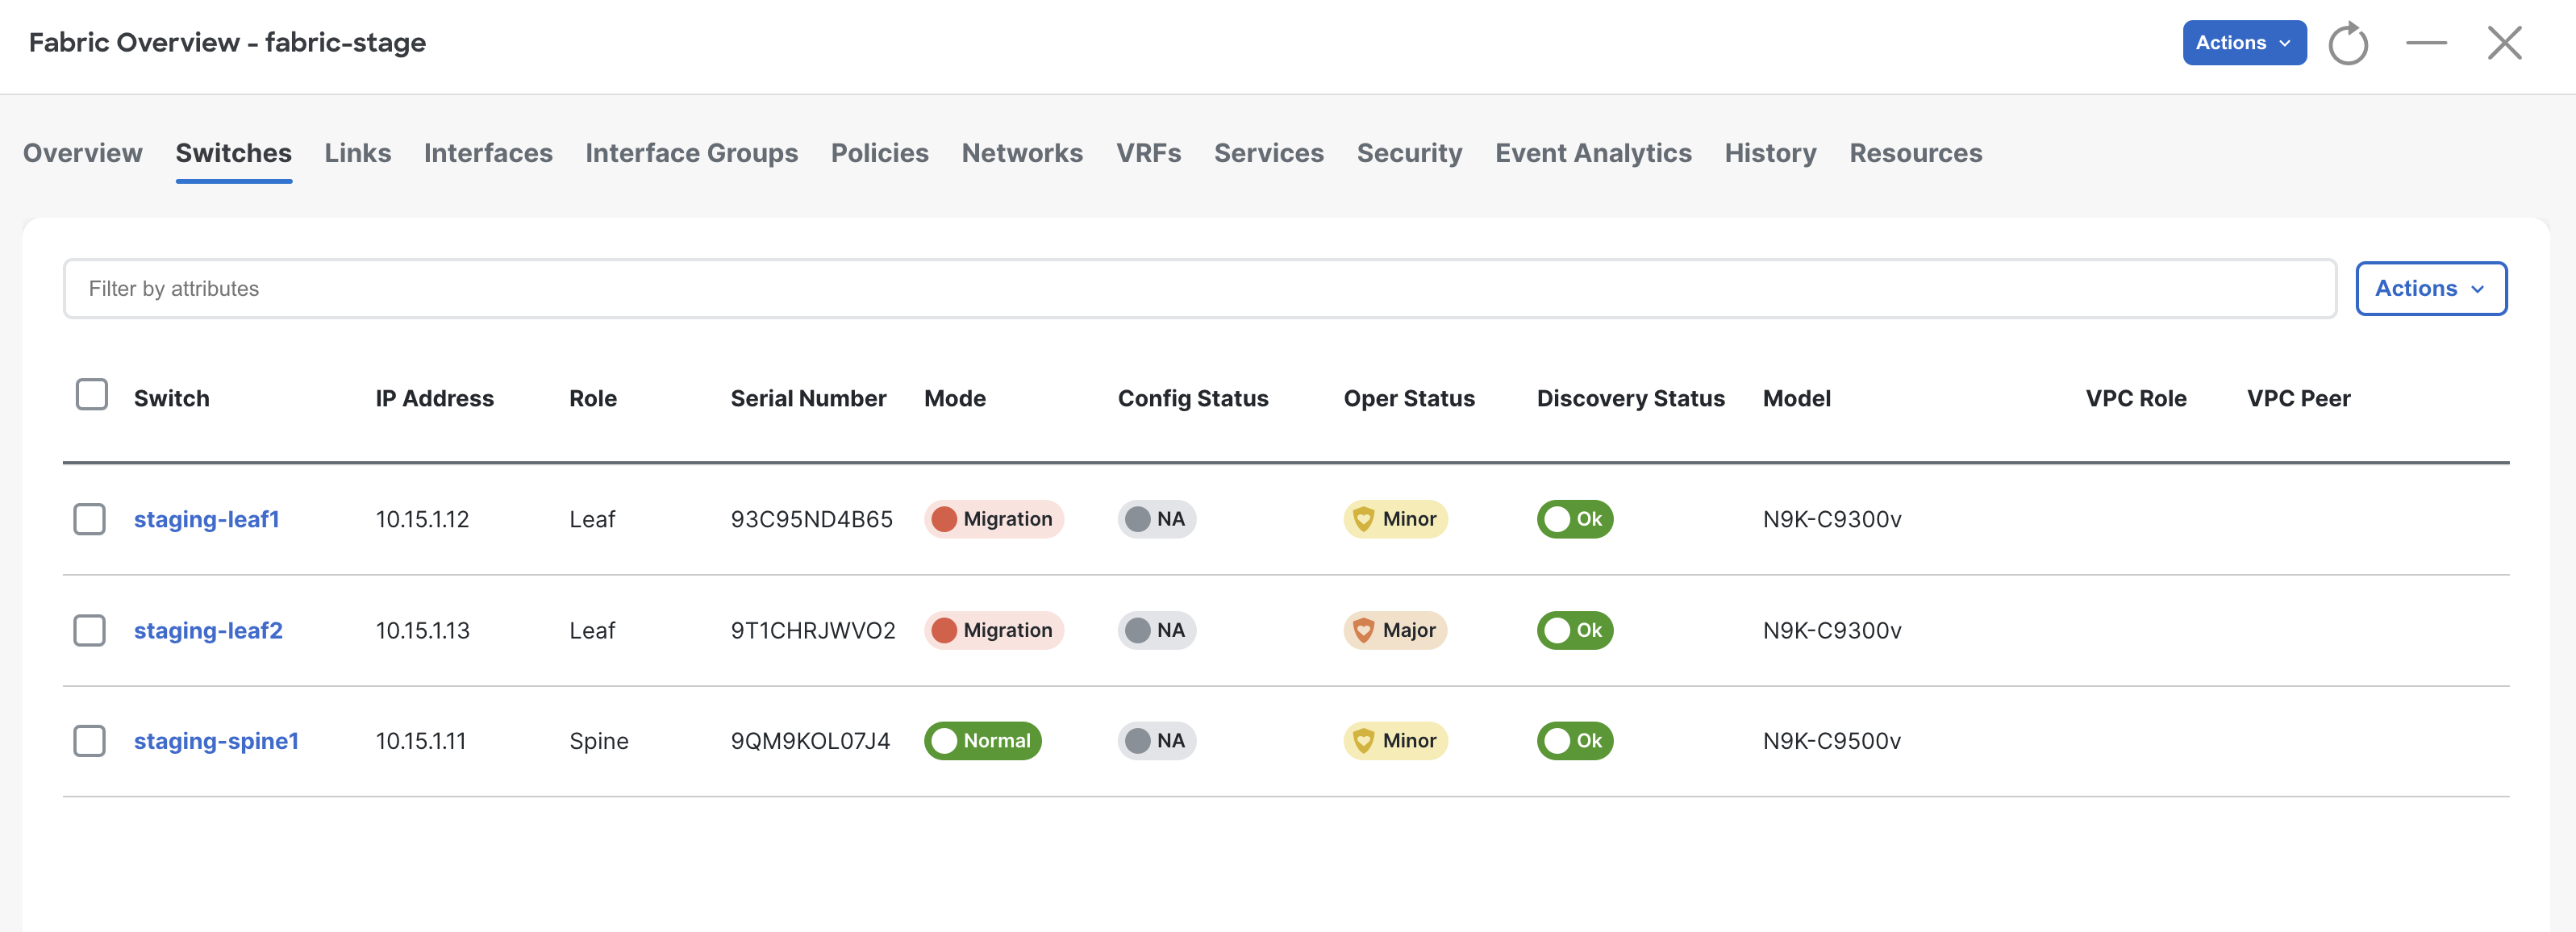
Here you will start to see the spine and leaf devices being discovered and added to the staging fabric.

You will see the switches transistion to different states during discovery:
This might be a good time for a cup of coffee or tea while the switches get added to your staging fabric!


Upon a successful run of the playbook your output should look as follows:
  <... SNIP ...>

  PLAY RECAP ****************************************************************************************************************************************************************
  fabric-stage                      : ok=188  changed=28   unreachable=0    failed=0    skipped=416  rescued=0    ignored=0


  PLAYBOOK RECAP ************************************************************************************************************************************************************
  Playbook run took 0 days, 0 hours, 5 minutes, 46 seconds


  TASKS RECAP ***************************************************************************************************************************************************************
  Wednesday 07 May 2025  15:57:08 +0000 (0:00:00.277)       0:05:46.610 *********
  ===============================================================================
  cisco.nac_dc_vxlan.create : Add NDFC Fabric Devices fabric-stage ------------------------------------------------------------------------------------------------- 288.20s
  cisco.nac_dc_vxlan.create : Build Switch Hostname Policy Payload from Data Model Update ---------------------------------------------------------------------------- 2.19s
  cisco.nac_dc_vxlan.connectivity_check : Get Cisco NDFC Version ----------------------------------------------------------------------------------------------------- 1.79s
  cisco.nac_dc_vxlan.common : Get POAP Data From POAP Enabled Devices ------------------------------------------------------------------------------------------------ 0.83s
  cisco.nac_dc_vxlan.common : Build Fabric Creation Parameters From Template ----------------------------------------------------------------------------------------- 0.82s
  cisco.nac_dc_vxlan.validate : Copy Service Model Data to Host ------------------------------------------------------------------------------------------------------ 0.81s
  cisco.nac_dc_vxlan.connectivity_check : Verify Authorization to NDFC 10.15.0.26 on Port 443 ------------------------------------------------------------------------ 0.75s
  cisco.nac_dc_vxlan.common : Retrieve NDFC Device Username and Password from Group Vars and update inv_config ------------------------------------------------------- 0.73s
  cisco.nac_dc_vxlan.common : Build VRFs Attach List From Template --------------------------------------------------------------------------------------------------- 0.73s
  cisco.nac_dc_vxlan.common : Build Interface ------------------------------------------------------------------------------------------------------------------------ 0.70s
  cisco.nac_dc_vxlan.common : Build Interface Po --------------------------------------------------------------------------------------------------------------------- 0.69s
  cisco.nac_dc_vxlan.common : Build Interface ------------------------------------------------------------------------------------------------------------------------ 0.69s
  cisco.nac_dc_vxlan.common : Build Policy List From Template -------------------------------------------------------------------------------------------------------- 0.68s
  cisco.nac_dc_vxlan.common : Build VPC interface -------------------------------------------------------------------------------------------------------------------- 0.67s
  cisco.nac_dc_vxlan.common : Build Networks Attach List From Template ----------------------------------------------------------------------------------------------- 0.67s
  cisco.nac_dc_vxlan.common : Build Interface ------------------------------------------------------------------------------------------------------------------------ 0.66s
  cisco.nac_dc_vxlan.common : Build Links for vPC Peering ------------------------------------------------------------------------------------------------------------ 0.65s
  cisco.nac_dc_vxlan.common : Build Interface ------------------------------------------------------------------------------------------------------------------------ 0.64s
  cisco.nac_dc_vxlan.common : Build sub_interface -------------------------------------------------------------------------------------------------------------------- 0.64s
  cisco.nac_dc_vxlan.common : Build VRFs Attach List From Template for loopback -------------------------------------------------------------------------------------- 0.64s

  ROLES RECAP ***************************************************************************************************************************************************************
  Wednesday 07 May 2025  15:57:08 +0000 (0:00:00.279)       0:05:46.612 *********
  ===============================================================================
  create ---------------------------------------------------------------- 293.03s
  common ----------------------------------------------------------------- 41.89s
  validate ---------------------------------------------------------------- 5.64s
  connectivity_check ------------------------------------------------------ 3.95s
  common_global ----------------------------------------------------------- 0.06s
  ~~~~~~~~~~~~~~~~~~~~~~~~~~~~~~~~~~~~~~~~~~~~~~~~~~~~~~~~~~~~~~~~~~~~~~~~~~~~~~~
  total ----------------------------------------------------------------- 344.56s
In this particular lab example it took around 5-6 minutes to add the switches to the fabric but next time you execute the role it will be much quicker because the switches are already added and are in the correct state.
It's also important to note here, that it only took 5-6 minutes because the dcnm_inventory module parameter for deploy was set to false.
You will perform the configuration deployment from NDFC to the actual switches a little bit later in the lab all one time when you rerun the playbook. Again, you are building things out in NDFC first, then will push everything to the switches all at once.
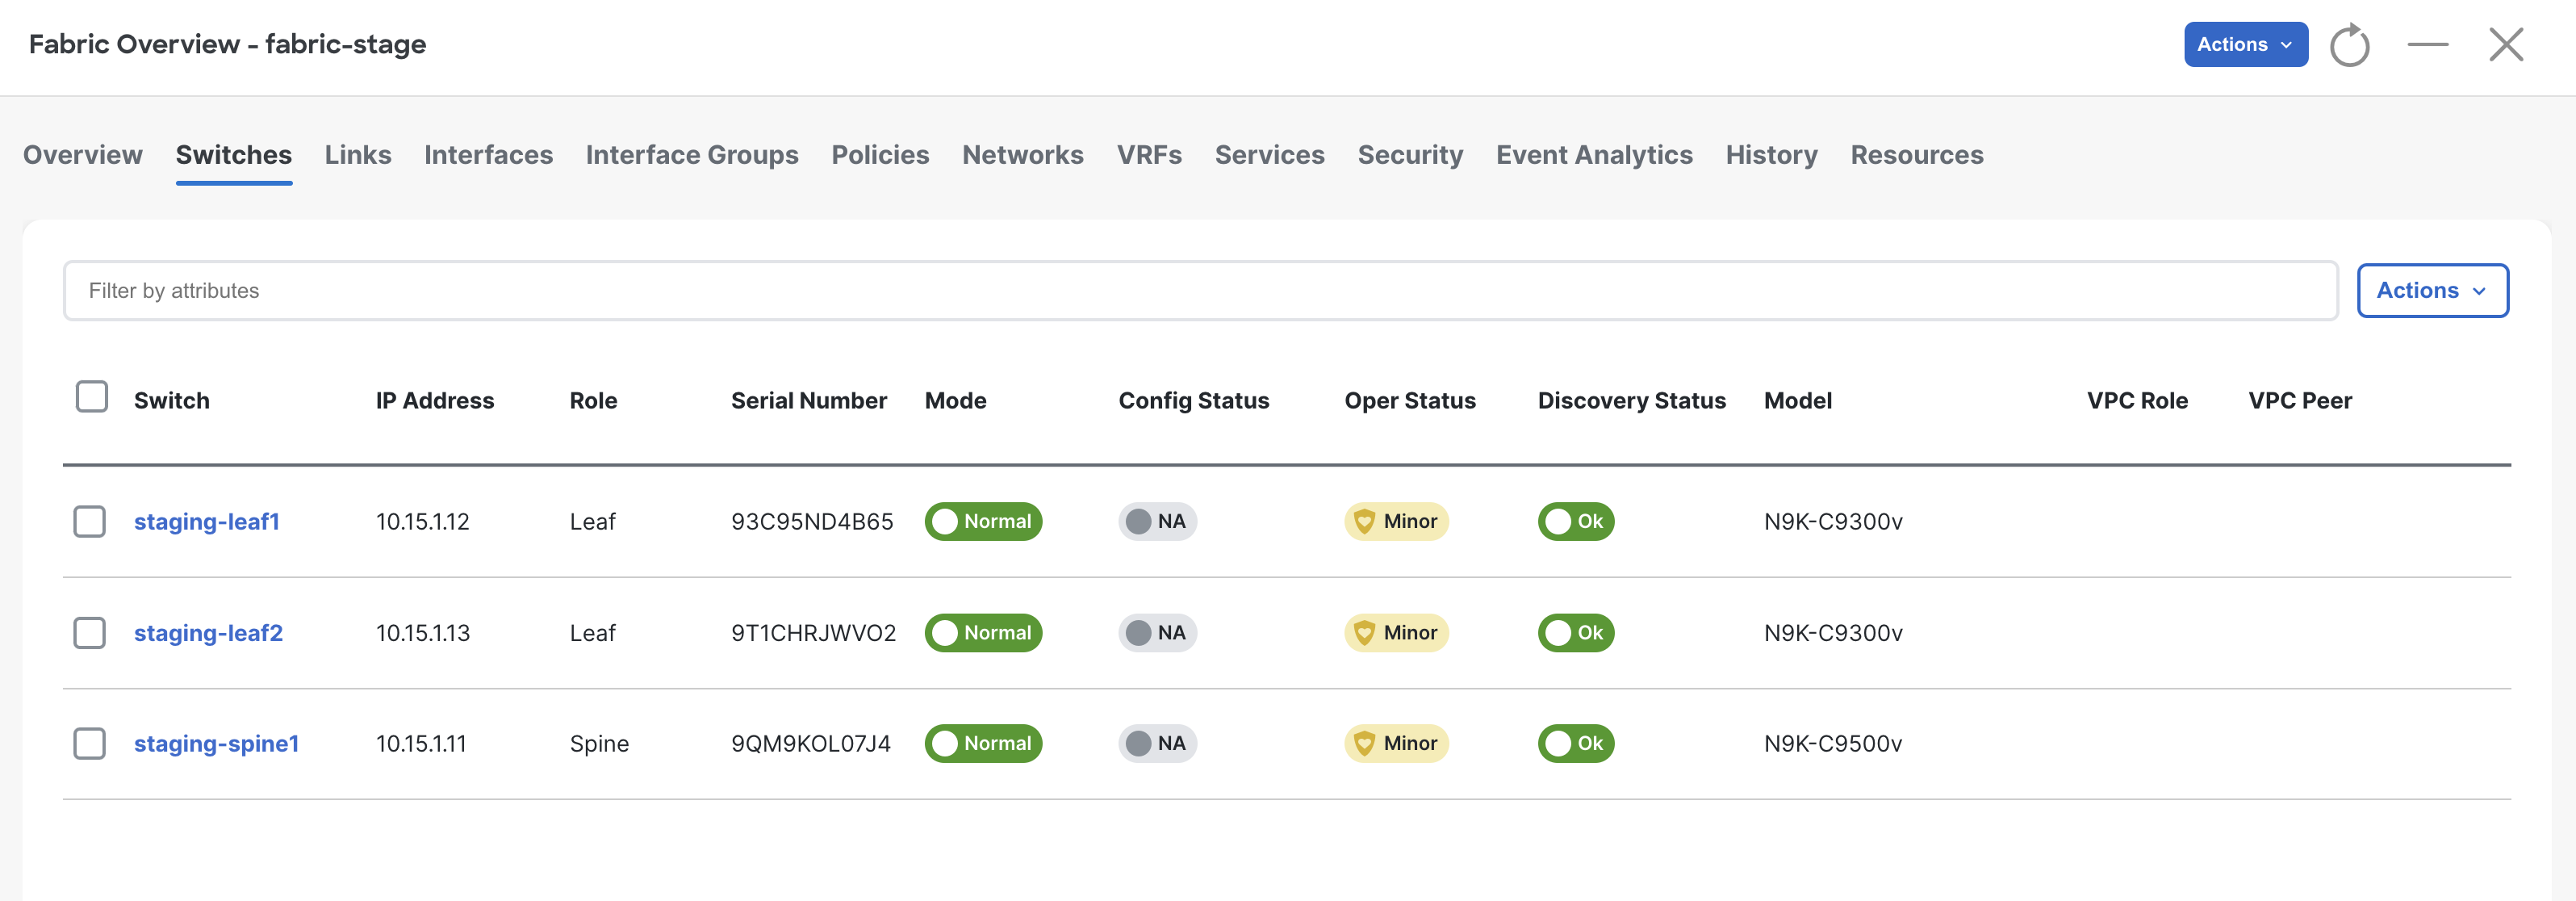
Check NDFC again and make sure the switches are added. The Mode should show as Normal and the Discovery Status should show as Ok.
You may have noticed that this time we ran the playbook with the --tags cr_manage_switches option to limit the tasks that were executed.
In this case we limited execution to only the tasks that manage switches in the fabric.
To see a full list of suppored tags in this collection, run the playbook command with --tags help
ansible-playbook -i hosts.stage.yml vxlan.yml -vvvv --tags help
You will see a list of supported tags in the output. The cr_manage_switches tag is used to manage switches in the fabric.
TASK [cisco.nac_dc_vxlan.common_global : Verify User Tags] ****************************************************************************************************************************************************
task path: /home/pod09/workspace/ndfclab/nac/collections/ansible_collections/cisco/nac_dc_vxlan/roles/common_global/tasks/main.yml:23
Friday 23 May 2025  02:48:29 +0000 (0:00:02.012)       0:00:02.012 ************
Friday 23 May 2025  02:48:29 +0000 (0:00:02.011)       0:00:02.011 ************
fatal: [fabric-stage -> localhost]: FAILED! => {
    "changed": false,
    "msg": "Tag 'help' not found in list of supported tags",
    "supported_tags": [
        "cc_verify",
        "cr_manage_fabric",
        "cr_manage_switches",
        "cr_manage_vpc_peers",
        "cr_manage_interfaces",
        "cr_manage_vrfs_networks",
        "cr_manage_policy",
        "cr_manage_links",
        "cr_manage_edge_connections",
        "rr_manage_interfaces",
        "rr_manage_networks",
        "rr_manage_vrfs",
        "rr_manage_vpc_peers",
        "rr_manage_links",
        "rr_manage_edge_connections",
        "rr_manage_switches",
        "rr_manage_policy",
        "role_validate",
        "role_create",
        "role_deploy",
        "role_remove"
    ]
}

PLAY RECAP ****************************************************************************************************************************************************************************************************
fabric-stage               : ok=0    changed=0    unreachable=0    failed=1    skipped=0    rescued=0    ignored=0
KEY: cr_* prefix == create_role, rr_* prefix == remove_role
cr_manage_fabric - Create and manage the fabric
cr_manage_switches - Create and manage switches in the fabric
cr_manage_vpc_peers - Create and manage vPC peers
cr_manage_interfaces - Create and manage interfaces
cr_manage_vrfs_networks - Create and manage VRFs and networks
cr_manage_policy - Create and manage policies
cr_manage_links - Create and manage links
cr_manage_edge_connections - Create and manage edge connections
rr_manage_switches - Remove switches in the fabric
rr_manage_vpc_peers - Remove vPC peering
rr_manage_interfaces - Remove and/or put interfaces into a default state
rr_manage_vrfs - Remove VRFs
rr_manage_networks - Remove Networks
rr_manage_policy - Remove policies
rr_manage_links - Remove links
rr_manage_edge_connections - Remove edge connections
role_validate - Run the Validate the role
role_create - Run the Create the role
role_deploy - Run the Deploy the role
role_remove - Run the Remove the role
On the keyword press Ctrl + K + W. This should close all open tabs to clear your workspace for the next section.
Continue to the next section to define the Ansible tasks for setting up vPC domains between leaf switches.