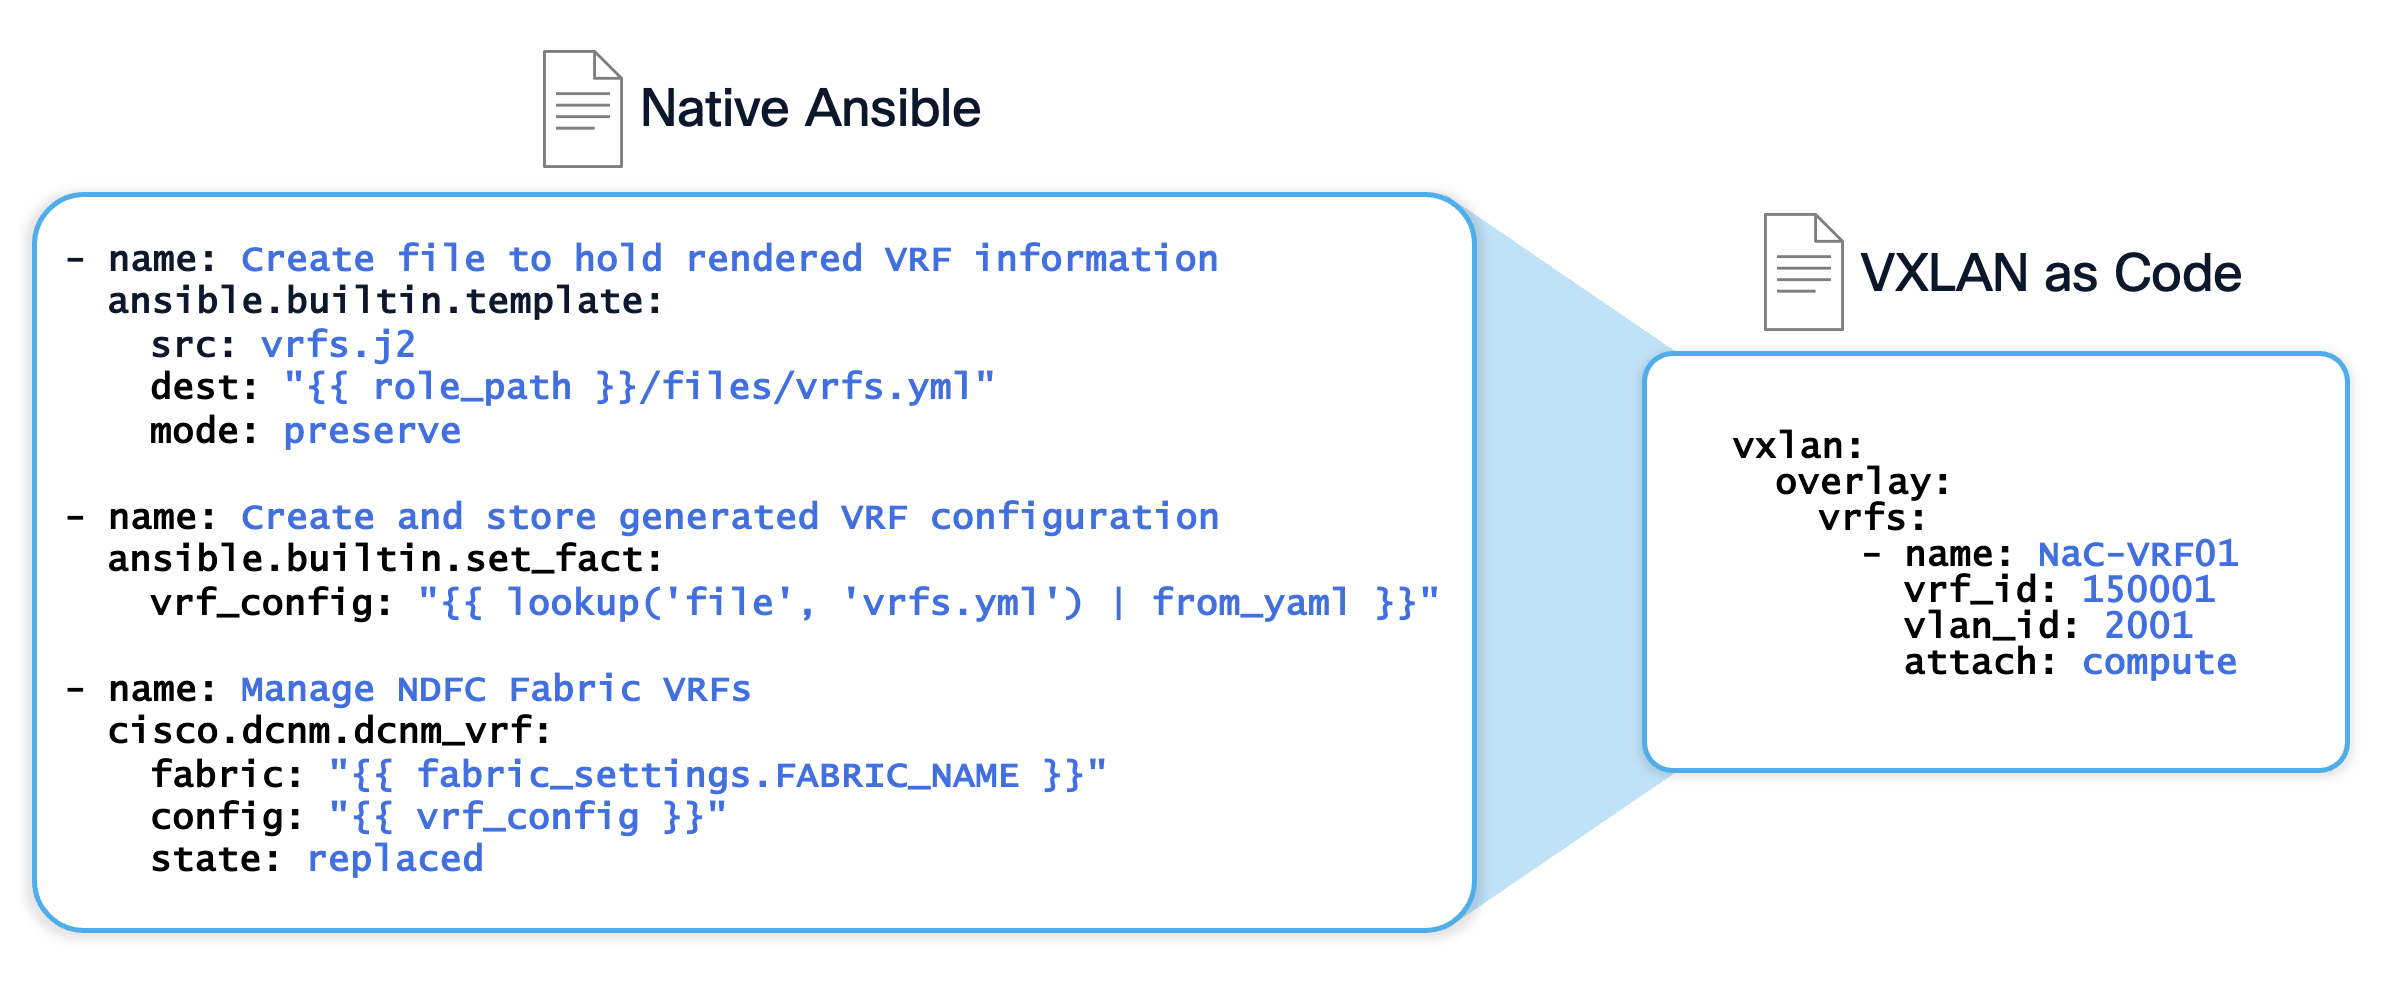
VXLAN as Code aims to reduce time to value by lowering the barrier of entry to network orchestration through simplification, abstraction, and curated examples.
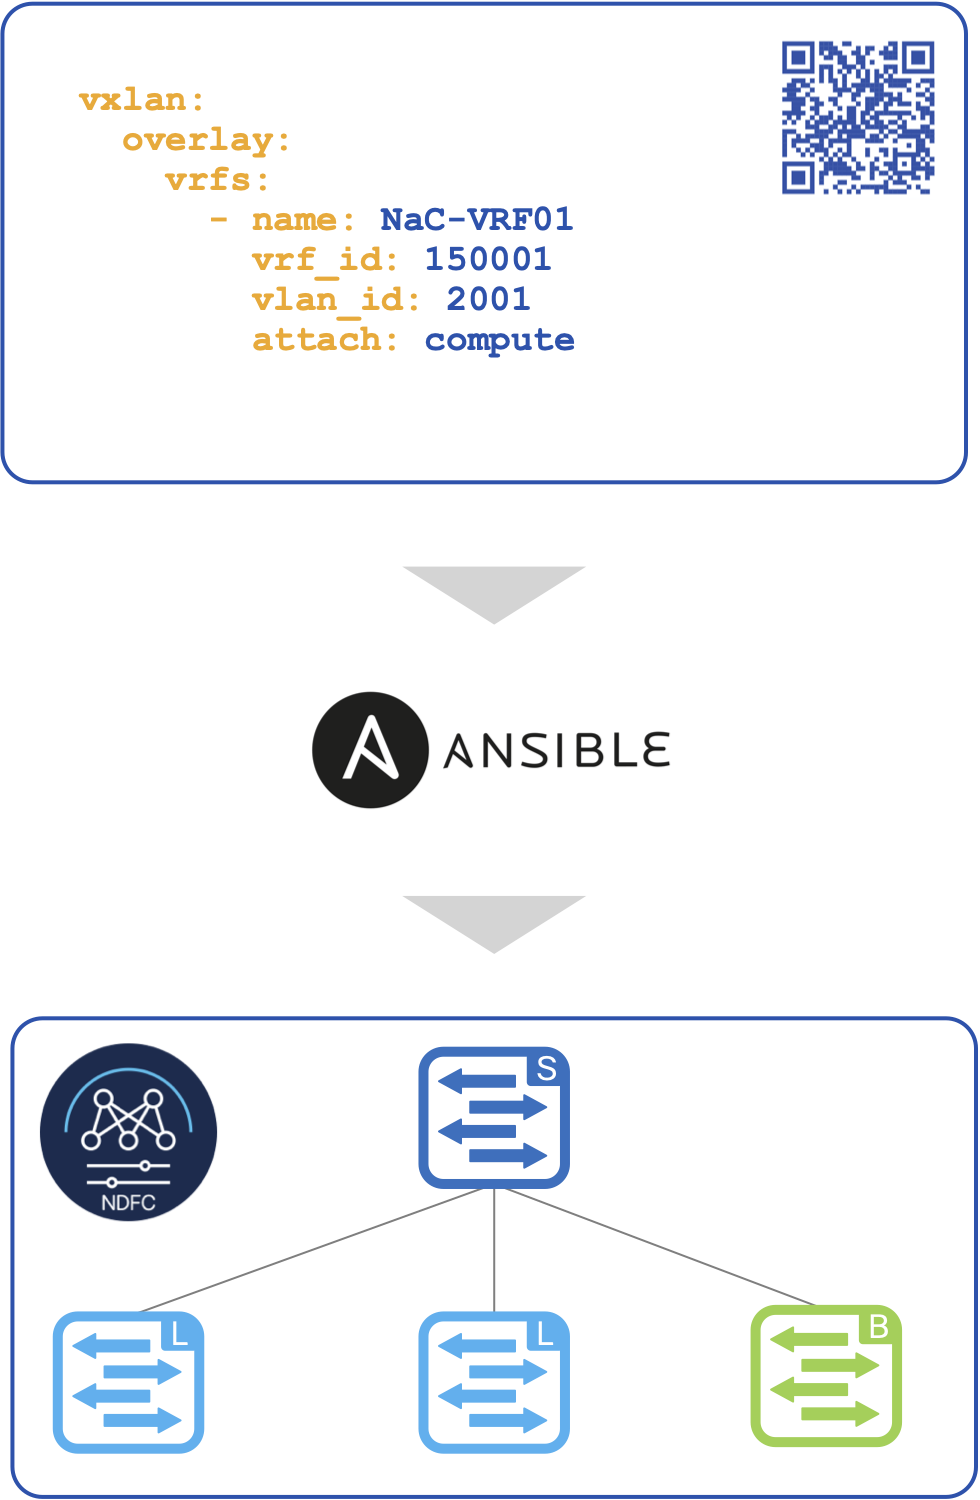
It allows users to instantiate network fabrics in minutes using an easy to use, opinionated data model and takes away the complexity of having to deal with references, dependencies or loops. Users can focus on describing the intended configuration while using a set of maintained and tested Ansible Modules without the need to understand the low-level network device configuration.
The data model is built by network engineers for each Cisco feature that is implemented and incorporates best practices.
The data model allows the representation of network complexity in a simple structure where validation and testing can be incorporated.
Return to your Visual Studio Code Terminal window.
Create a directory called nac under the /home/cisco/Documents/ndfclab
project directory.
mkdir -p ~/workspace/ndfclab/nac
cd ~/workspace/ndfclab/nac
Within the ~/workspace/ndfclab/nac directory create additional directories;
This directory structure will keep things organized for clarity and demonstrate some other ways to work with file structures in Ansible.
Remember that you can click the copy button in the upper right hand corner of each Visual
Sudio Code Termnial section in this lab guide and then paste it into the actual VSCode terminal instead
of typing everything out!
Simply hover your mouse pointer above the upper right hand corner of the window below
to make the copy button appear.
mkdir group_vars
mkdir -p group_vars/ndfc
mkdir host_vars
mkdir -p host_vars/fabric-stage
mkdir -p host_vars/fabric-prod
mkdir collections
Since you're operating in the same virtualenv, Ansible is already installed and you can confirm by checking the version. Again, you're be working with Ansible Core release 2.17.10.
ansible --version
Upon a successful installation and verification of the Ansible version, your output should look as follows:
    ansible [core 2.17.10]
      config file = None
      configured module search path = ['/home/pod06/.ansible/plugins/modules', '/usr/share/ansible/plugins/modules']
      ansible python module location = /home/pod06/.pyenv/versions/3.11.9/envs/ndfclab/lib/python3.11/site-packages/ansible
      ansible collection location = /home/pod06/.ansible/collections:/usr/share/ansible/collections
      executable location = /home/pod06/.pyenv/versions/ndfclab/bin/ansible
      python version = 3.11.9 (main, Apr 25 2025, 11:33:57) [GCC 11.4.0] (/home/pod06/.pyenv/versions/3.11.9/envs/ndfclab/bin/python)
      jinja version = 3.1.6
      libyaml = True
First, create a requirements.txt file in the ~/workspace/ndfclab/nac directory.
touch ~/workspace/ndfclab/nac/requirements.txt
cat << EOF > ~/workspace/ndfclab/nac/requirements.txt

ansible-core==2.17.10
ansible-lint==24.10.0
iac-validate==0.2.6
macaddress==2.0.2
netaddr==1.3.0
packaging==25.0
requests==2.32.2
jmespath==1.0.1
EOF
Install the Python dependencies required for the VXLAN as Code solution.
pip install -r requirements.txt
Create an ansible.cfg file to disable hostkey checking and set your python interpreter for the purposes of this lab.
Additionally, NDFC Ansible modules require the Ansible persistent_connection to have some values modified.
The command_timeout and connect_timeout are required to be set to a 1000 seconds or greater.
If this is something you forget to do in your environment outside of this lab, not to worry, the modules will notify you
upon execution time.
touch ~/workspace/ndfclab/nac/ansible.cfg
cat << EOF > ~/workspace/ndfclab/nac/ansible.cfg

[defaults]
interpreter_python = "$PYENV_VIRTUAL_ENV/bin/python"
host_key_checking = False
collections_path = ./collections/
callback_whitelist=ansible.posix.timer,ansible.posix.profile_tasks,ansible.posix.profile_roles
callbacks_enabled=ansible.posix.timer,ansible.posix.profile_tasks,ansible.posix.profile_roles
bin_ansible_callbacks = True

[persistent_connection]
command_timeout=7200
connect_timeout=7200
EOF
First, create a requirements.yml file in the ~/workspace/ndfclab/nac directory.
touch ~/workspace/ndfclab/nac/requirements.yml
cat << EOF > ~/workspace/ndfclab/nac/requirements.yml

collections:
  - name: community.general
    version: 10.6.0
  - name: ansible.posix
    version: 2.0.0
  - name: ansible.utils
    version: 6.0.0
  - name: ansible.netcommon
    version: 8.0.0
  - name: cisco.dcnm
    version: 3.8.0
EOF
Install the Ansible Collection dependencies required for the VXLAN as Code solution.
ansible-galaxy collection install -r requirements.yml -p ./collections
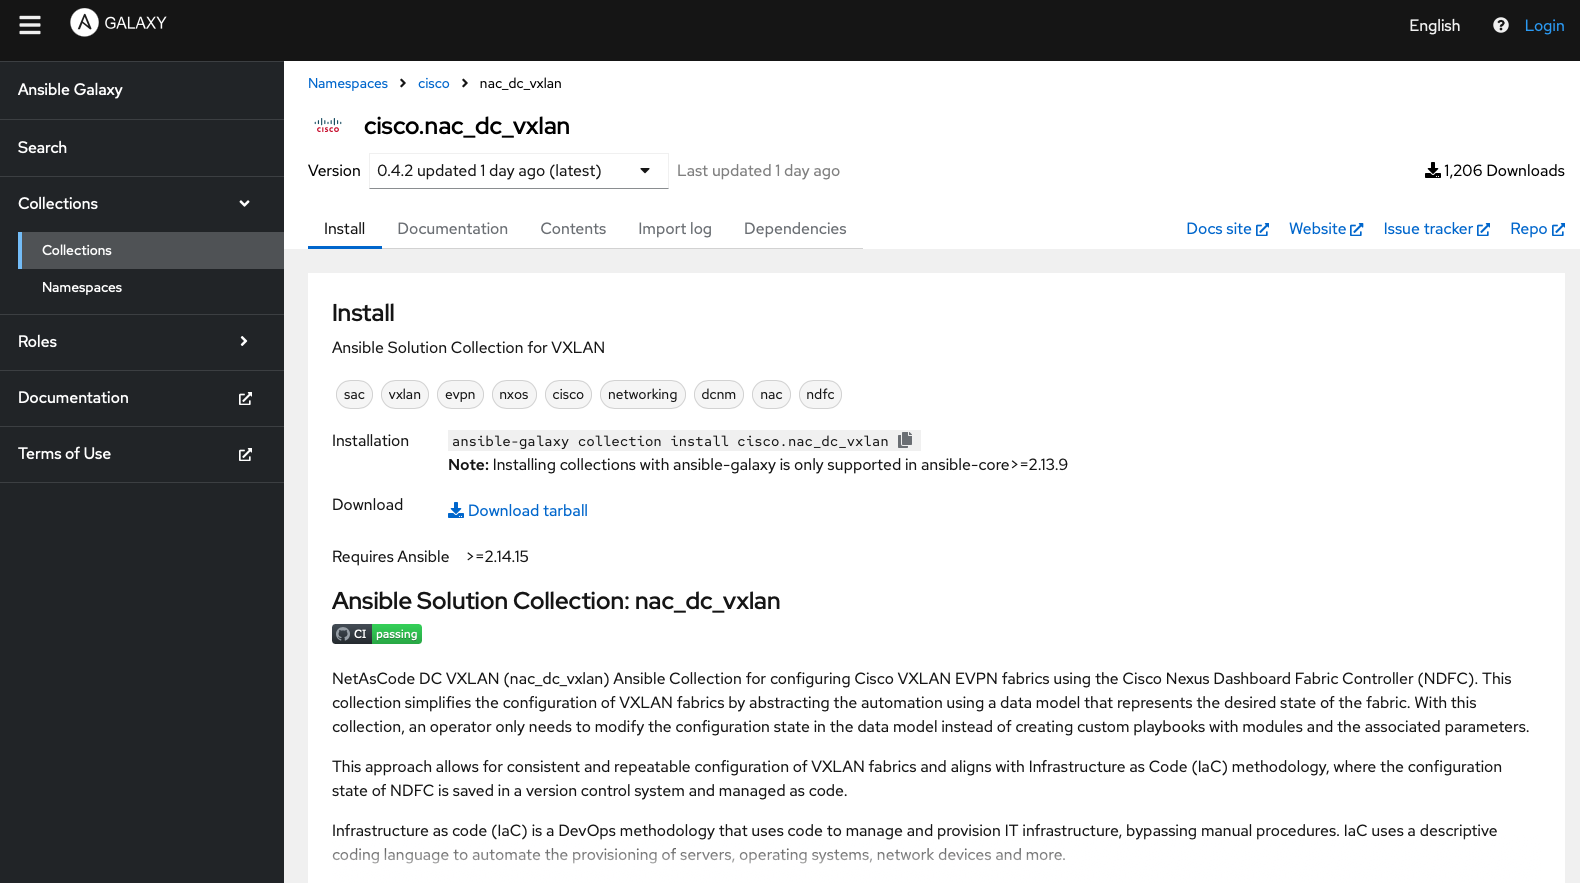
ansible-galaxy collection install cisco.nac_dc_vxlan==0.4.2 -p ./collections
Use the following ansible-galaxy command to verify the collection was installed properly and make note of the dependent collections installed; one of them should look familiar.
ansible-galaxy collection list
You should see the following output:
    # /home/pod06/workspace/ndfclab/ansible/collections/ansible_collections
    Collection         Version
    -----------------  -------
    ansible.netcommon  8.0.0
    ansible.posix      2.0.0
    ansible.utils      6.0.0
    cisco.dcnm         3.8.0
    cisco.nac_dc_vxlan 0.4.2
    community.general  10.6.0
All documentation for the VXLAN as Code, nac_dc_vxlan, Ansible collection can be found on Ansible Galaxy. Navigate to Ansible Galaxy to see the list of modules and review the documentation.

Staging FabricThe Ansible inventory file defines how Ansible will connect and authenticate with NDFC.
touch ~/workspace/ndfclab/nac/hosts.stage.yml
cat << EOF > ~/workspace/ndfclab/nac/hosts.stage.yml
---
# Inventory Information For Staging Fabric
ndfc:
  hosts:
    fabric-stage:
      ansible_host: 10.15.0.26
EOF
The following file should look familiar as it is similar to the one you created in the previous Ansible section. In this section you will use the lookup
plugin and use environment variables to pass sensitive information such as usernames and passwords to Ansible.
The lookup plugin allows you to access data from outside of Ansible, such as environment variables,
or files, and use that data in your playbooks. In this case, you will be using the lookup plugin to access environment variables
that you will set in a shell script. This allows you to keep sensitive information, such as passwords, out of your playbooks and inventory files,
while still being able to use them in your Ansible tasks.
touch ~/workspace/ndfclab/nac/group_vars/ndfc/connection.yml
cat << EOF > ~/workspace/ndfclab/nac/group_vars/ndfc/connection.yml
---
# Connection Parameters for 'ndfc' inventory group
#
# Controller Credentials
ansible_connection: ansible.netcommon.httpapi
ansible_network_os: cisco.dcnm.dcnm
ansible_httpapi_port: 443
ansible_httpapi_use_ssl: true
ansible_httpapi_validate_certs: false
# ansible_httpapi_login_domain: local
# NDFC API Credentials
ansible_user: "{{ lookup('ansible.builtin.env', 'ND_USERNAME') }}"
ansible_password: "{{ lookup('ansible.builtin.env', 'ND_PASSWORD') }}"
# Credentials for devices in Inventory
ndfc_switch_username: "{{ lookup('ansible.builtin.env', 'NDFC_SW_USERNAME') }}"
ndfc_switch_password: "{{ lookup('ansible.builtin.env', 'NDFC_SW_PASSWORD') }}"
EOF
Next, you will create a file named ndfc.yml that will contain the parameters to control what elements are allowed to be removed using Remove role.
This will be used as a safety net to ensure that you do not accidentally remove any elements that you do not intend to remove. If you do wish to remove any of the elements, you can set the
corresponding parameter to true in the ndfc.yml file.
touch ~/workspace/ndfclab/nac/group_vars/ndfc/ndfc.yml
cat << EOF > ~/workspace/ndfclab/nac/group_vars/ndfc/ndfc.yml
---
# Parameter to ignore diff-run
force_run_all: true

# Parameters for the tasks in the 'Remove' role
interface_delete_mode: false
inventory_delete_mode: false
link_vpc_delete_mode: false
network_delete_mode: false
policy_delete_mode: false
vpc_delete_mode: false
vrf_delete_mode: false
EOF
First, let's create a quick shell script to set an environment variable for your ND user's password. Again, your command line
program will first try to leverage an environment variable named ND_PASSWORD for authentication purposes with your
ndfc ndclient object.
touch ~/workspace/ndfclab/nac/secrets.sh
cat <<EOF >> ~/workspace/ndfclab/nac/secrets.sh
export ND_USERNAME="admin"
export ND_PASSWORD="cisco.123"
export NDFC_SW_USERNAME="admin"
export NDFC_SW_PASSWORD="cisco.123"
EOF
Source the simple shell script to set the secret env variables.
source secrets.sh
You can check if your env variable is set by issuing the below command in your VSCode terminal window:
env | grep -E "^ND"
$ env | grep -E "^ND"
ND_PASSWORD=cisco.123
NDFC_SW_USERNAME=admin
ND_USERNAME=admin
NDFC_SW_PASSWORD=cisco.123
Navigate to the next section to begin working with VXLAN as Code.