When you moved your child fabrics to the MSD fabric group in ND, you moved the overlay management responsibilities to the Multi-Site (MSD) level. In ND, specific overlay configurations for VRFs are no longer allowed to be configured at the individual fabric level once in a Multi-Site fabric group. The initial adding of VRFs is now done at the Multi-Site level in ND. However, specific VRF and Network configuration is split between the Multi-Site fabric and the individual child fabric(s), requiring you to revisit the VRF and Network at both levels.
In NaC, the data model for Multi-Site overlay configuration assumes full view and management of the overlay VRF by managing it at the Multi-Site level and transparently down to the child fabrics as needed, depending on the configuration parameters. This means that you do not have to retain and correlate VRF configuration at both the Multi-Site and individual fabric levels.
With the management now at the Multi-Site level, you need to ensure that any existing overlay configurations for VRFs and Networks in the individual fabrics are removed or commented out when it comes to subsequent Ansible playbook runs.
Comment out any existing content in the vrfs.nac.yml file for your Site1 fabric.
sed -i 's/^/# /' ~/workspace/ndlab/nac/host_vars/site1-fabric/vrfs.nac.yml
Comment out any existing content in the networks.nac.yml file for your Site1 fabric.
sed -i 's/^/# /' ~/workspace/ndlab/nac/host_vars/site1-fabric/networks.nac.yml
Create a multisite overlay VRF file named vrfs.nac.yml. This file will contain the VRF configuration for your Multi-Site fabric.
What is important in this situation is to ensure you move over any VRFs from your existing child fabrics that continue to need to be part of the Multi-Site overlay.
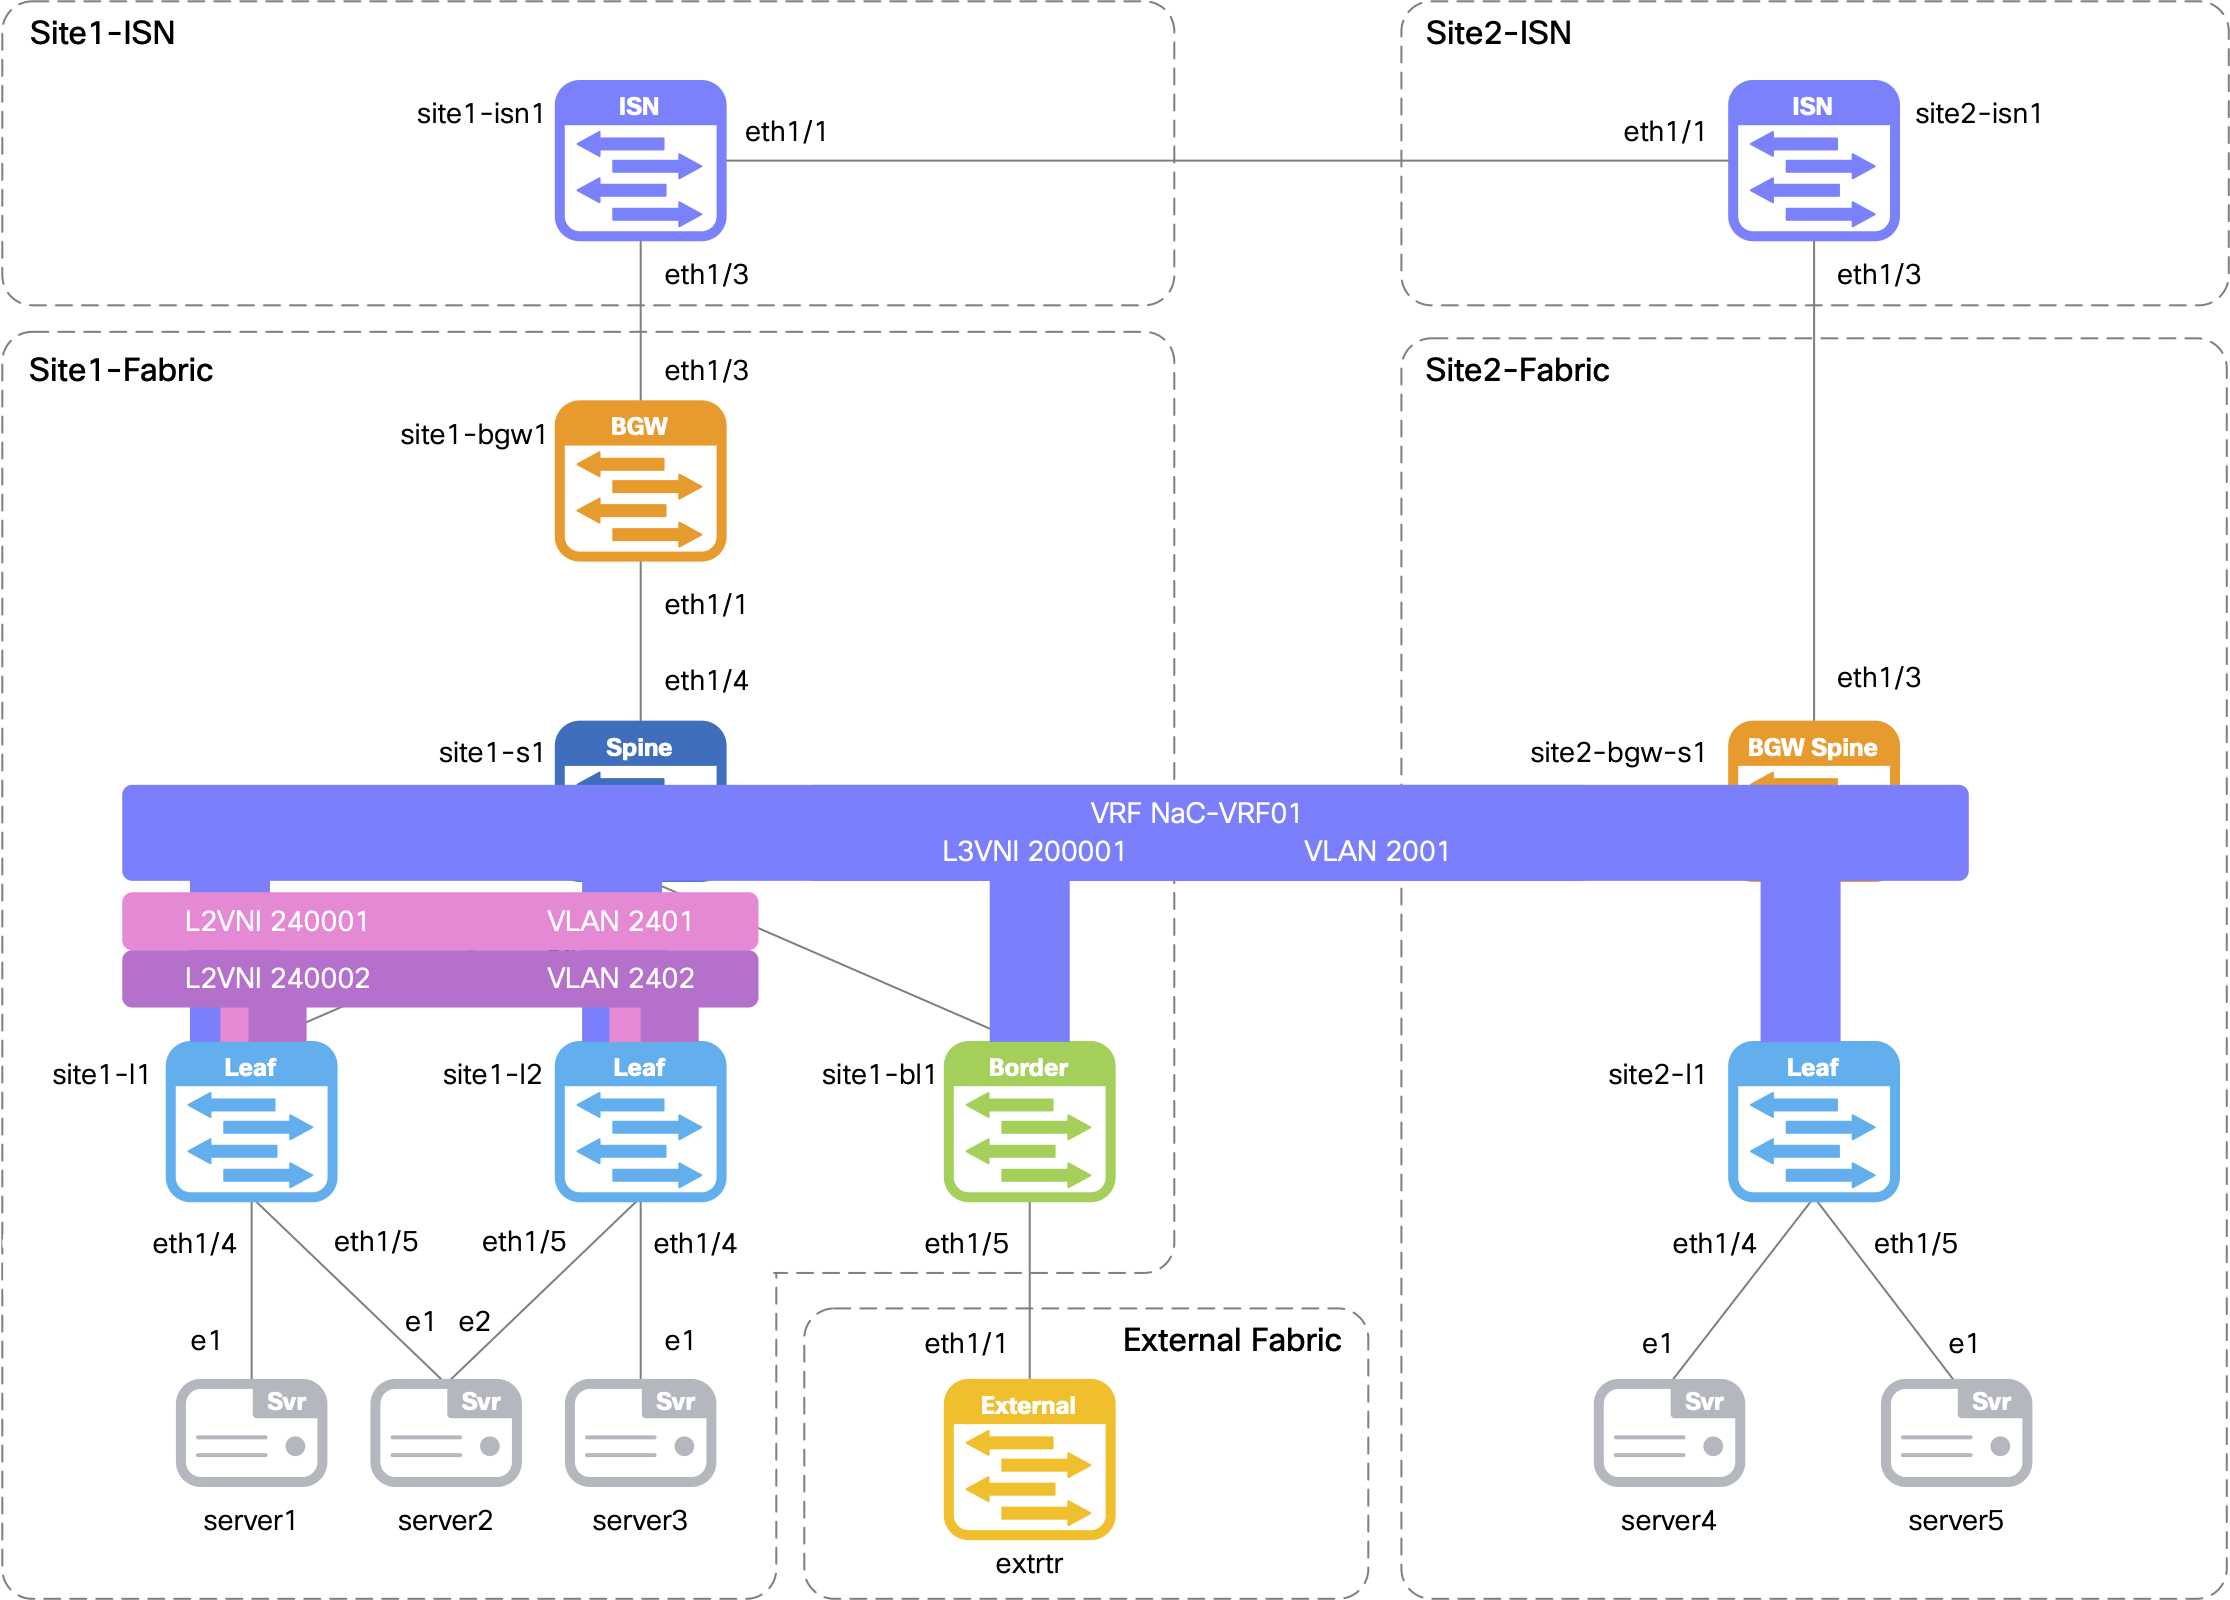
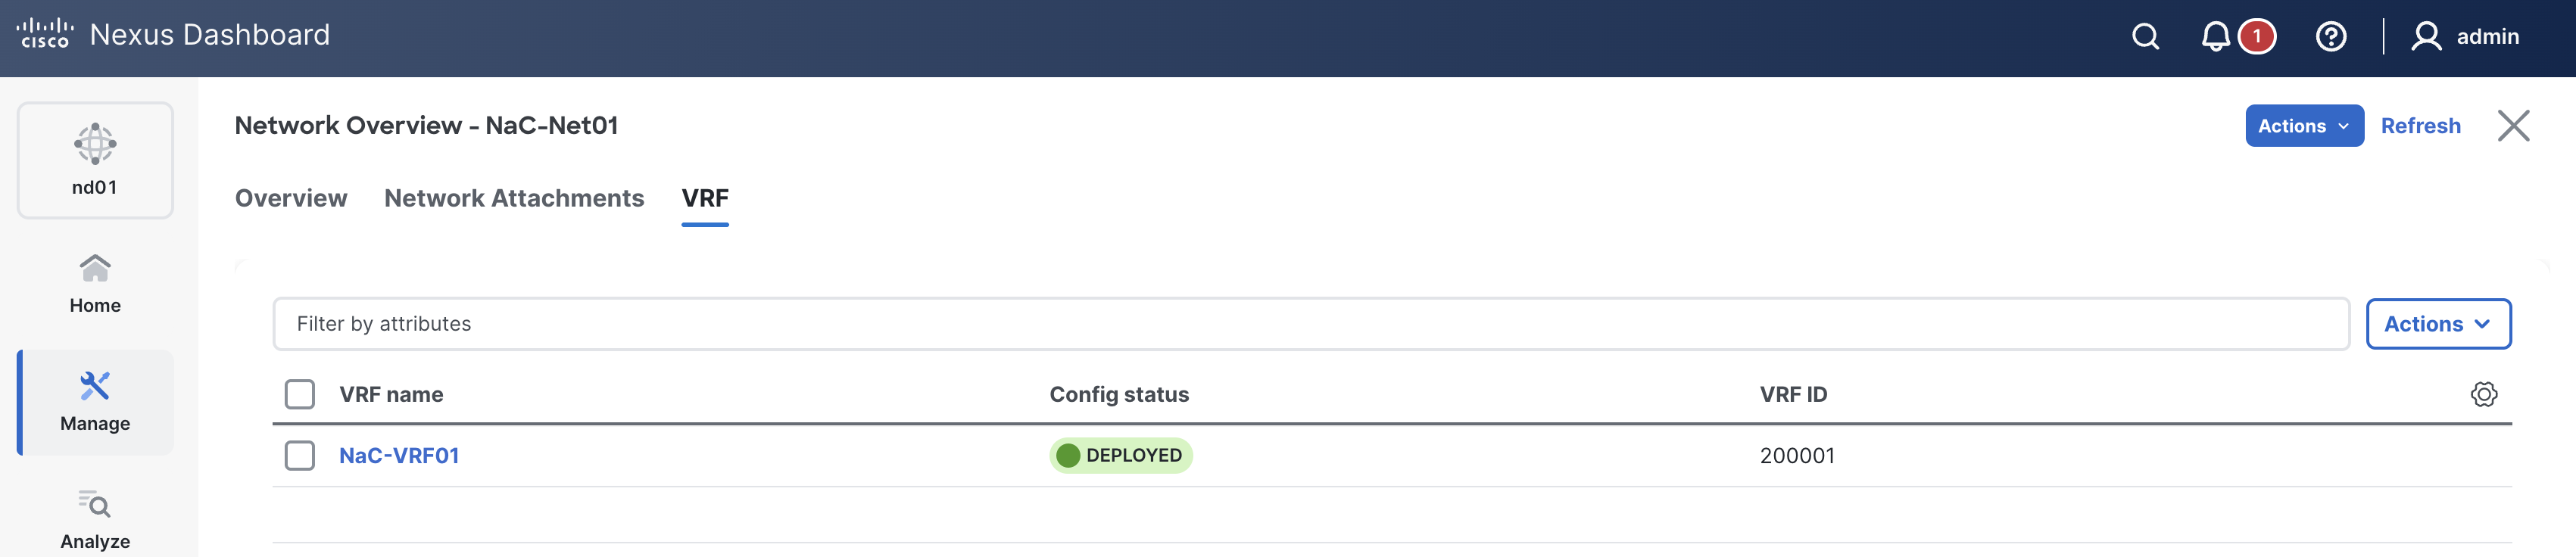
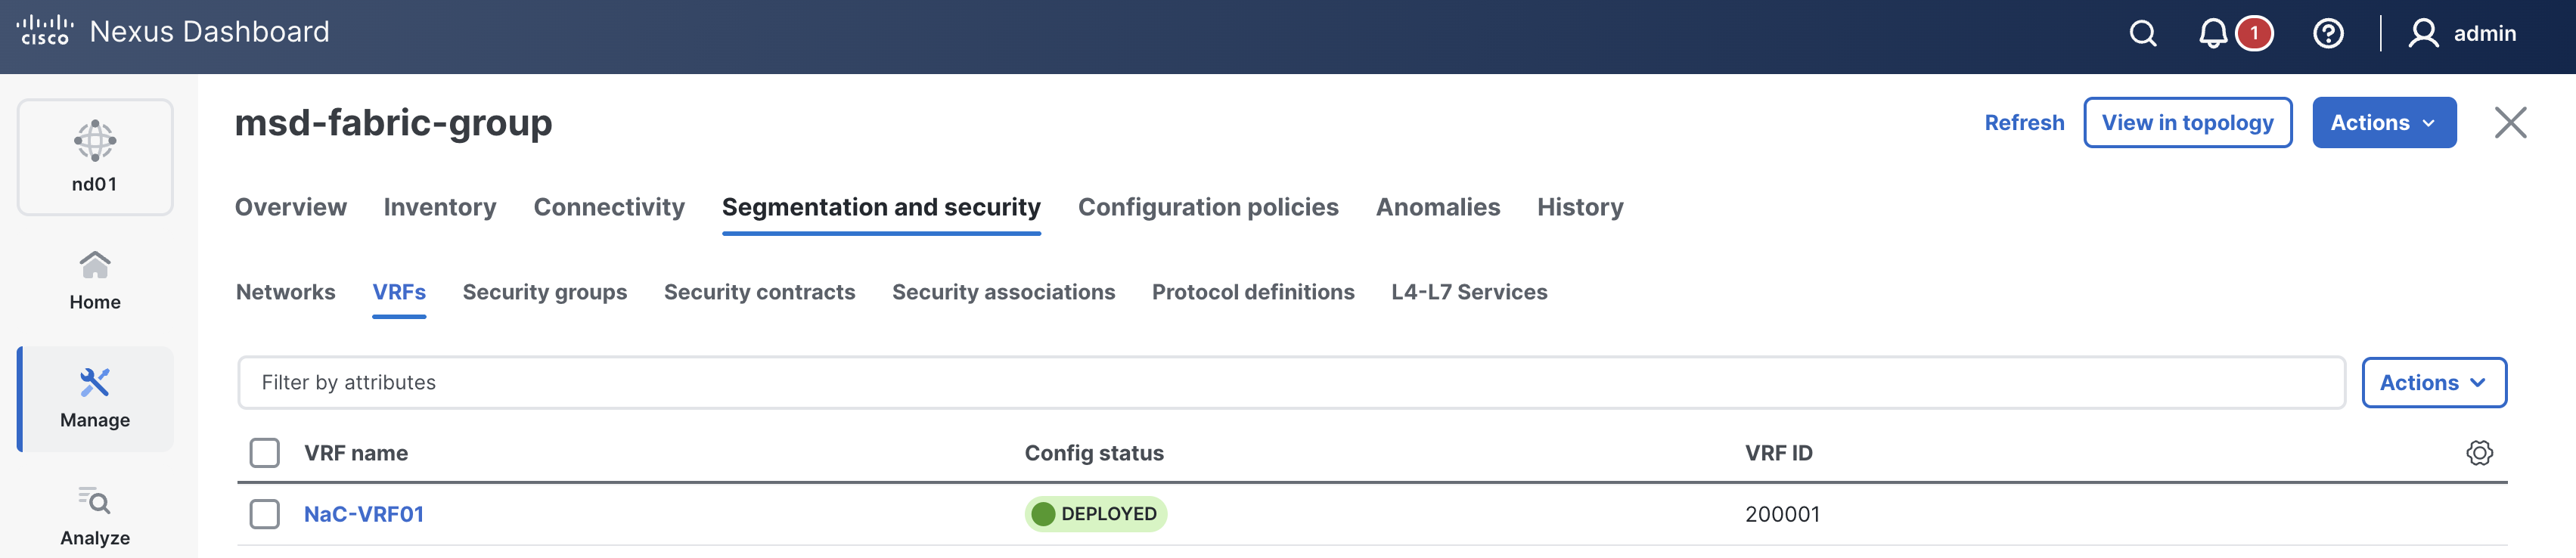
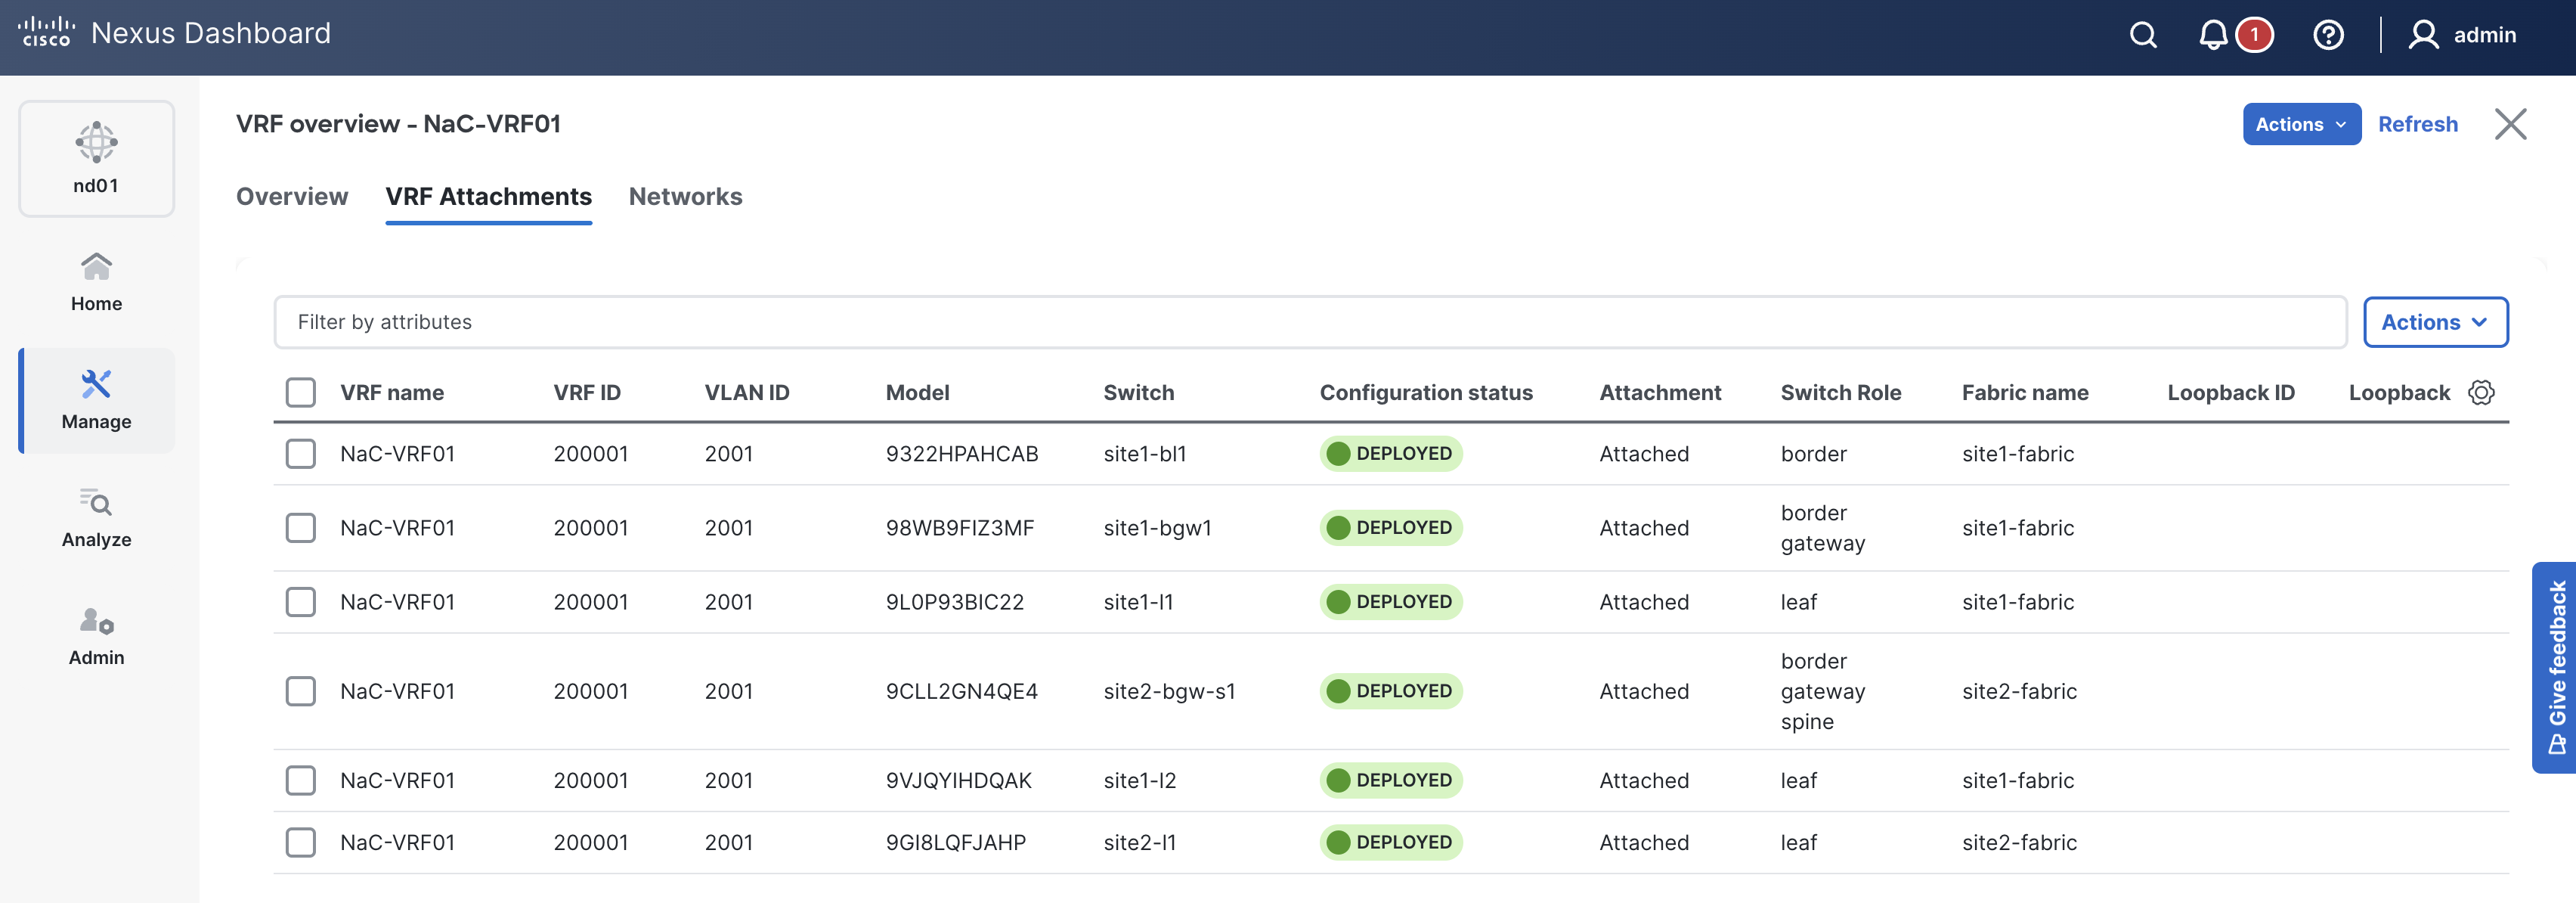
In this case, you have a single VRF named NaC-VRF01 that needs to be added to the file but now will be updated and associated to both Site1 and Site2 fabrics,
thus extending the VRF across the Multi-Site fabric.
Make note of two data model sections in this file:
child_fabrics parameter to associate the VRF to multiple child fabrics in the Multi-Site fabric group.
touch ~/workspace/ndlab/nac/host_vars/msd-fabric-group/vrfs.nac.yml
code-server -r ~/workspace/ndlab/nac/host_vars/msd-fabric-group/vrfs.nac.yml
---

vxlan:
  multisite:
    overlay:
      vrfs:
        - name: NaC-VRF01
          vrf_id: 200001
          vlan_id: 2001
          child_fabrics:
            - name: site1-fabric
            - name: site2-fabric
          vrf_attach_group: all
      vrf_attach_groups:
        - name: all
          switches:
            - hostname: site1-l1
            - hostname: site1-l2
            - hostname: site1-bl1
            - hostname: site1-bgw1
            - hostname: site2-l1
            - hostname: site2-bgw-s1
Create a multisite overlay Network file named networks.nac.yml. This file will contain the Network configuration for your Multi-Site fabric.
What is important in this situation is to ensure you move over any Networks from your existing child fabrics that continue to need to be part of the Multi-Site overlay.
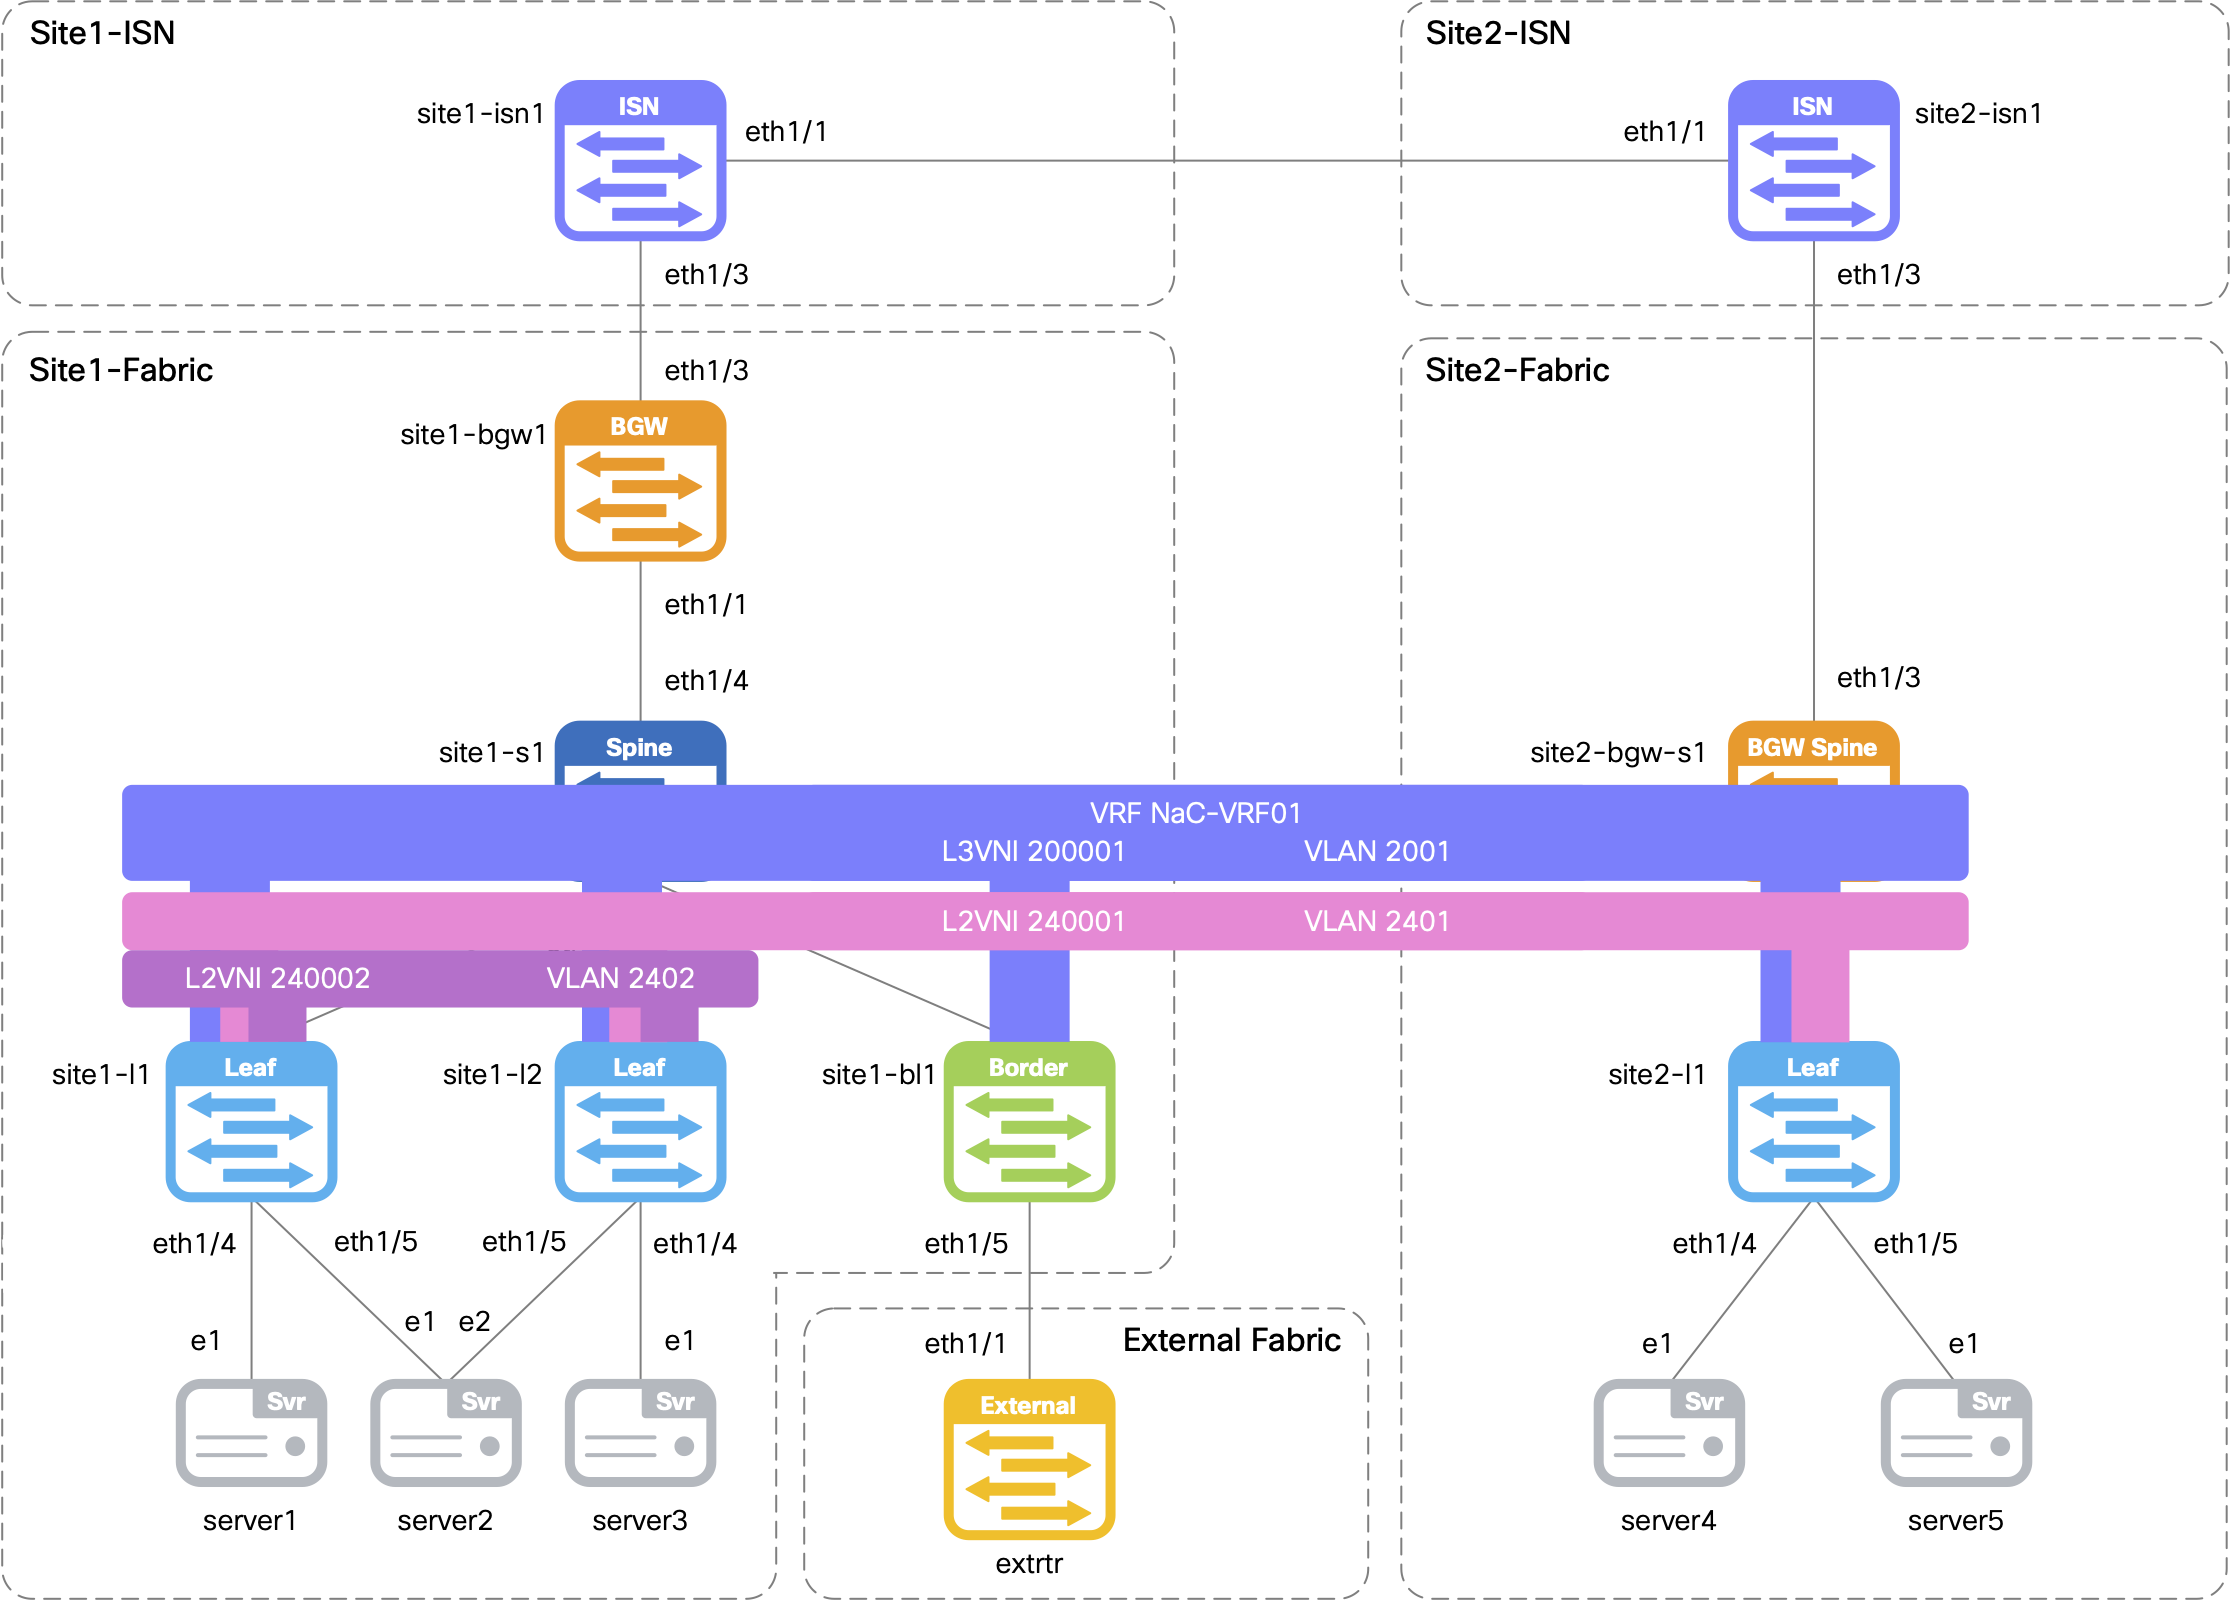
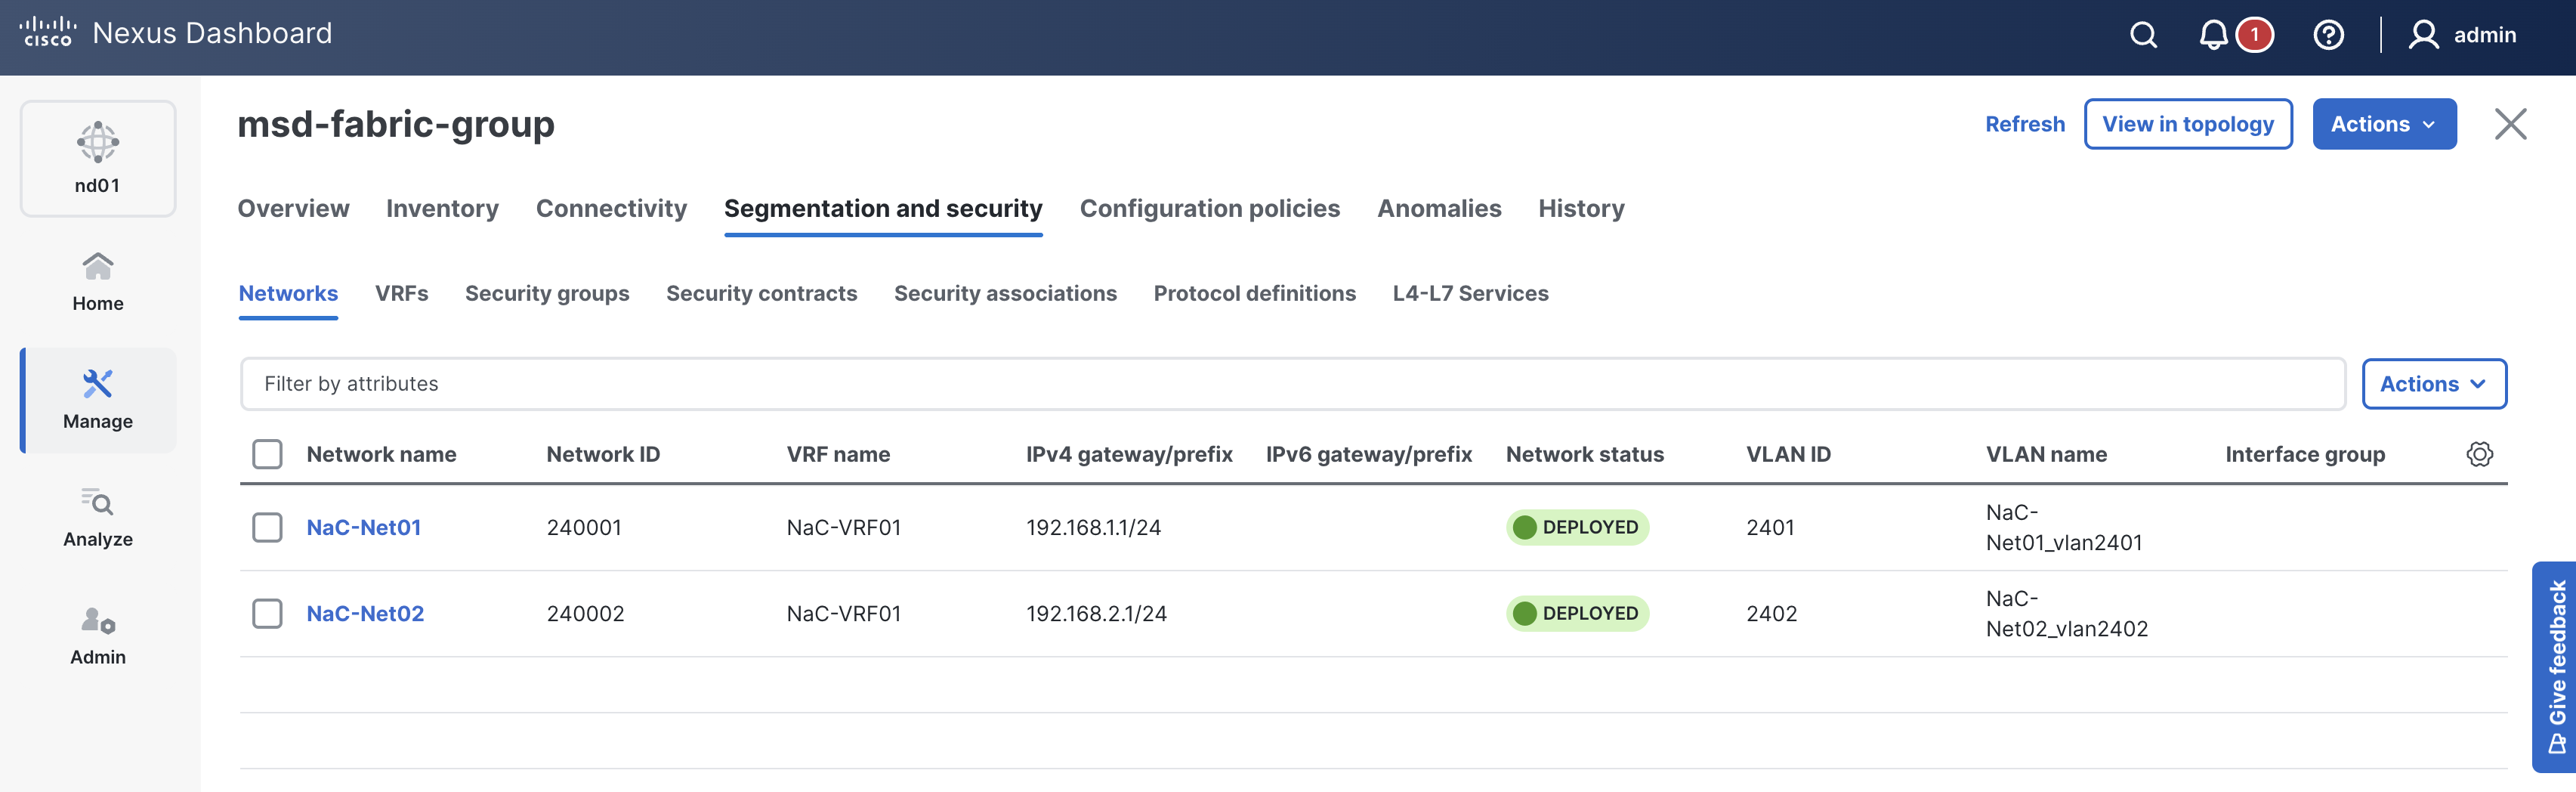
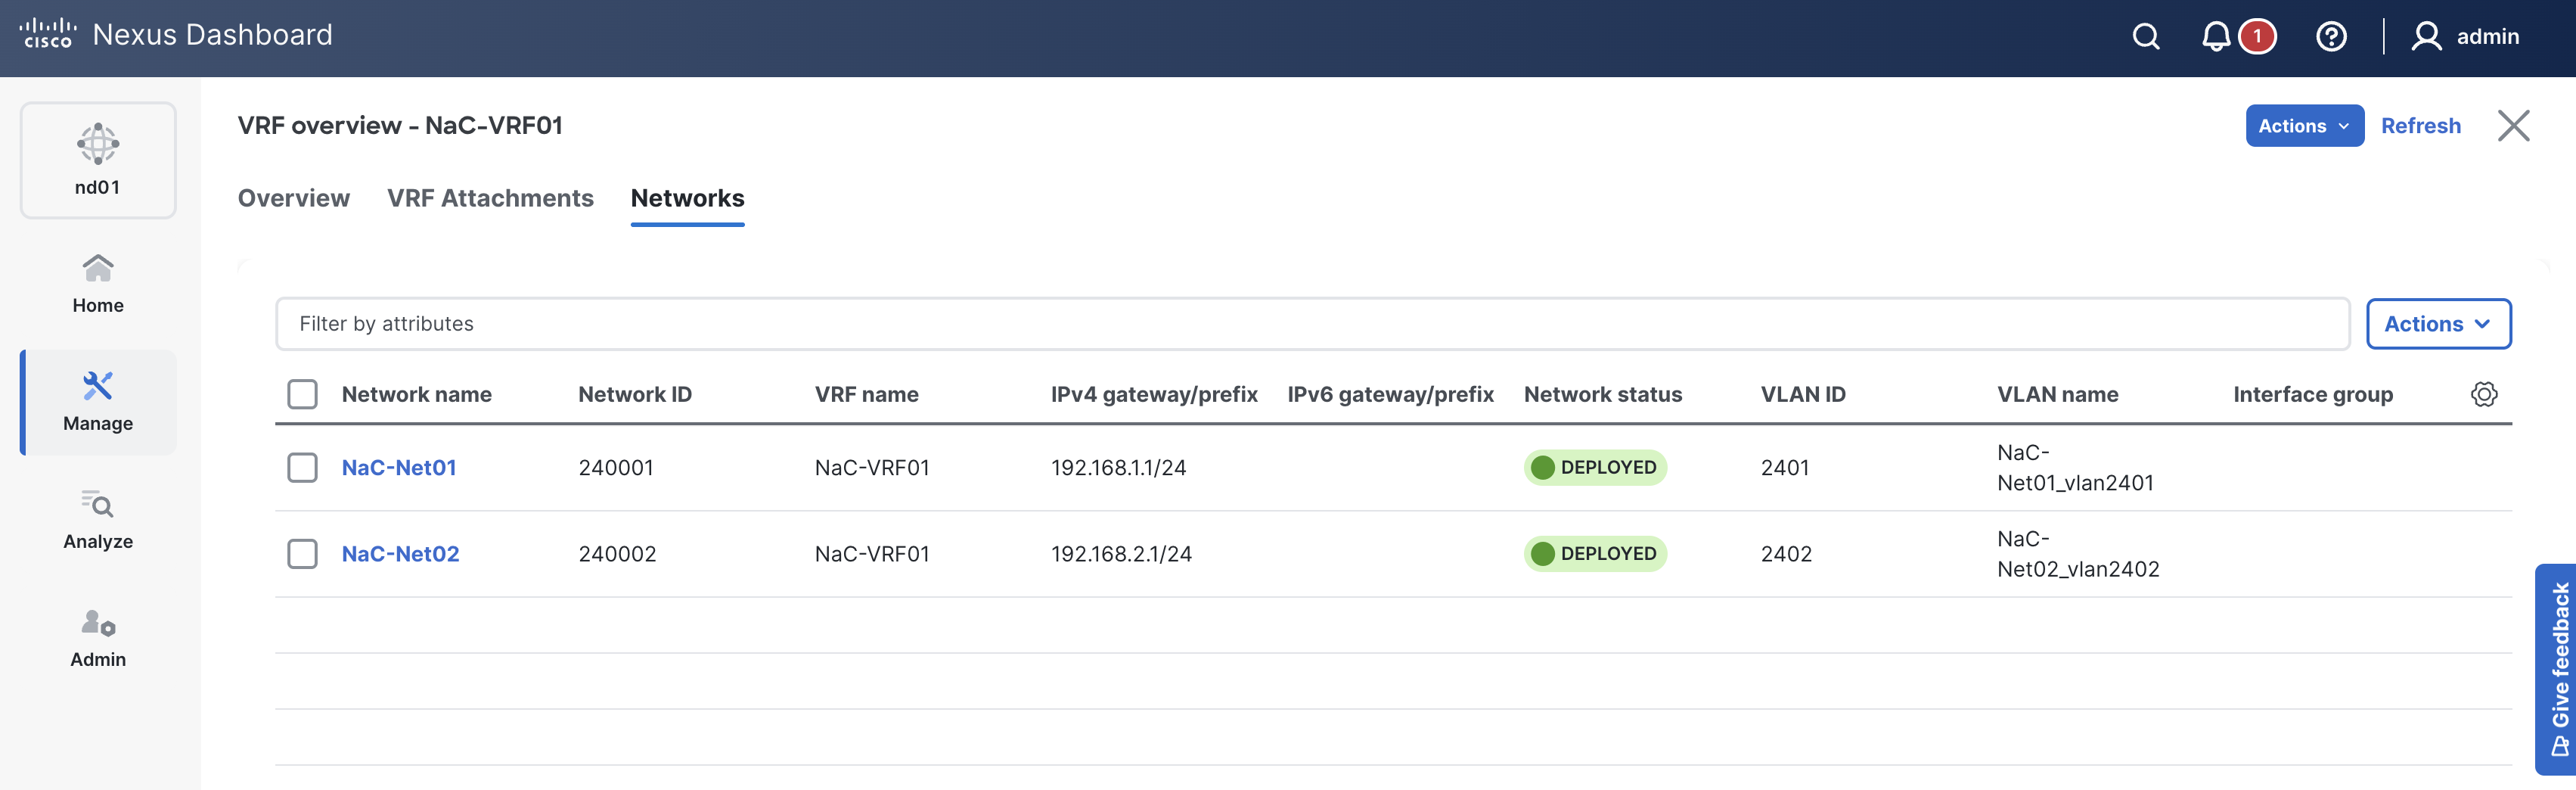
In this case, you have two Networks named NaC-Net01 and NaC-Net02 that need to be added to the file.
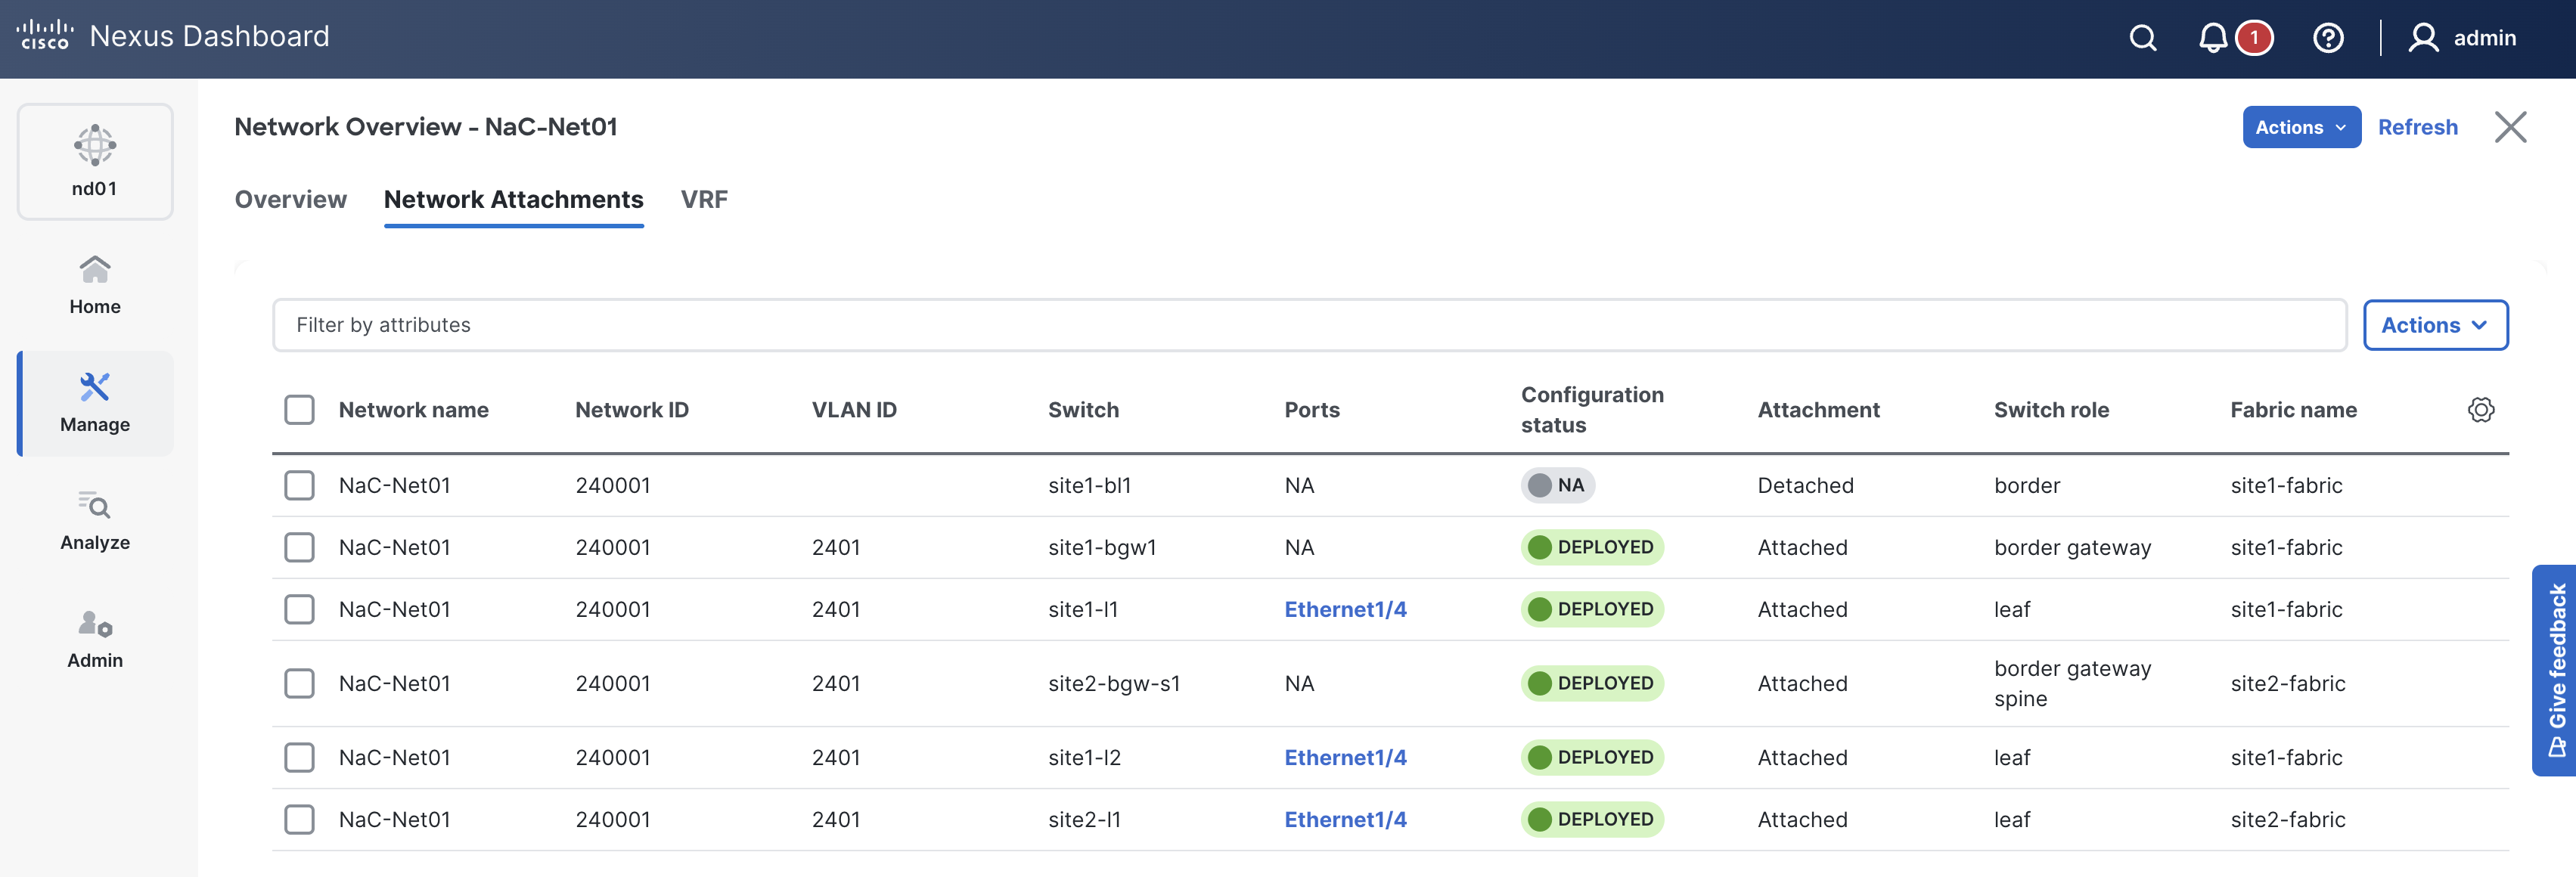
Additionally, you will extend NaC-Net01 from Site1 to Site2 by associating both child fabrics and updating the network attachment groups to include switches from both sites.
Again, make note of two data model sections in this file:
child_fabrics parameter to associate the Network to multiple child fabrics in the Multi-Site fabric group.
touch ~/workspace/ndlab/nac/host_vars/msd-fabric-group/networks.nac.yml
code-server -r ~/workspace/ndlab/nac/host_vars/msd-fabric-group/networks.nac.yml
---

vxlan:
  multisite:
    overlay:
      networks:
        - name: NaC-Net01
          vrf_name: NaC-VRF01
          net_id: 240001
          vlan_id: 2401
          vlan_name: NaC-Net01_vlan2401
          gw_ip_address: 192.168.1.1/24
          child_fabrics:
            - name: site1-fabric
            - name: site2-fabric
          network_attach_group: net01
        - name: NaC-Net02
          vrf_name: NaC-VRF01
          net_id: 240002
          vlan_id: 2402
          vlan_name: NaC-Net02_vlan2402
          gw_ip_address: 192.168.2.1/24
          child_fabrics:
            - name: site1-fabric
            - name: site2-fabric
          network_attach_group: net02
      network_attach_groups:
        - name: net01
          switches:
            - hostname: site1-l1
              ports:
                - ethernet1/4
            - hostname: site1-l2
              ports:
                - ethernet1/4
            - hostname: site1-bgw1
            - hostname: site2-l1
              ports:
                - ethernet1/4
            - hostname: site2-bgw-s1
        - name: net02
          switches:
            - hostname: site1-l1
              ports:
                - port-channel5
            - hostname: site1-l2
              ports:
                - port-channel5
Make sure you are in your root Ansible directory.
cd ~/workspace/ndlab/nac
From the root Ansible project directory execute the following command:
ansible-playbook -i hosts.msd.yml vxlan.yml
Upon a successful run of the playbook your output should look as follows:
  <... SNIP ...>

  PLAY RECAP **************************************************************************************************************************************************************************
  msd-fabric-group           : ok=46   changed=4    unreachable=0    failed=0    skipped=19   rescued=0    ignored=0


  PLAYBOOK RECAP ******************************************************************************************
  Playbook run took 0 days, 0 hours, 1 minutes, 16 seconds


  TASKS RECAP *********************************************************************************************
  Wednesday 03 June 2026  00:46:46 +0000 (0:00:00.050)       0:01:16.424 ********
  ===============================================================================
  cisco.nac_dc_vxlan.deploy : Execute Deploy of Resources ----------------------------------------- 37.09s
  cisco.nac_dc_vxlan.create : Execute Create Resources -------------------------------------------- 18.43s
  cisco.nac_dc_vxlan.remove : Execute Remove Resources --------------------------------------------- 7.18s
  cisco.nac_dc_vxlan.connectivity_check : Get Cisco Nexus Dashboard Fabric Controller Version ------ 1.64s
  cisco.nac_dc_vxlan.common : Build Resources ------------------------------------------------------ 1.35s
  cisco.nac_dc_vxlan.validate : Copy Service Model Data to Host ------------------------------------ 0.80s
  cisco.nac_dc_vxlan.connectivity_check : Verify Authorization to Nexus Dashboard ------------------ 0.76s
  cisco.nac_dc_vxlan.validate : Copy Extended Service Model Data to Host --------------------------- 0.62s
  cisco.nac_dc_vxlan.connectivity_check : Verify Connection to Nexus Dashboard --------------------- 0.54s
  cisco.nac_dc_vxlan.validate : Move Golden Service Model Data Previous ---------------------------- 0.51s
  cisco.nac_dc_vxlan.validate : Stat Factory Defaults ---------------------------------------------- 0.50s
  cisco.nac_dc_vxlan.connectivity_check : Get Cisco Nexus Dashboard Version ------------------------ 0.44s
  cisco.nac_dc_vxlan.validate : Stat Current Extended Service Model Data --------------------------- 0.39s
  cisco.nac_dc_vxlan.validate : Stat the Extended Service Model Data ------------------------------- 0.37s
  cisco.nac_dc_vxlan.validate : Stat the Golden Service Model Data --------------------------------- 0.37s
  cisco.nac_dc_vxlan.validate : Stat Current Golden Service Model Data ----------------------------- 0.35s
  cisco.nac_dc_vxlan.validate : Move Extended Service Model Data Previous -------------------------- 0.34s
  cisco.nac_dc_vxlan.remove : Display Remove Resources Summary ------------------------------------- 0.26s
  cisco.nac_dc_vxlan.common : Display Change Flag Values ------------------------------------------- 0.24s
  cisco.nac_dc_vxlan.create : Display Create Resources Summary ------------------------------------- 0.23s

  ROLES RECAP *********************************************************************************************
  Wednesday 03 June 2026  00:46:46 +0000 (0:00:00.050)       0:01:16.423 ********
  ===============================================================================
  deploy ----------------------------------------------------------------- 37.25s
  create ----------------------------------------------------------------- 18.71s
  remove ------------------------------------------------------------------ 7.54s
  validate ---------------------------------------------------------------- 6.75s
  connectivity_check ------------------------------------------------------ 3.75s
  common ------------------------------------------------------------------ 2.07s
  common_global ----------------------------------------------------------- 0.05s
  ~~~~~~~~~~~~~~~~~~~~~~~~~~~~~~~~~~~~~~~~~~~~~~~~~~~~~~~~~~~~~~~~~~~~~~~~~~~~~~~
  total ------------------------------------------------------------------ 76.12s
Return to your ND browser where you should be sitting on the Switches tab
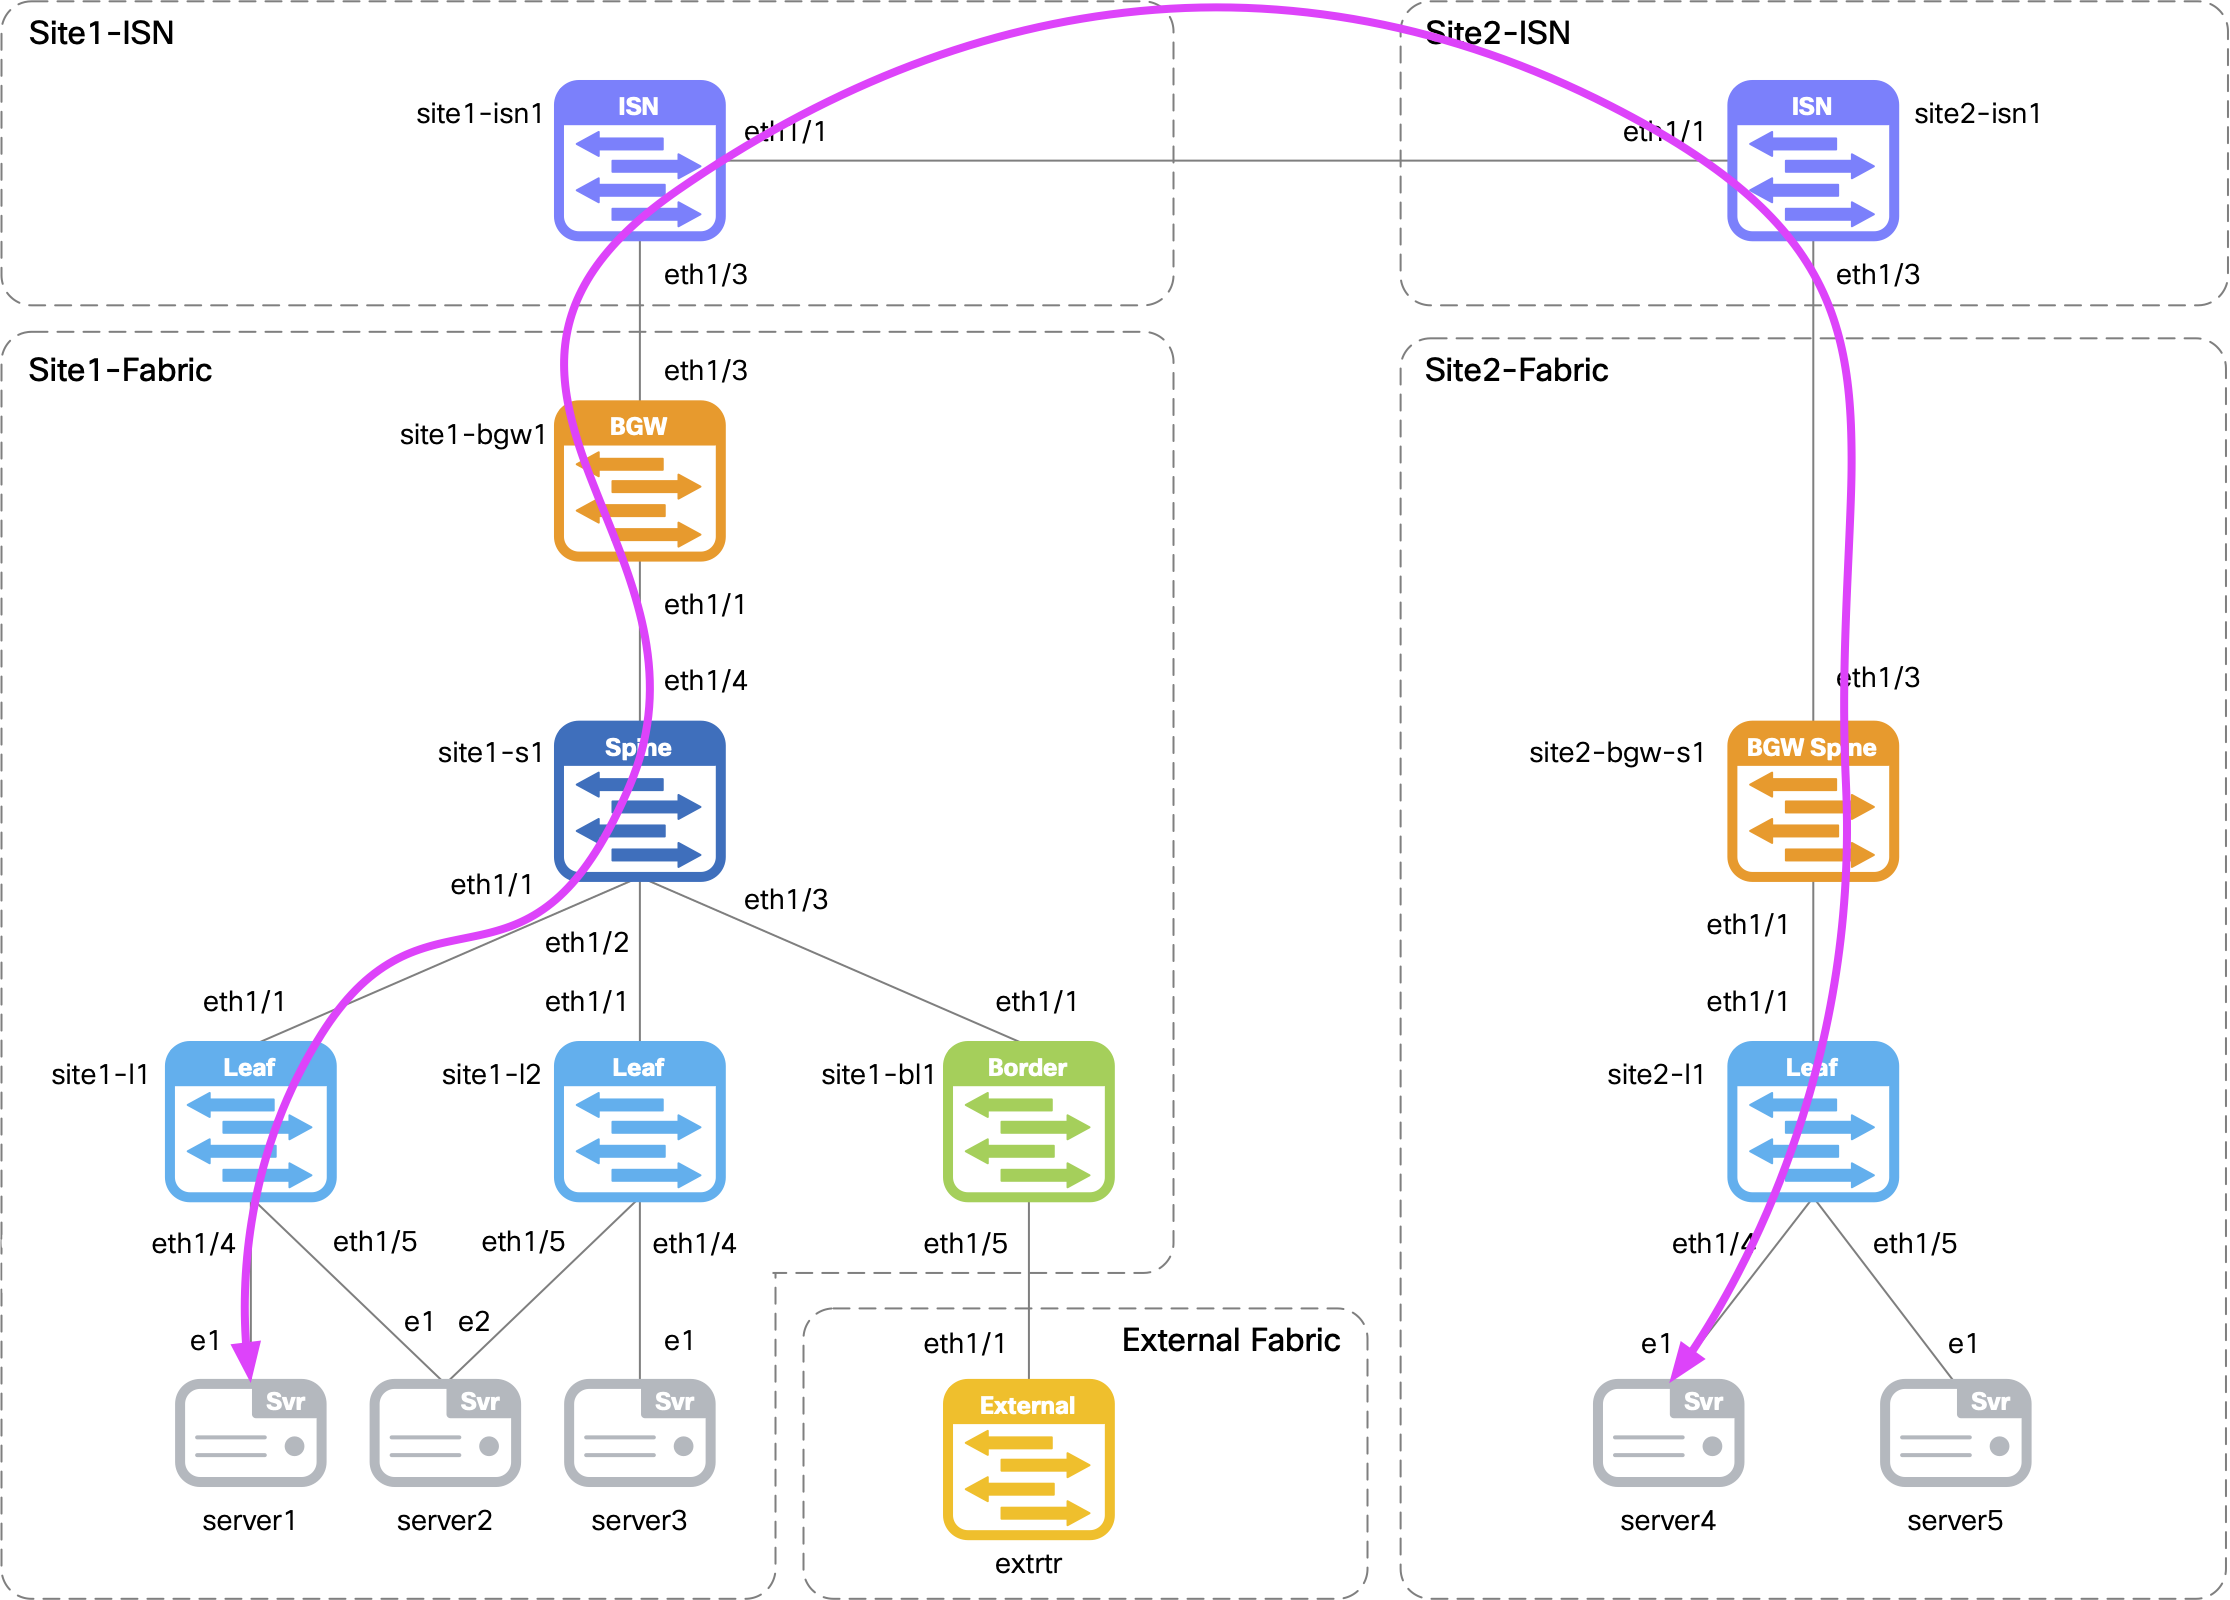
Return to your terminal window and connect to Server4 located in Site2 to verify connectivity over the Multi-Site overlay to Server1 located in Site1.
If prompted to accept the RSA key fingerprint like below, type or copy yes then input the password above.
When prompted, the password is cisco.123 .
ssh -l cisco 10.15.9.104
cisco@10.15.9.104's password:
Initiate a ping from Server4 to Server1's IP address of 192.168.1.101.
ping -c 5 192.168.1.101
Output:
PING 192.168.1.101 (192.168.1.101): 56 data bytes
64 bytes from 192.168.1.101: seq=0 ttl=253 time=11.631 ms
64 bytes from 192.168.1.101: seq=1 ttl=253 time=10.717 ms
64 bytes from 192.168.1.101: seq=2 ttl=253 time=11.234 ms
64 bytes from 192.168.1.101: seq=3 ttl=253 time=10.291 ms
64 bytes from 192.168.1.101: seq=4 ttl=253 time=11.116 ms

--- 192.168.1.101 ping statistics ---
5 packets transmitted, 5 packets received, 0% packet loss
round-trip min/avg/max = 10.291/10.997/11.631 ms
Disconnect from Server4 by typing exit.
exit
Connection to 10.15.9.104 closed.
Navigate back to your VSCode application.
Continue to the next section to add custom validation before bringing everything you have done locally with ND and NaC into a NetDevOps pipeline.