To begin building Site1's fabric, you will need to create a set of YAML files that define the fabric, global settings, underlay, and other parameters. These files will be used by Ansible to create and manage the fabric in ND.
Create the fabric.nac.yml file in the host_vars/site1-fabric directory. This file will contain the fabric name and type.
Note that the actual filename does not matter, rather the keys and values within the file need to follow the VXLAN as Code Data Model structure.
touch ~/workspace/ndlab/nac/host_vars/site1-fabric/fabric.nac.yml
code-server -r ~/workspace/ndlab/nac/host_vars/site1-fabric/fabric.nac.yml
Copy and paste the following content into the fabric.nac.yml file that is now open in your VSCode editor.
---

vxlan:
  fabric:
    name: site1-fabric
    type: VXLAN_EVPN
Next, you will create the global.nac.yml file in the host_vars/site1-fabric directory. This file will contain global settings for the fabric, such as BGP ASN, route reflectors, DNS servers, NTP servers, and bootstrap settings.
touch ~/workspace/ndlab/nac/host_vars/site1-fabric/global.nac.yml
code-server -r ~/workspace/ndlab/nac/host_vars/site1-fabric/global.nac.yml
Copy and paste the following content into the global.nac.yml file that is now open in your VSCode editor.
---

vxlan:
  global:
    ibgp:
      bgp_asn: "65001"
      route_reflectors: 2
      anycast_gateway_mac: 1234.5678.9000
      dns_servers:
        - ip_address: 10.0.249.16
          vrf: management
      ntp_servers:
        - ip_address: 10.81.254.131
          vrf: management
      bootstrap:
        enable_bootstrap: true
        enable_local_dhcp_server: true
        dhcp_version: DHCPv4
        dhcp_v4:
          scope_start_address: 10.15.9.200
          scope_end_address: 10.15.9.201
          switch_mgmt_default_gw: 10.15.9.1
          mgmt_prefix: 24
You will then create the underlay.nac.yml file in the host_vars/site1-fabric directory. This file will contain underlay settings for the fabric, such as routing protocol to use, IP addressing, and multicast settings.
touch ~/workspace/ndlab/nac/host_vars/site1-fabric/underlay.nac.yml
code-server -r ~/workspace/ndlab/nac/host_vars/site1-fabric/underlay.nac.yml
Copy and paste the following content into the underlay.nac.yml file that is now open in your VSCode editor.
---

vxlan:
  underlay:
    general:
      routing_protocol: ospf
      underlay_routing_loopback_id: 0
      underlay_routing_protocol_tag: UNDERLAY
      underlay_vtep_loopback_id: 1
      replication_mode: multicast
    ipv4:
      fabric_interface_numbering: p2p
      subnet_mask: 31
      underlay_routing_loopback_ip_range: 10.11.0.0/22
      underlay_vtep_loopback_ip_range: 10.111.100.0/22
      underlay_rp_loopback_ip_range: 10.251.251.0/24
      underlay_subnet_ip_range: 10.1.0.0/16
    ospf:
      area_id: 0.0.0.0
    multicast:
      underlay_rp_loopback_id: 251
      rp_mode: asm
The Ansible inventory file defines how Ansible will connect and authenticate with ND in conjunction with the group_vars and host_vars files you created earlier.
touch ~/workspace/ndlab/nac/hosts.site1.yml
cat << EOF > ~/workspace/ndlab/nac/hosts.site1.yml
---
# Inventory Information For Site1 Fabric
nd:
  hosts:
    site1-fabric:
      ansible_host: 10.15.0.35
EOF
Now you need to create the main or top-level Ansible playbook that will be used to build the fabric.
This playbook is the main entry point for all roles and tasks used to manage your fabric through ND. It will be reused for all fabrics you create in
this lab as the host group that it targets is the nd group, which will be the group all of your fabrics are a part of.
touch ~/workspace/ndlab/nac/vxlan.yml
cat << EOF > ~/workspace/ndlab/nac/vxlan.yml
---
# This is the main entry point playbook for calling the various
# roles in this collection.
- name: Main Playbook
  hosts: nd
  any_errors_fatal: true
  gather_facts: false

  roles:
    # -----------------------
    # DataCenter Roles
    # cisco.nac_dc_vxlan.dtc manages direct to controller ND workflows
    #
    - role: cisco.nac_dc_vxlan.dtc.create
      tags: 'role_create'
    - role: cisco.nac_dc_vxlan.dtc.deploy
      tags: 'role_deploy'
    - role: cisco.nac_dc_vxlan.dtc.remove
      tags: 'role_remove'
EOF
Make sure you are in your root Ansible directory.
cd ~/workspace/ndlab/nac
From the root Ansible project directory execute the following command:
ansible-playbook -i hosts.site1.yml vxlan.yml
Upon a successful run of the playbook your output should look as follows:
  <... SNIP ...>

  PLAY RECAP **********************************************************************************************************************************************************************
  site1-fabric               : ok=45   changed=4    unreachable=0    failed=0    skipped=20   rescued=0    ignored=0


  PLAYBOOK RECAP *******************************************************************************************
  Playbook run took 0 days, 0 hours, 0 minutes, 30 seconds


  TASKS RECAP **********************************************************************************************
  Tuesday 02 June 2026  21:18:51 +0000 (0:00:00.050)       0:00:30.686 **********
  =============================================================================
  cisco.nac_dc_vxlan.create : Execute Create Resources --------------------------------------------- 12.86s
  cisco.nac_dc_vxlan.common : Build Resources ------------------------------------------------------- 3.15s
  cisco.nac_dc_vxlan.connectivity_check : Get Cisco Nexus Dashboard Fabric Controller Version ------- 1.70s
  cisco.nac_dc_vxlan.remove : Execute Remove Resources ---------------------------------------------- 1.29s
  cisco.nac_dc_vxlan.deploy : Execute Deploy of Resources ------------------------------------------- 1.28s
  cisco.nac_dc_vxlan.deploy : Execute Deploy of Resources ------------------------------------------- 1.26s
  cisco.nac_dc_vxlan.validate : Copy Service Model Data to Host ------------------------------------- 0.79s
  cisco.nac_dc_vxlan.connectivity_check : Verify Authorization to Nexus Dashboard ------------------- 0.78s
  cisco.nac_dc_vxlan.validate : Copy Extended Service Model Data to Host ---------------------------- 0.61s
  cisco.nac_dc_vxlan.validate : Stat Factory Defaults ----------------------------------------------- 0.53s
  cisco.nac_dc_vxlan.connectivity_check : Verify Connection to Nexus Dashboard ---------------------- 0.52s
  cisco.nac_dc_vxlan.connectivity_check : Get Cisco Nexus Dashboard Version ------------------------- 0.44s
  cisco.nac_dc_vxlan.validate : Stat the Golden Service Model Data ---------------------------------- 0.34s
  cisco.nac_dc_vxlan.validate : Stat the Extended Service Model Data -------------------------------- 0.31s
  cisco.nac_dc_vxlan.common : Create Fact To Store Common Role Path --------------------------------- 0.23s
  cisco.nac_dc_vxlan.remove : Log Deploy During Remove Info Message --------------------------------- 0.21s
  cisco.nac_dc_vxlan.common : Display Change Flag Values -------------------------------------------- 0.21s
  cisco.nac_dc_vxlan.create : Display Create Resources Summary -------------------------------------- 0.20s
  cisco.nac_dc_vxlan.remove : Display Remove Resources Summary -------------------------------------- 0.19s
  cisco.nac_dc_vxlan.validate : Validate NDFC Service Model Data ------------------------------------ 0.19s

  ROLES RECAP **********************************************************************************************
  Tuesday 02 June 2026  21:18:51 +0000 (0:00:00.051)       0:00:30.685 **********
  ===============================================================================
  create ----------------------------------------------------------------- 13.12s
  validate ---------------------------------------------------------------- 5.16s
  common ------------------------------------------------------------------ 3.86s
  connectivity_check ------------------------------------------------------ 3.80s
  deploy ------------------------------------------------------------------ 2.66s
  remove ------------------------------------------------------------------ 1.74s
  common_global ----------------------------------------------------------- 0.05s
  ~~~~~~~~~~~~~~~~~~~~~~~~~~~~~~~~~~~~~~~~~~~~~~~~~~~~~~~~~~~~~~~~~~~~~~~~~~~~~~~
  total ------------------------------------------------------------------ 30.39s
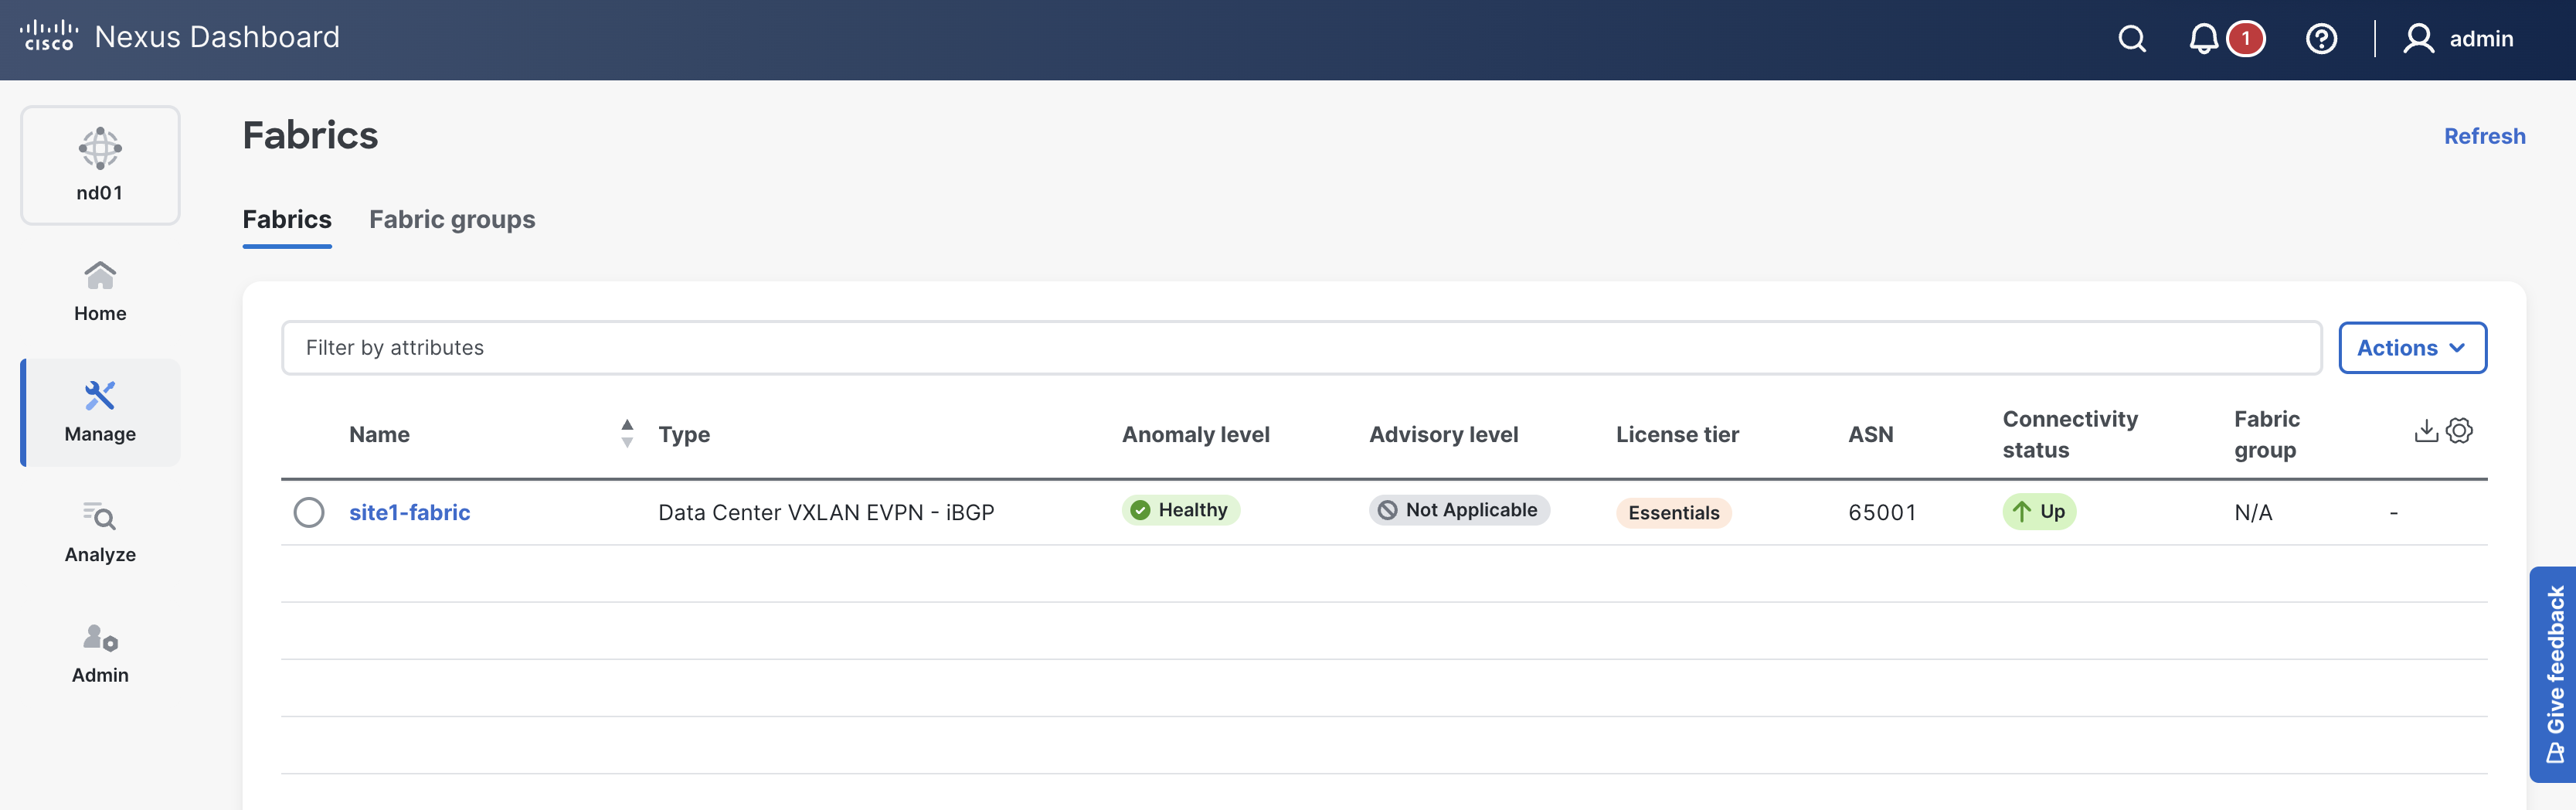
Return to ND in your browser where you should still be sitting at the Fabrics dashboard. After the playbook has run, verify your Site1 fabric has been created by Ansible.
You should see the fabric site1-fabric in the list of fabrics.
Ansible created this fabric using your YAML variables and ND's default settings. The fabric is empty at this point.
If your site1-fabric is not showing, please try clicking the Refresh button in the top-right of the Fabrics pane.
Each time you run the Ansible playbook in this vxlan-as-code section of the lab you will notice
a set of dependency roles and tasks within these roles get run before the
cisco.nac_dc_vxlan.dtc.create role is executed.
The dependency roles are the:
cisco.nac_dc_vxlan.dtc.connectivity_check role,
cisco.nac_dc_vxlan.validate role, and the
cisco.nac_dc_vxlan.common role.
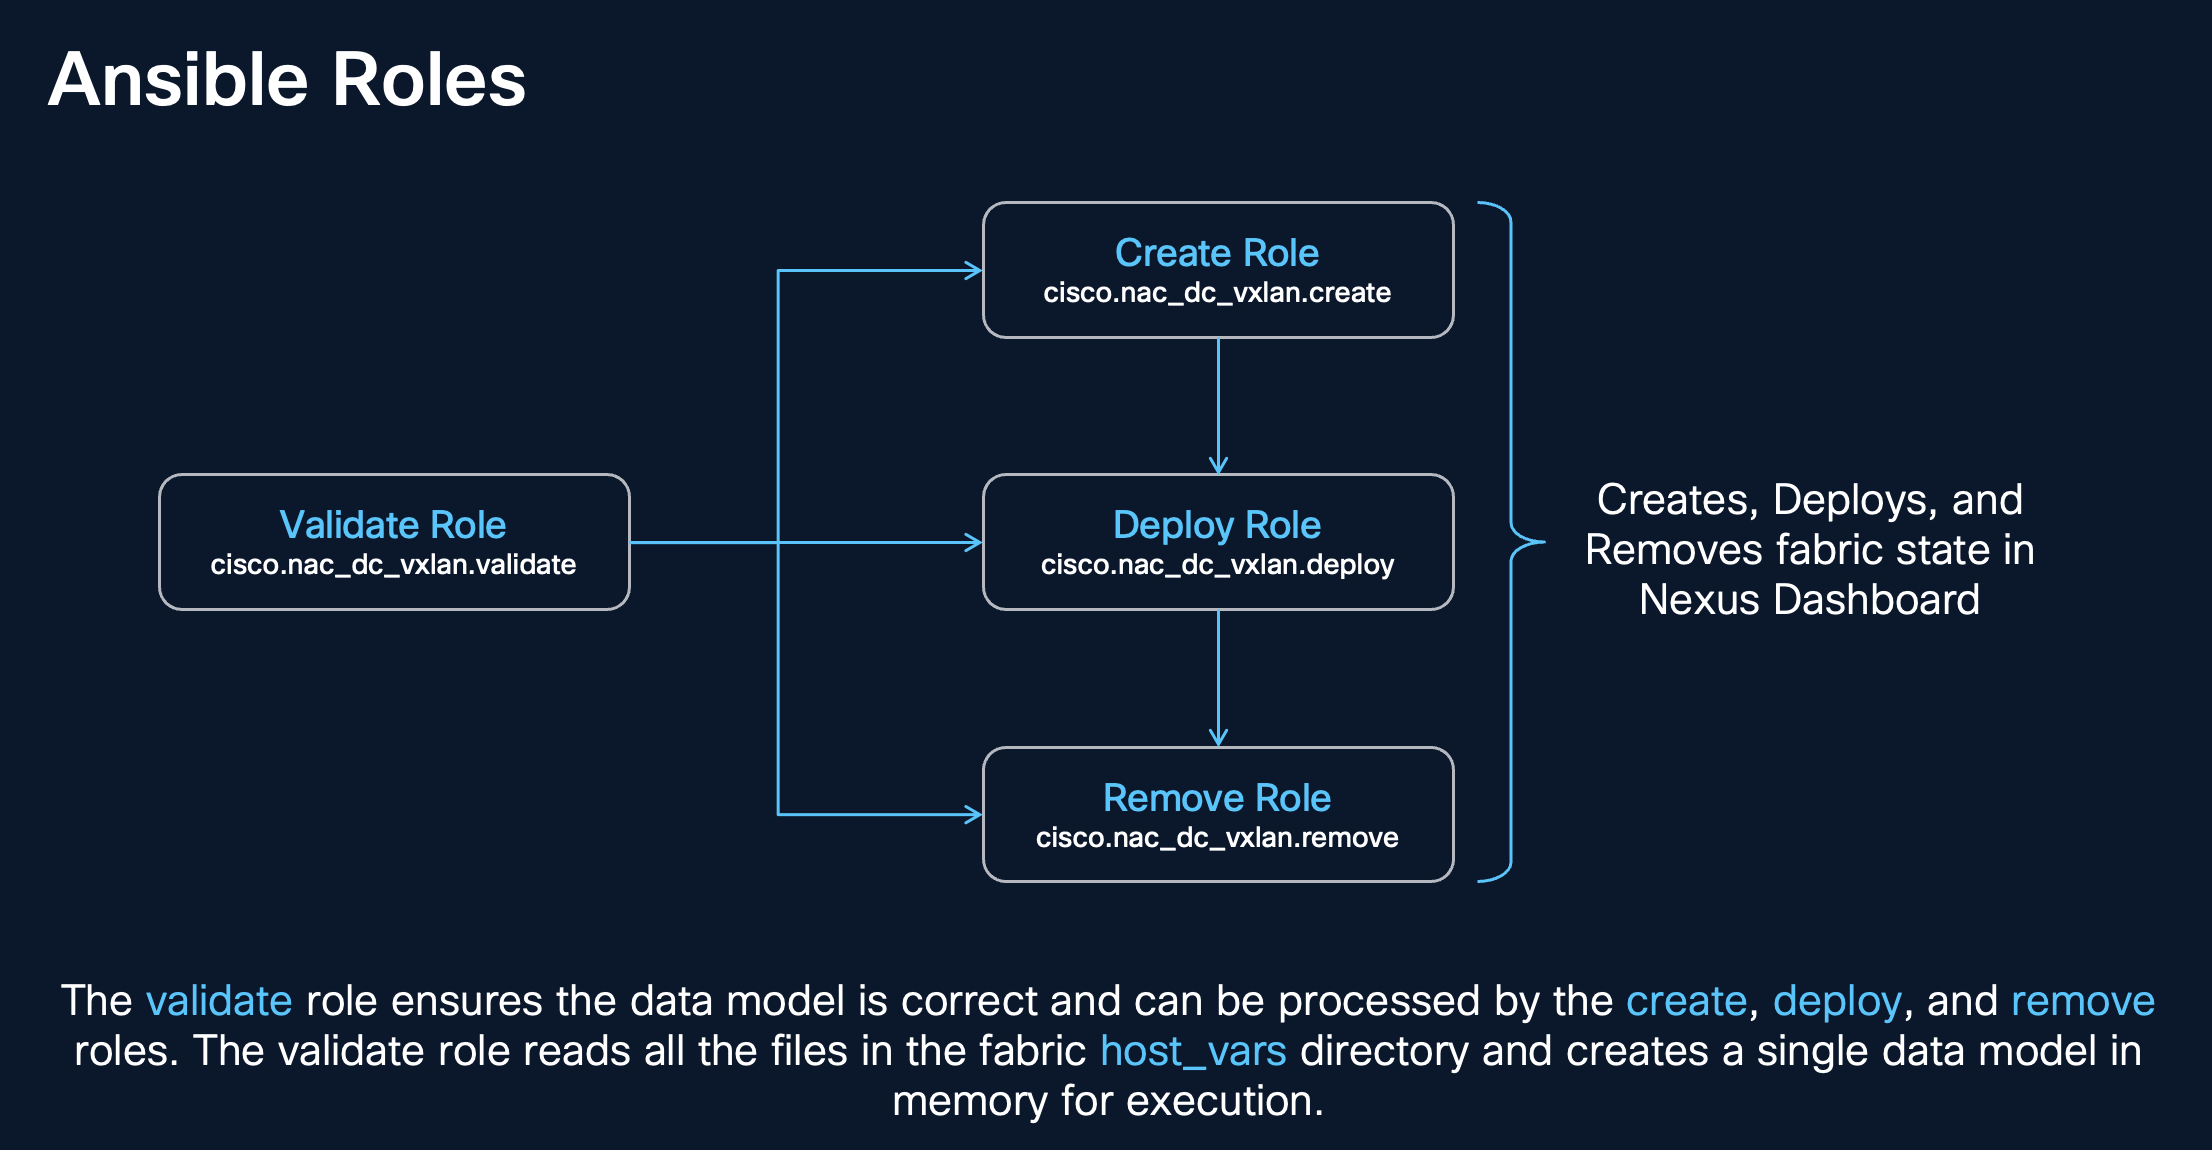
The diagram below illustrates the dependencies of the cisco.nac_dc_vxlan.dtc.create role and the various tasks that run in each role.
The cisco.nac_dc_vxlan.dtc.create role is dependent on the:
cisco.nac_dc_vxlan.dtc.connectivity_check rolecisco.nac_dc_vxlan.validate rolecisco.nac_dc_vxlan.common rolecisco.nac_dc_vxlan.dtc.create role is the role that creates the fabric in ND.
As you can see from the ROLES RECAP, the dependency roles take around 75 seconds to run before the cisco.nac_dc_vxlan.dtc.create role is executed.
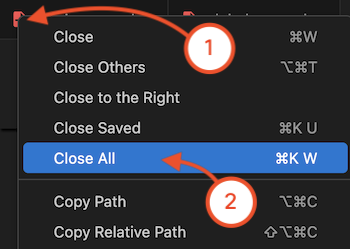
With DevOps toolchains, it is natural that you deal with a number of files. In an effort to keep your workspace in VSCode tidy and focused on your current tasks, you can use a shortcut to close files at the end of each section.
Navigate back to your VSCode application.
Please continue to the next section to start managing inventory in your Site1 fabric.