Under the topology section you can define the interfaces that will be configured on the switches in your fabric. You will create a new file named interfaces_access.nac.yml.
This file will contain the access interfaces to use per switch. It defines which VLAN to use as well as other parameters such as MTU, speed, and description.
Copy and paste the following content into the file.
touch ~/workspace/ndlab/nac/host_vars/site1-fabric/interfaces_access.nac.yml
code-server -r ~/workspace/ndlab/nac/host_vars/site1-fabric/interfaces_access.nac.yml
Copy and paste the following content into the interfaces_access.nac.yml file that is now open in your VSCode editor.
---
vxlan:
topology:
switches:
- name: site1-l1
interfaces:
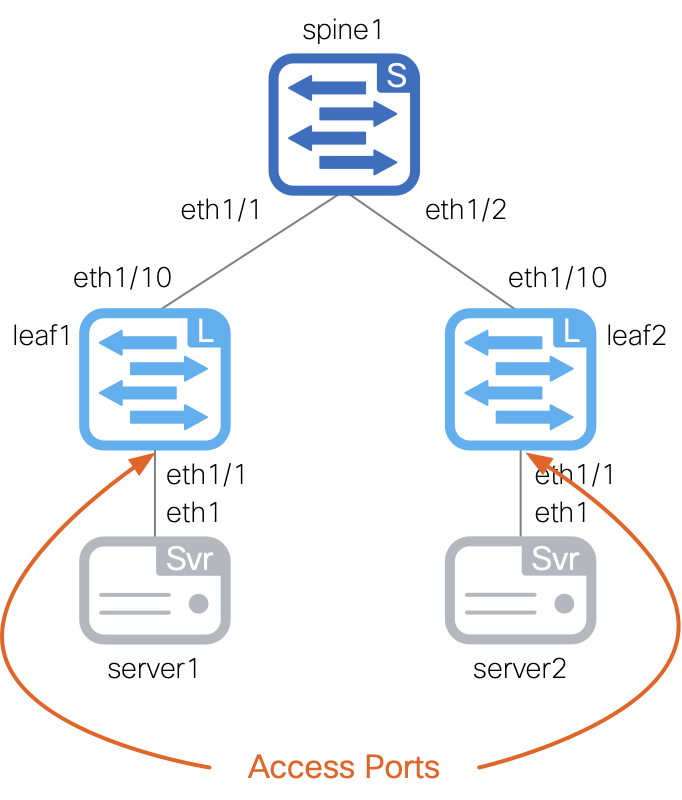
- name: Ethernet1/4
description: To Server1 E1
mode: access
enabled: true
mtu: jumbo
speed: auto
access_vlan: 2401
spanning_tree_portfast: true
- name: site1-l2
interfaces:
- name: Ethernet1/4
description: To Server3 E1
mode: access
enabled: true
mtu: jumbo
speed: auto
access_vlan: 2401
spanning_tree_portfast: true
In addition to the access interfaces, you will also create a new file named interfaces_vpc.nac.yml.
This file will contain the vPC interfaces to use per switch. It defines parameters such as vPC ID, port-channel mode, and port-channel member interfaces.
As you can see, you can easily split your interface definitions across multiple files to keep things organized.
touch ~/workspace/ndlab/nac/host_vars/site1-fabric/interfaces_vpc.nac.yml
code-server -r ~/workspace/ndlab/nac/host_vars/site1-fabric/interfaces_vpc.nac.yml
Copy and paste the following content into the interfaces_vpc.nac.yml file that is now open in your VSCode editor.
---
vxlan:
topology:
switches:
- name: site1-l1
interfaces:
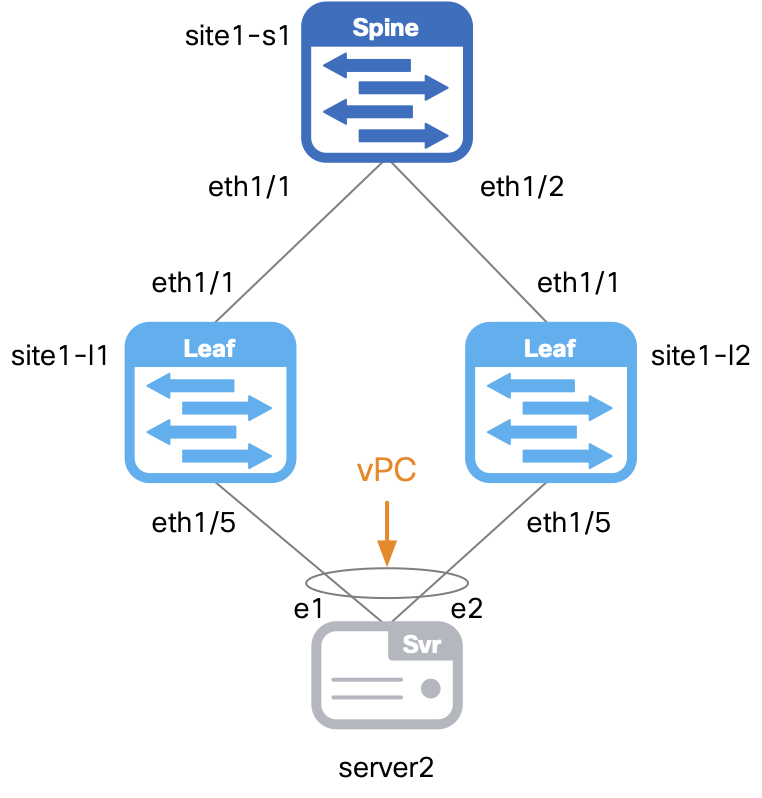
- name: port-channel5
description: To Server2 bond
mode: trunk
enabled: true
pc_mode: active
vpc_id: 5
members:
- eth1/5
mtu: jumbo
speed: auto
spanning_tree_portfast: true
- name: site1-l2
interfaces:
- name: port-channel5
description: To Server2 bond
mode: trunk
enabled: true
pc_mode: active
vpc_id: 5
members:
- eth1/5
mtu: jumbo
speed: auto
spanning_tree_portfast: true
This file will contain the routed interfaces to use, in this case on the pre-provisioned border leaf switch. It defines parameters such as sub-interface dot1q ID, VRF, and IP address.
touch ~/workspace/ndlab/nac/host_vars/site1-fabric/interfaces_routed.nac.yml
code-server -r ~/workspace/ndlab/nac/host_vars/site1-fabric/interfaces_routed.nac.yml
Copy and paste the following content into the interfaces_routed.nac.yml file that is now open in your VSCode editor.
---
vxlan:
topology:
switches:
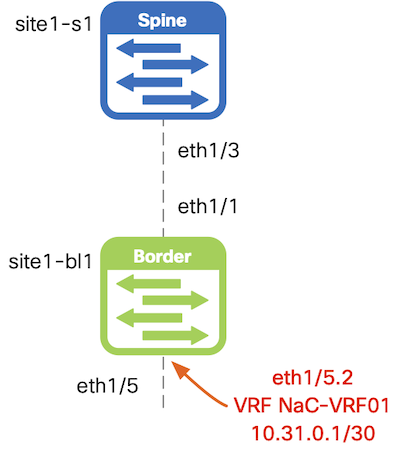
- name: site1-bl1
interfaces:
- name: Ethernet1/5
mode: routed
description: To ExtRtr Eth1/1
enabled: true
- name: Ethernet1/5.2
mode: routed_sub
description: To ExtRtr Eth1/1.2
enabled: true
dot1q_id: 2
vrf: NaC-VRF01
ipv4_address: 10.31.0.1/30
Make sure you are in your root Ansible directory.
cd ~/workspace/ndlab/nac
From the root Ansible project directory execute the following command:
ansible-playbook -i hosts.site1.yml vxlan.yml --tags cr_manage_interfaces
Upon a successful run of the playbook your output should look as follows:
  <... SNIP ...>

  PLAY RECAP ************************************************************************************************************************************************************
  site1-fabric               : ok=39   changed=4    unreachable=0    failed=0    skipped=17   rescued=0    ignored=0


  PLAYBOOK RECAP *******************************************************************************************
  Playbook run took 0 days, 0 hours, 0 minutes, 21 seconds


  TASKS RECAP **********************************************************************************************
  Tuesday 02 June 2026  21:43:46 +0000 (0:00:00.101)       0:00:21.288 **********
  ===============================================================================
  cisco.nac_dc_vxlan.create : Execute Create Resources ---------------------------------------------- 6.13s
  cisco.nac_dc_vxlan.common : Build Resources ------------------------------------------------------- 3.60s
  cisco.nac_dc_vxlan.connectivity_check : Get Cisco Nexus Dashboard Fabric Controller Version ------- 1.73s
  cisco.nac_dc_vxlan.validate : Copy Service Model Data to Host ------------------------------------- 0.79s
  cisco.nac_dc_vxlan.connectivity_check : Verify Authorization to Nexus Dashboard ------------------- 0.76s
  cisco.nac_dc_vxlan.validate : Copy Extended Service Model Data to Host ---------------------------- 0.60s
  cisco.nac_dc_vxlan.connectivity_check : Verify Connection to Nexus Dashboard ---------------------- 0.52s
  cisco.nac_dc_vxlan.validate : Stat Factory Defaults ----------------------------------------------- 0.51s
  cisco.nac_dc_vxlan.connectivity_check : Get Cisco Nexus Dashboard Version ------------------------- 0.51s
  cisco.nac_dc_vxlan.validate : Move Golden Service Model Data Previous ----------------------------- 0.49s
  cisco.nac_dc_vxlan.validate : Move Extended Service Model Data Previous --------------------------- 0.38s
  cisco.nac_dc_vxlan.validate : Stat the Golden Service Model Data ---------------------------------- 0.37s
  cisco.nac_dc_vxlan.validate : Stat the Extended Service Model Data -------------------------------- 0.33s
  cisco.nac_dc_vxlan.common : Display Change Flag Values -------------------------------------------- 0.26s
  cisco.nac_dc_vxlan.create : Display Create Resources Summary -------------------------------------- 0.25s
  cisco.nac_dc_vxlan.connectivity_check : Set Cisco Nexus Dashboard Fabric Controller Version Var --- 0.21s
  cisco.nac_dc_vxlan.validate : Display Inventory Directory ----------------------------------------- 0.21s
  cisco.nac_dc_vxlan.validate : Display Role Path --------------------------------------------------- 0.21s
  cisco.nac_dc_vxlan.validate : Role Entry Point - [cisco.nac_dc_vxlan.validate] -------------------- 0.21s
  cisco.nac_dc_vxlan.connectivity_check : Set Cisco Nexus Dashboard Version Var --------------------- 0.21s

  ROLES RECAP **********************************************************************************************
  Tuesday 02 June 2026  21:43:46 +0000 (0:00:00.102)       0:00:21.288 **********
  ===============================================================================
  create ------------------------------------------------------------------ 6.48s
  validate ---------------------------------------------------------------- 6.13s
  common ------------------------------------------------------------------ 4.39s
  connectivity_check ------------------------------------------------------ 3.95s
  common_global ----------------------------------------------------------- 0.04s
  ~~~~~~~~~~~~~~~~~~~~~~~~~~~~~~~~~~~~~~~~~~~~~~~~~~~~~~~~~~~~~~~~~~~~~~~~~~~~~~~
  total ------------------------------------------------------------------ 20.99s
Return to your ND browser where you should be sitting on the Switches tab.
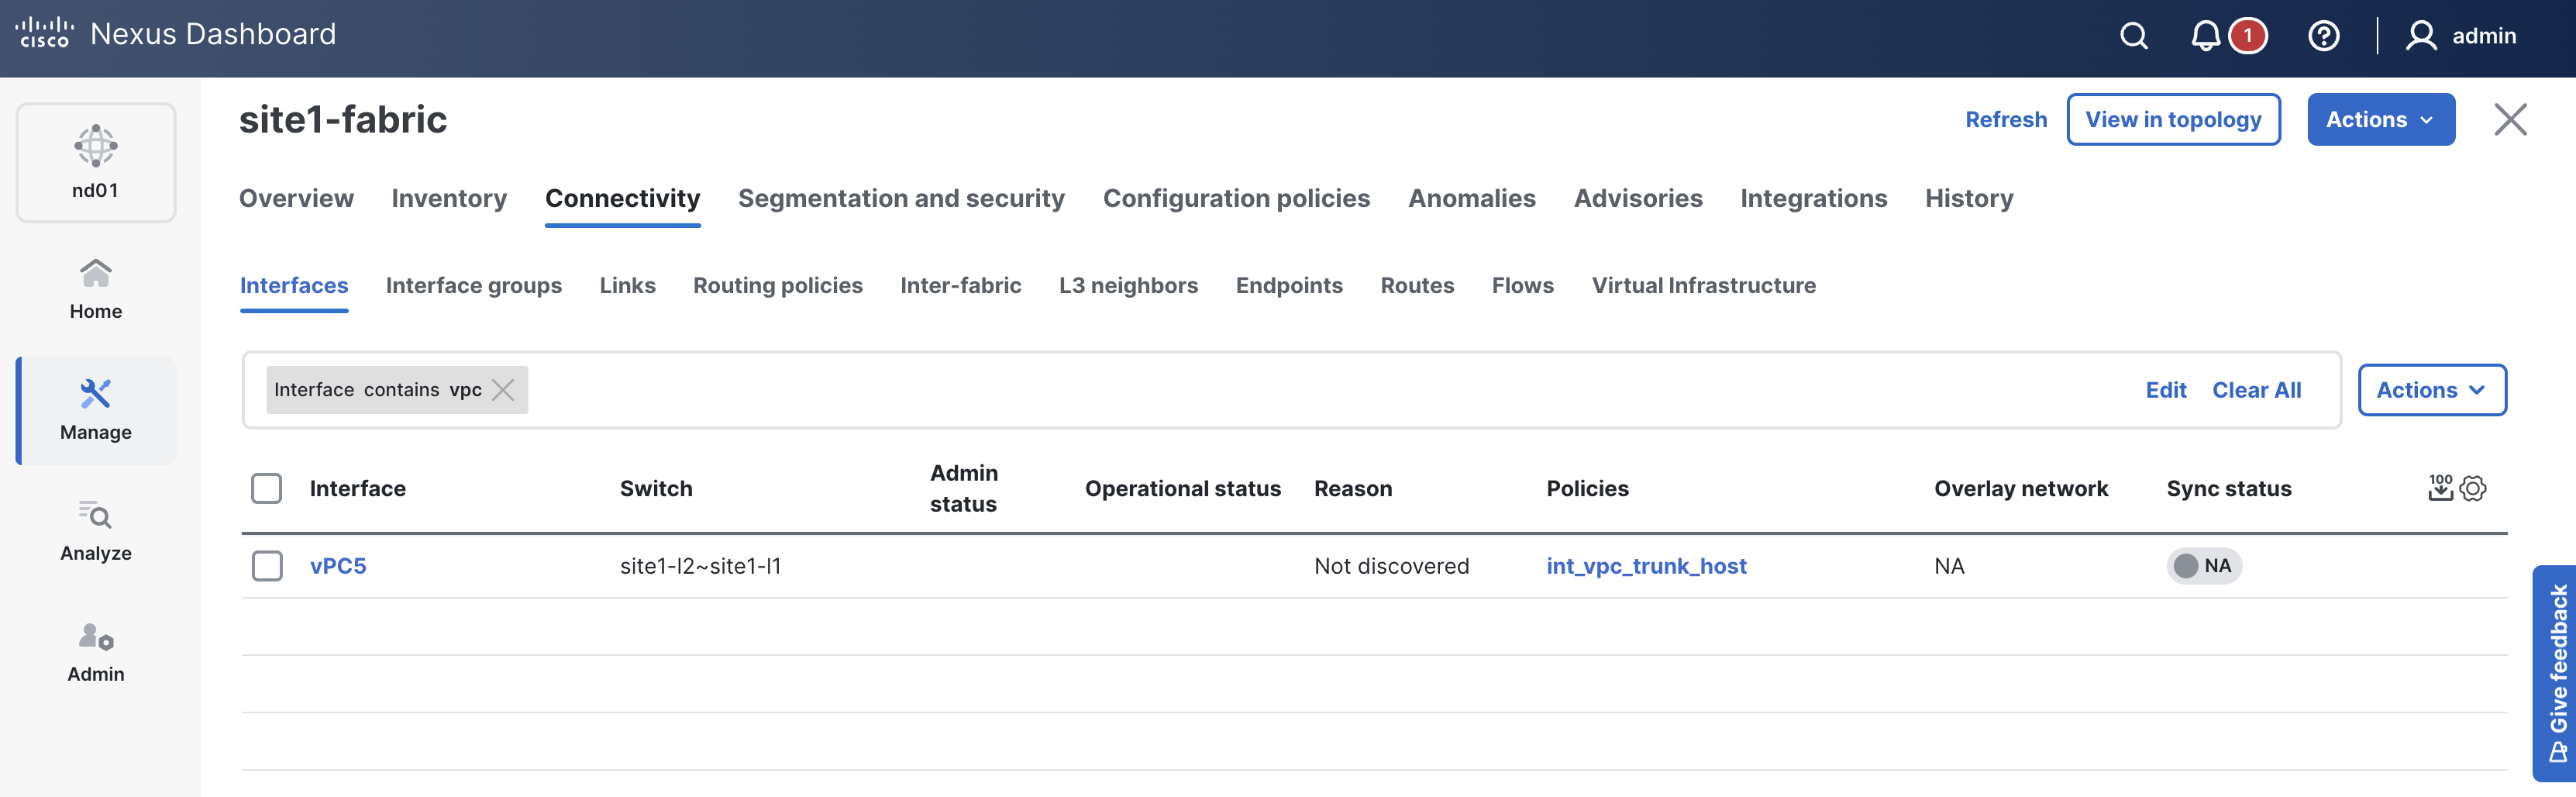
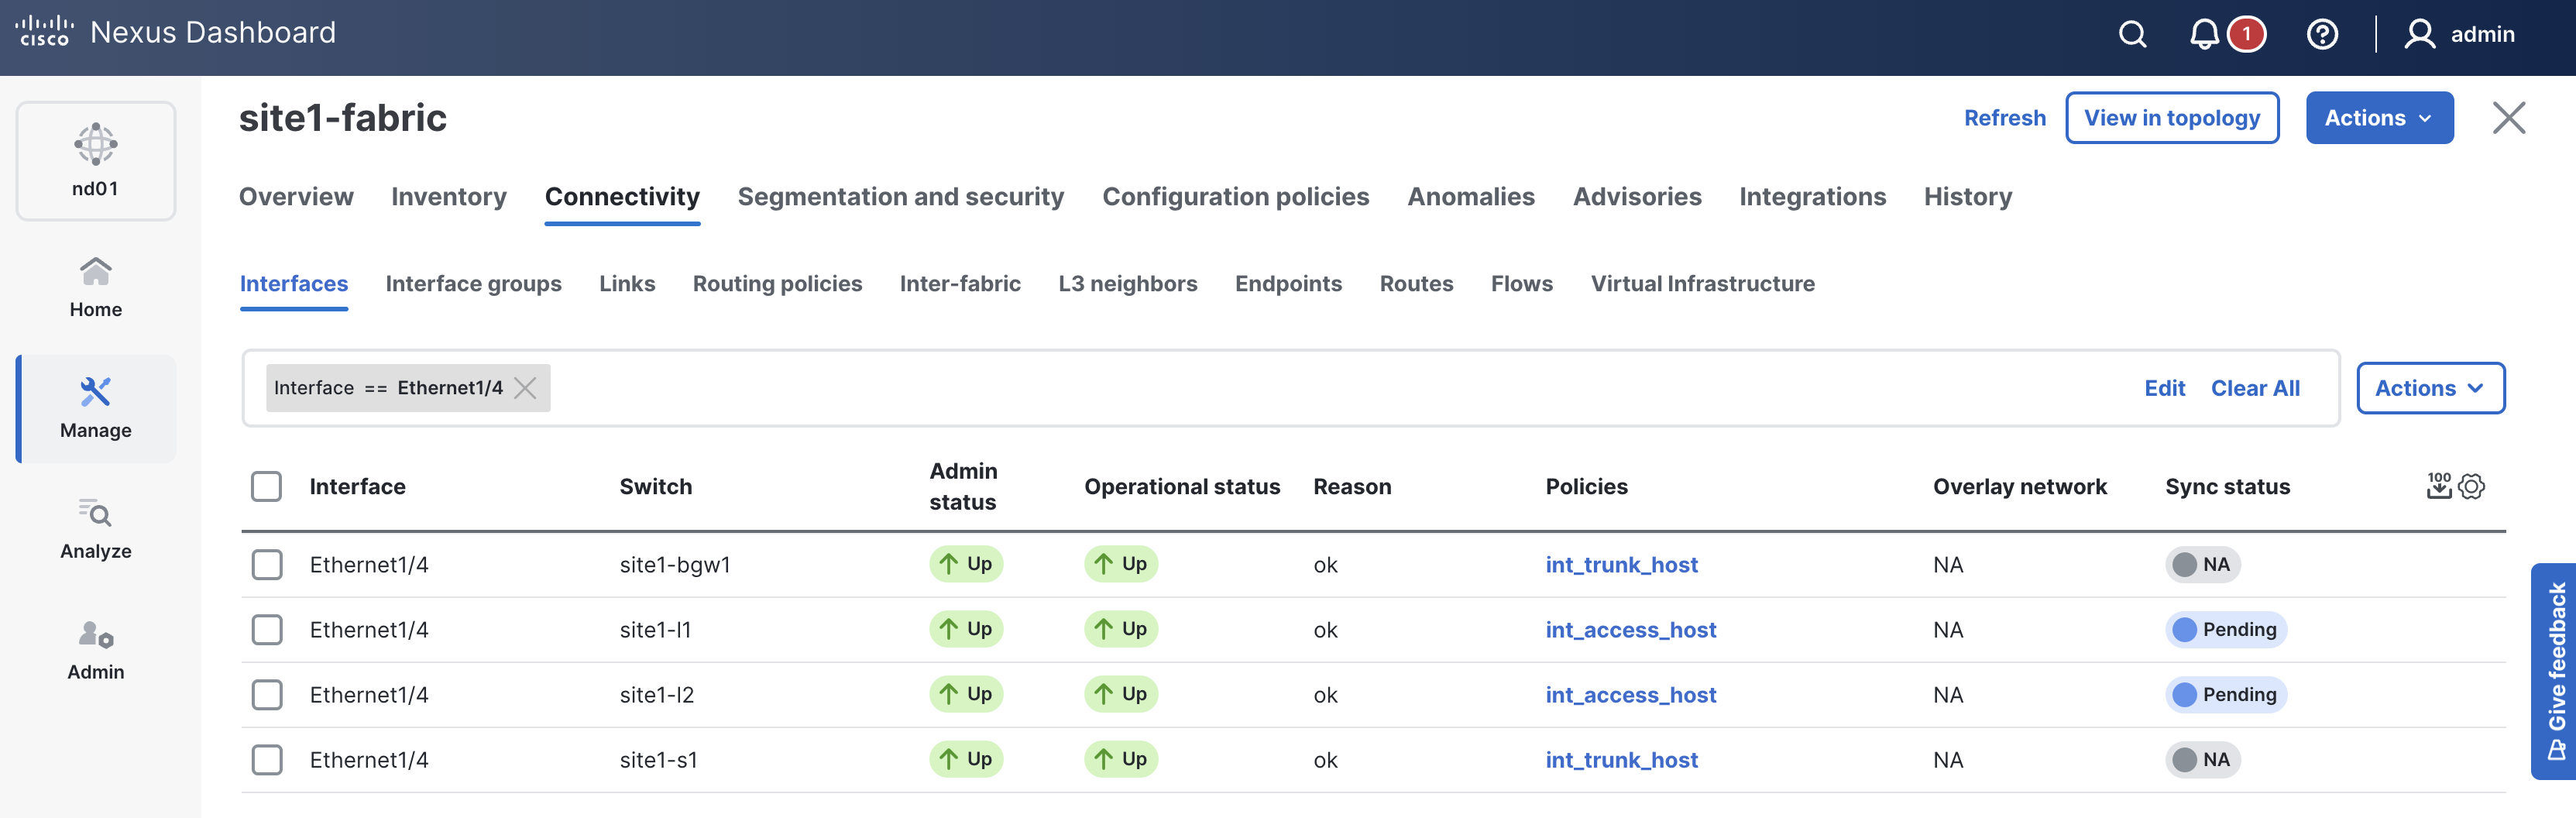
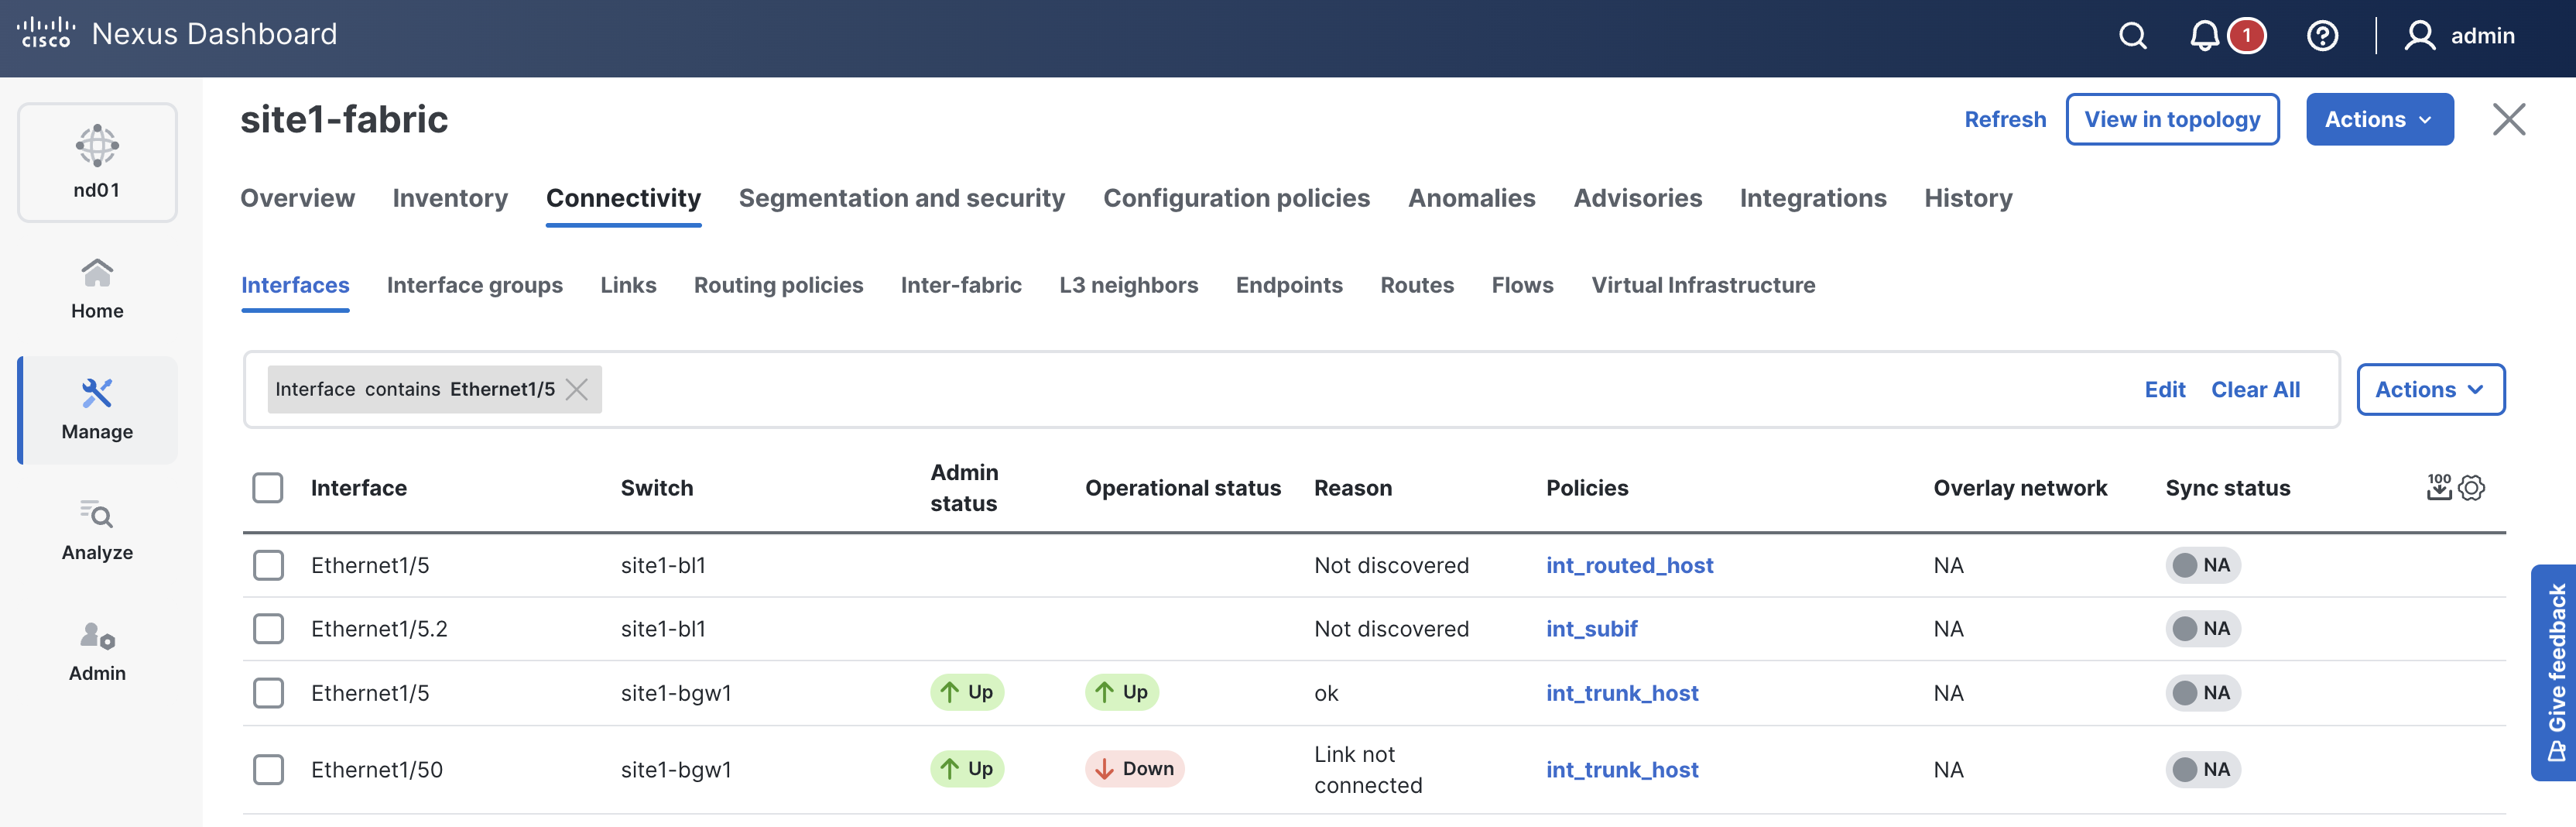
When reviewing the Interfaces tab, it is expected to see interfaces in various states since a deployment has not taken place yet. Again, you will deploy to your switches in the deploy role. Follow the remaining steps to verify the interface configuration is pre-staged in ND.
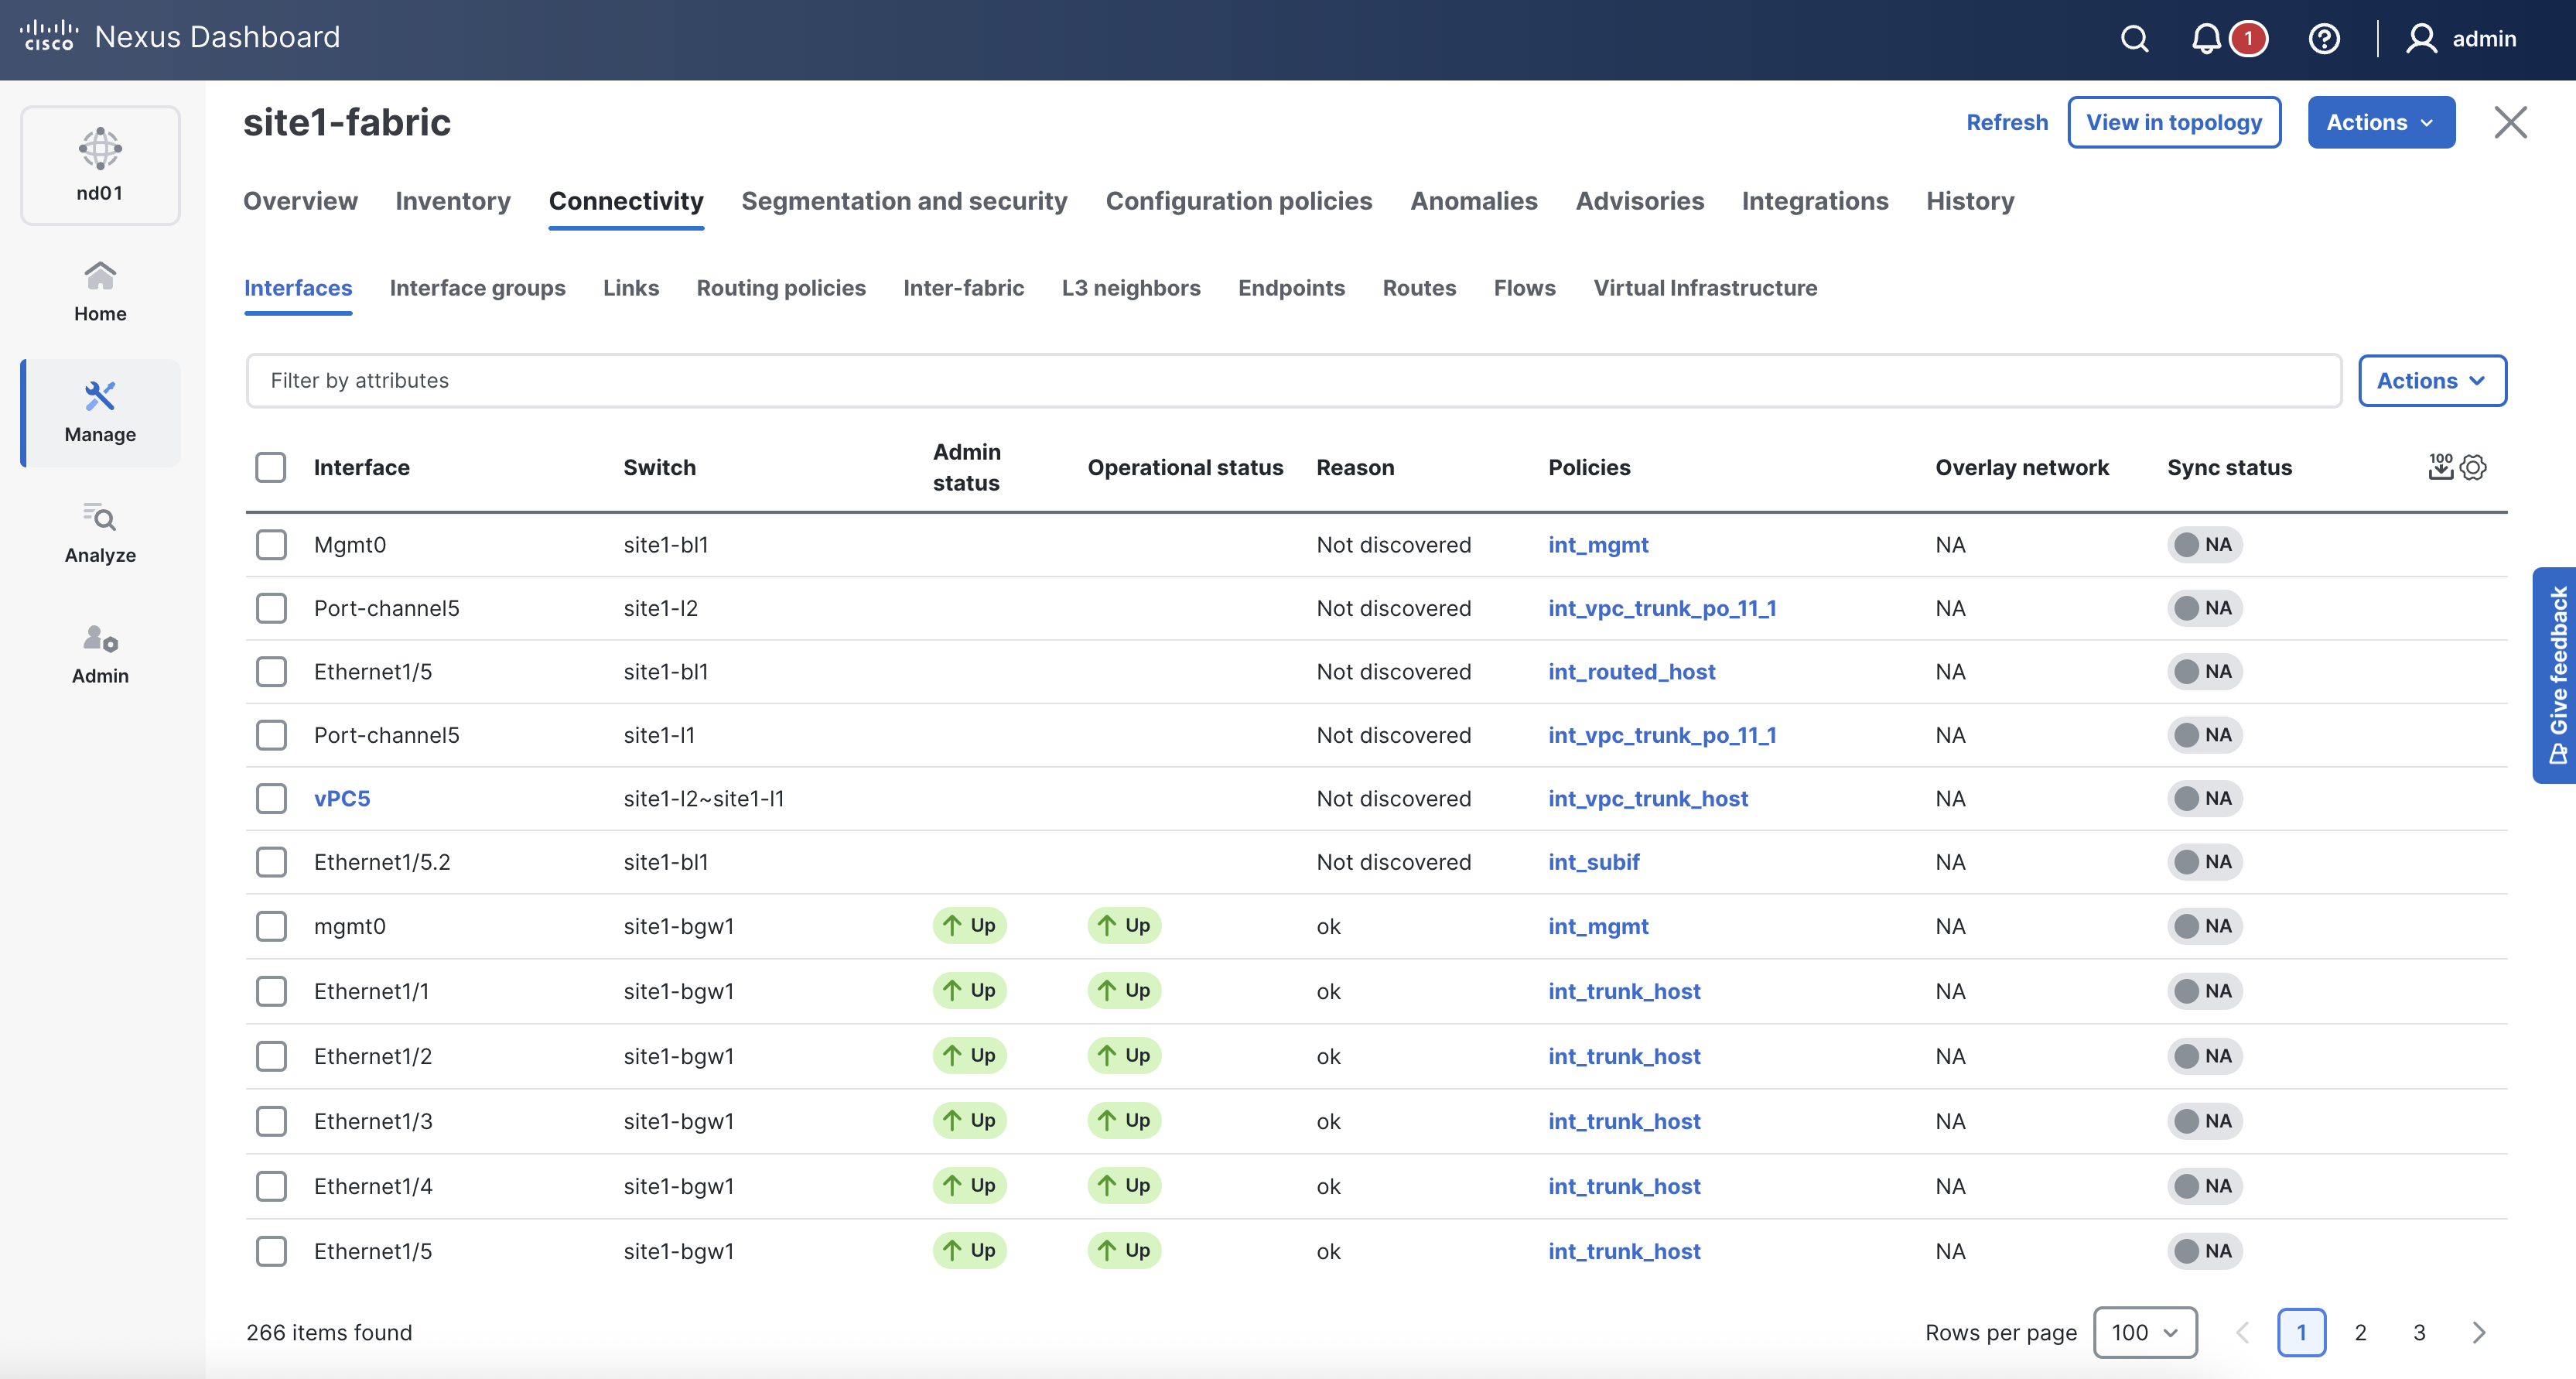

EnterMake sure interface vPC5 is created between site1-l1 and site1-l2. This will change to In-Sync after the deployment role is completed later in the lab.

EnterVerify that the policy for interface Ethernet1/4 on site1-l1 and site1-l2 is set to access

EnterVerify that the policy for interface Ethernet1/5 on site1-bl1 is routed
Navigate back to your VSCode application.
Continue to the next section to build out the overlay by defining VRFs and networks.