To configure VRF-Lite in your Site1 fabric, update your vrfs.nac.yml file to include the border leaf switch in the VRF attach group.
Copy and paste the following content into the vrfs.nac.yml file that is now open in your VSCode editor.
touch ~/workspace/ndlab/nac/host_vars/site1-fabric/vrfs.nac.yml
cat << EOF > ~/workspace/ndlab/nac/host_vars/site1-fabric/vrfs.nac.yml
---
vxlan:
overlay:
vrfs:
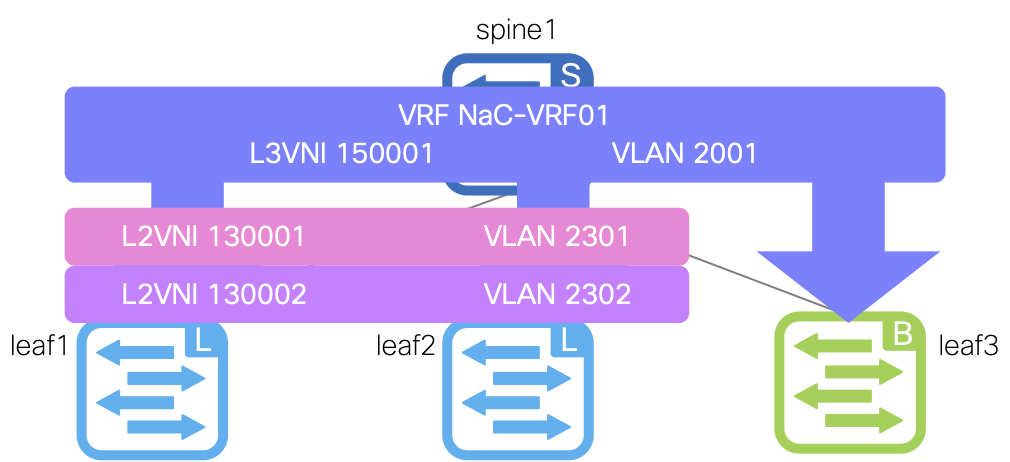
- name: NaC-VRF01
vrf_id: 200001
vlan_id: 2001
vrf_attach_group: all
vrf_attach_groups:
- name: all
switches:
- hostname: site1-l1
- hostname: site1-l2
- hostname: site1-bl1
EOF
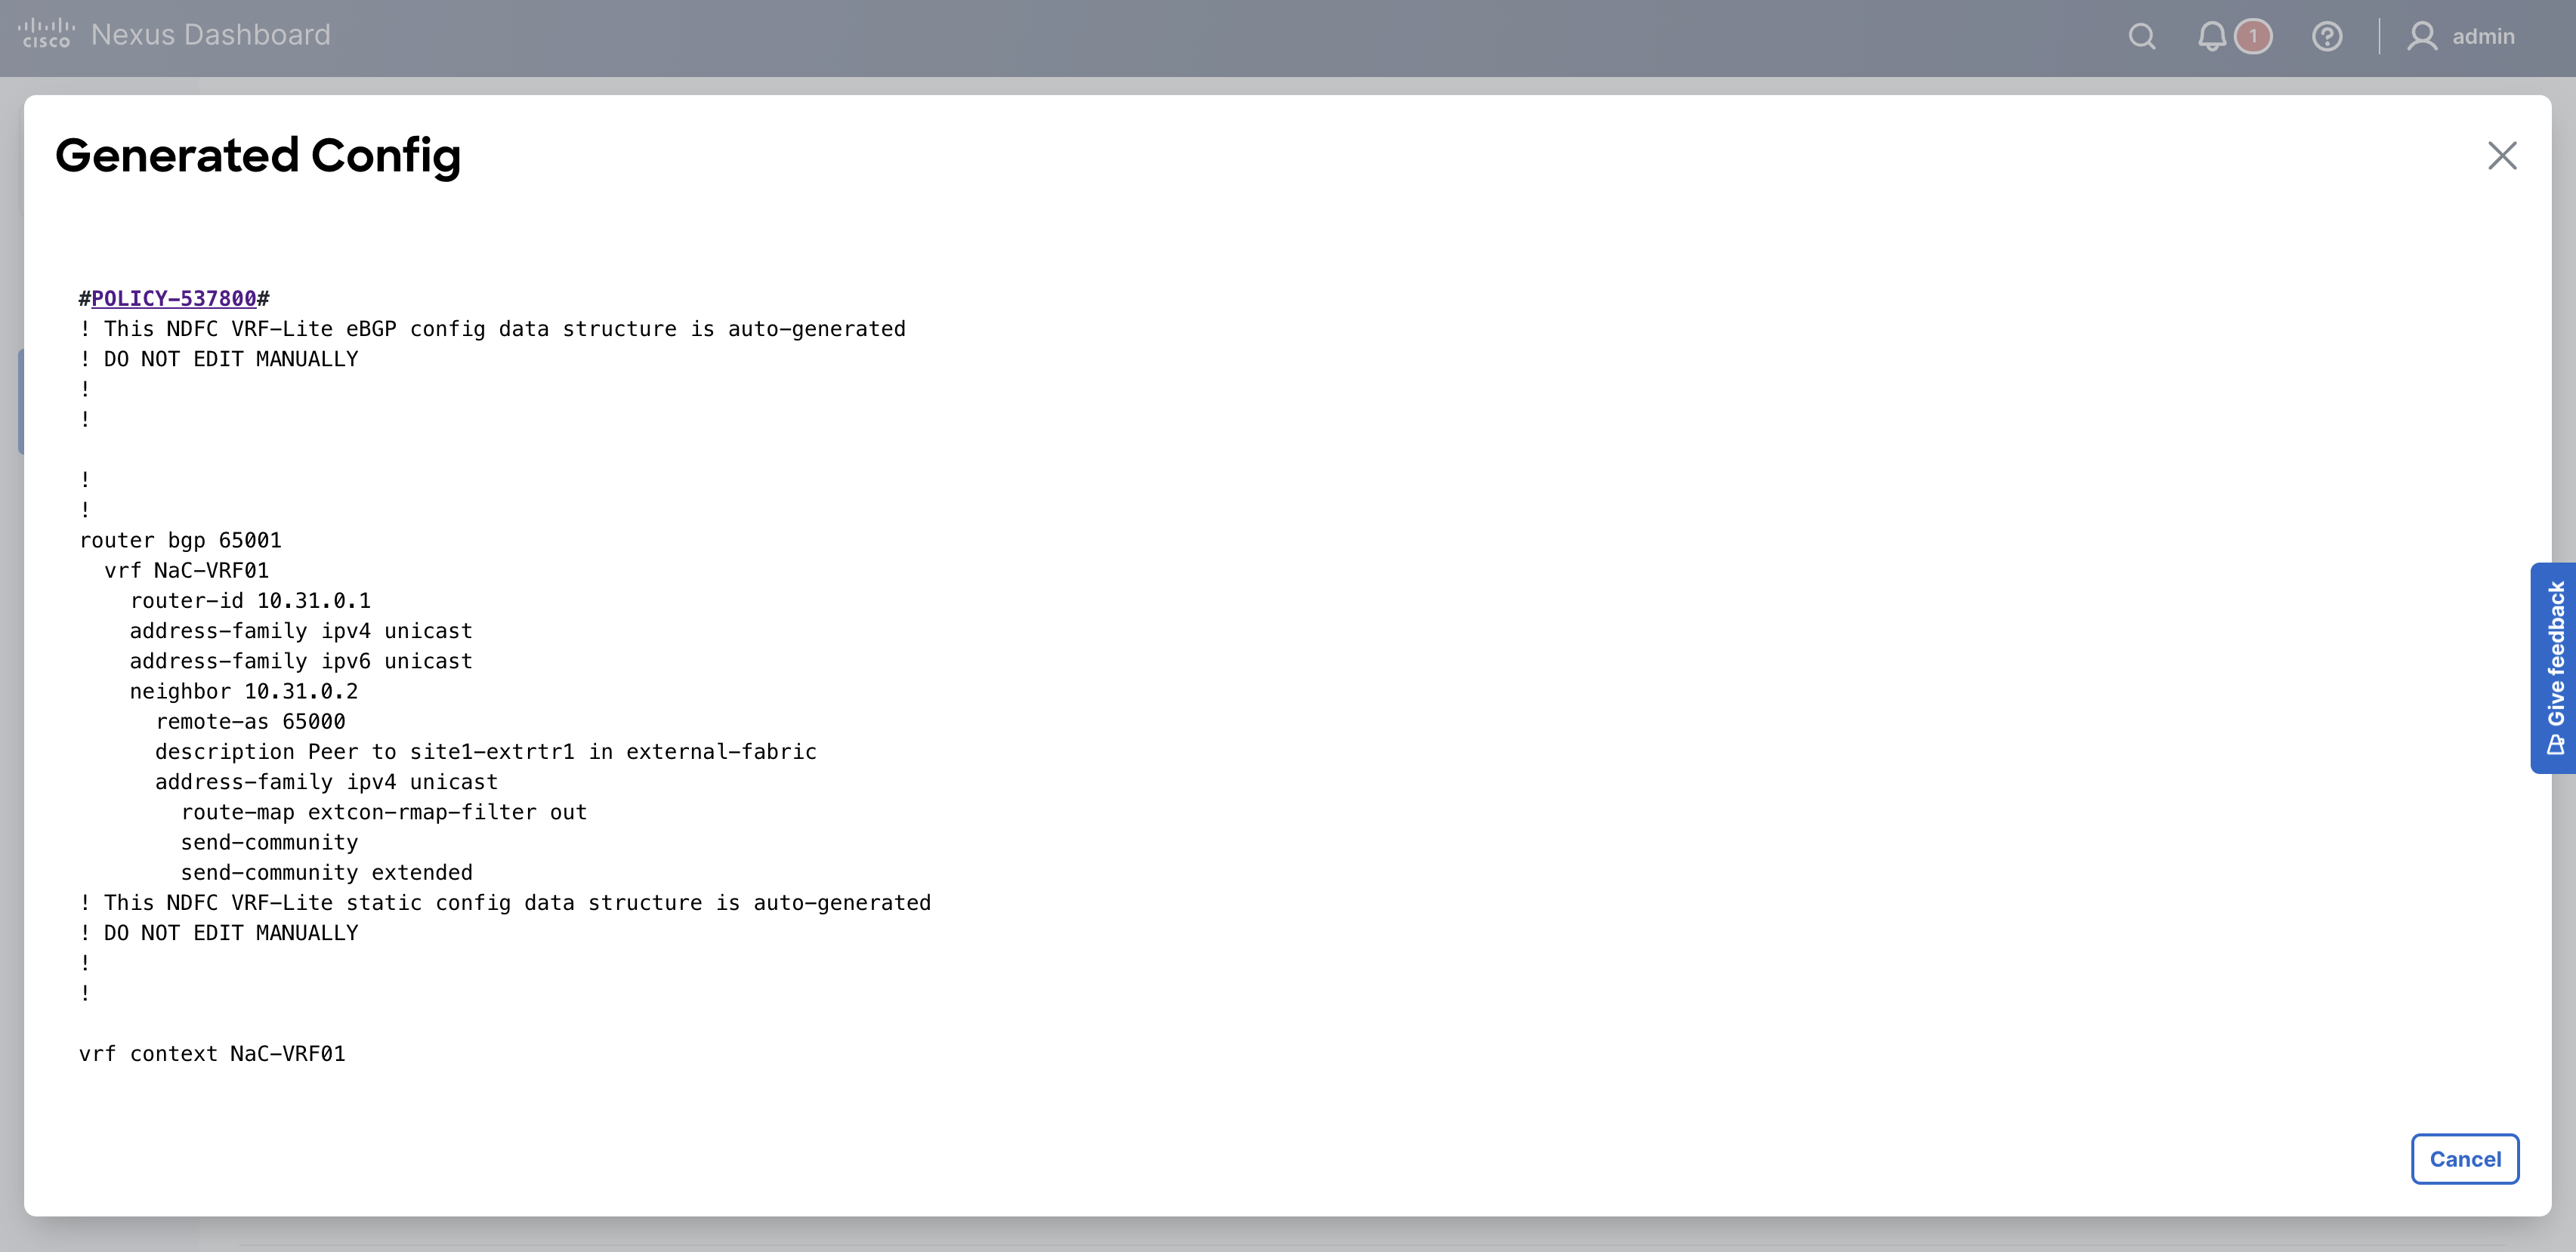
Next, create a file named vrf_lite.nac.yml that contains the data for VRF-Lite to establish the
BGP peering with the external router as well as define a default static route towards the external router.
touch ~/workspace/ndlab/nac/host_vars/site1-fabric/vrf_lite.nac.yml
code-server -r ~/workspace/ndlab/nac/host_vars/site1-fabric/vrf_lite.nac.yml
Copy and paste the following content into the vrf_lite.nac.yml file that is now open in your VSCode editor.
---

vxlan:
  overlay_extensions:
    vrf_lites:
      - name: NaC-VRF-Lite01
        vrf: NaC-VRF01
        switches:
          - name: site1-bl1
            router_id: 10.31.0.1
            bgp_peers:
              - address: 10.31.0.2
                remote_as: 65000
                description: Peer to site1-extrtr1 in external-fabric
                address_family_ipv4_unicast:
                  send_community: true
                  send_ext_community: true
                  route_map_out: extcon-rmap-filter
            static_routes:
              static_ipv4:
                - prefix: 0.0.0.0/0
                  next_hops:
                    - ip: 10.31.0.2
  policy:
    policies:
      - name: BGP Network Statement Policy
        template_name: bgp_vrf_network
        template_vars:
          BGP_AS: 65001
          VRF_NAME: NaC-VRF01
          IP_PREFIX: 0.0.0.0/0
    groups:
      - name: Border Leaf
        policies:
          - name: BGP Network Statement Policy
    switches:
      - name: site1-bl1
        groups:
          - Border Leaf
Make sure you are in your root Ansible directory.
cd ~/workspace/ndlab/nac
From the root Ansible project directory execute the following command:
ansible-playbook -i hosts.site1.yml vxlan.yml --tags cr_manage_switches,cr_manage_vrfs,cr_manage_networks,cr_manage_policy,role_deploy
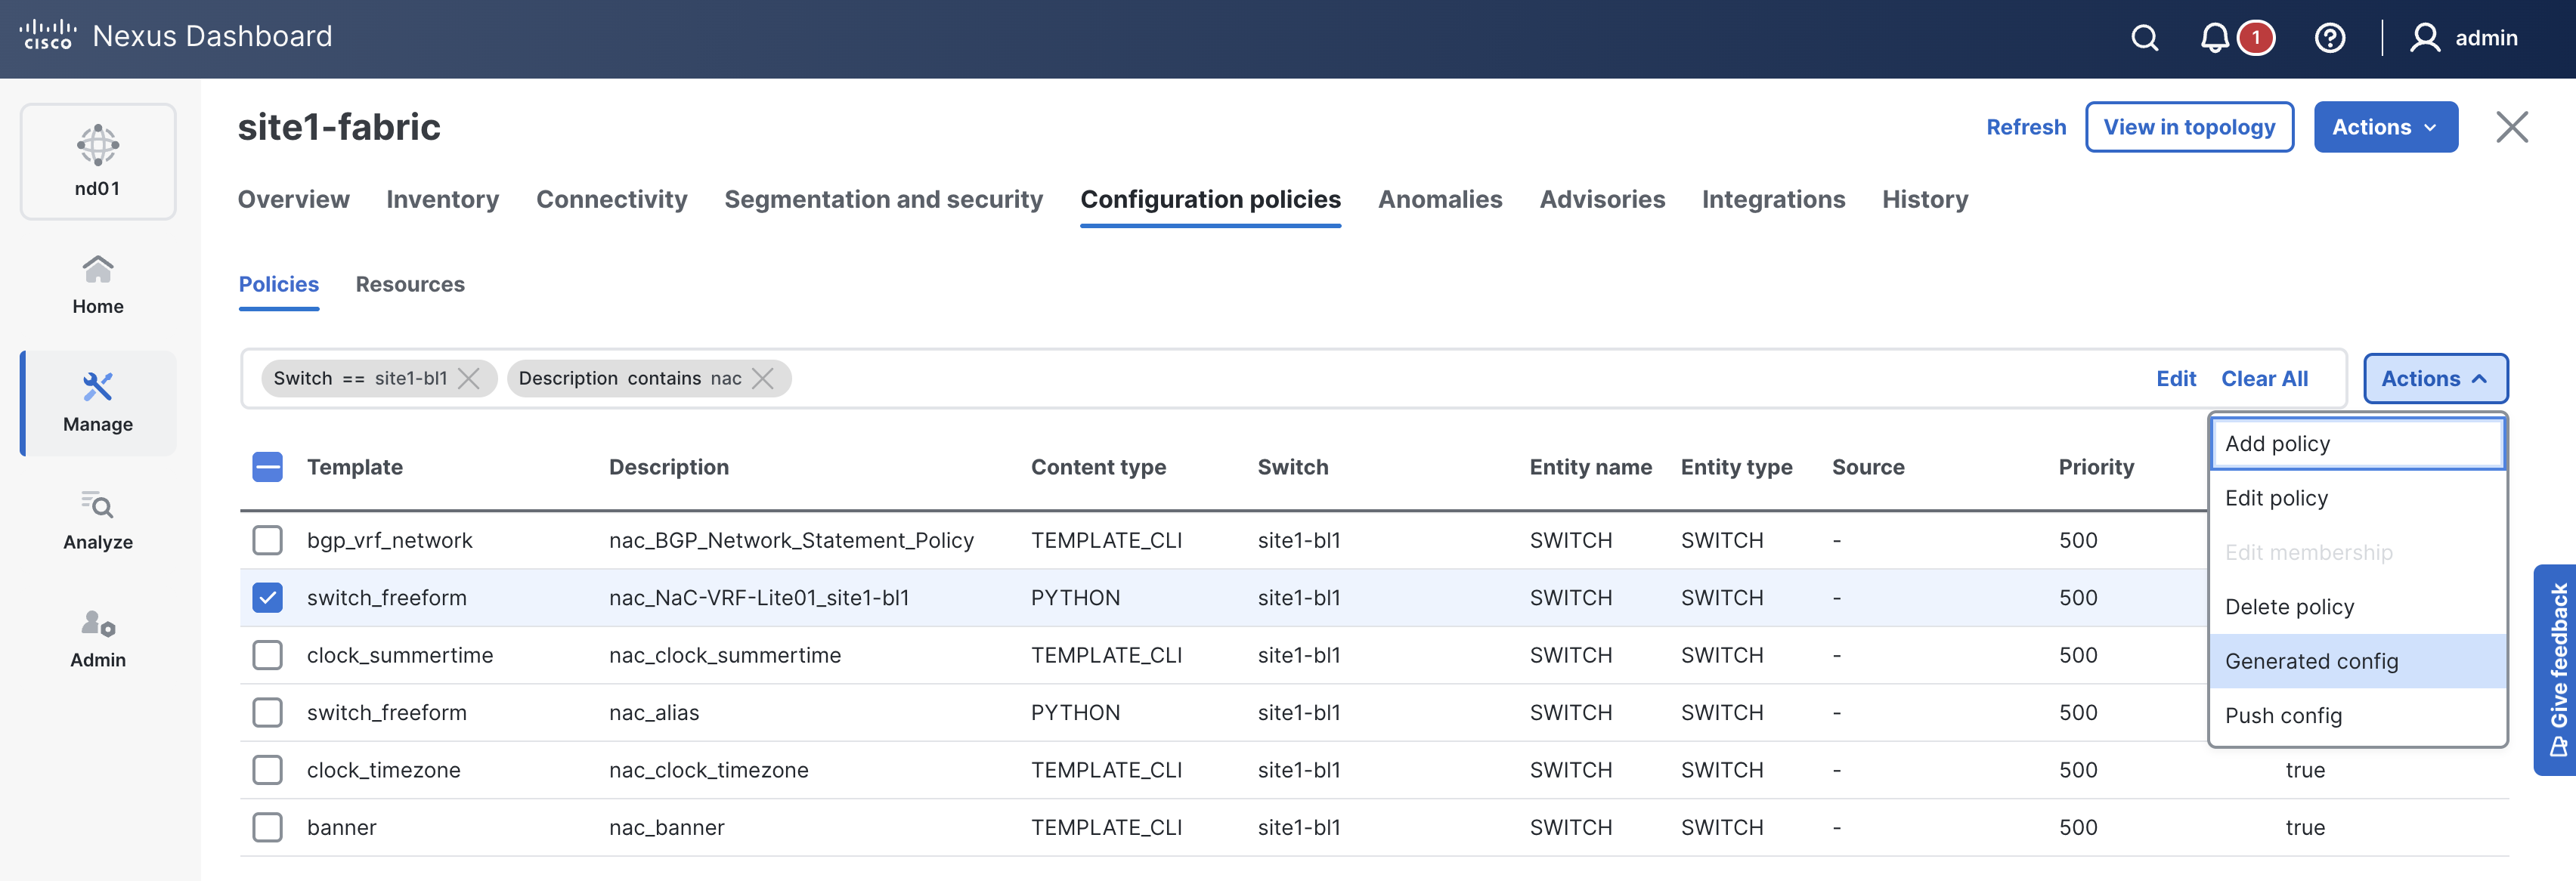
In your ND browser, navigate to the switches view.
Here you will start to see the spine and leaf devices being discovered and added to the site1-fabric fabric.
This might be a good time for another cup of coffee or tea while the switch POAPs into your Site1 fabric!
This part of the data model for POAP is doing the following:


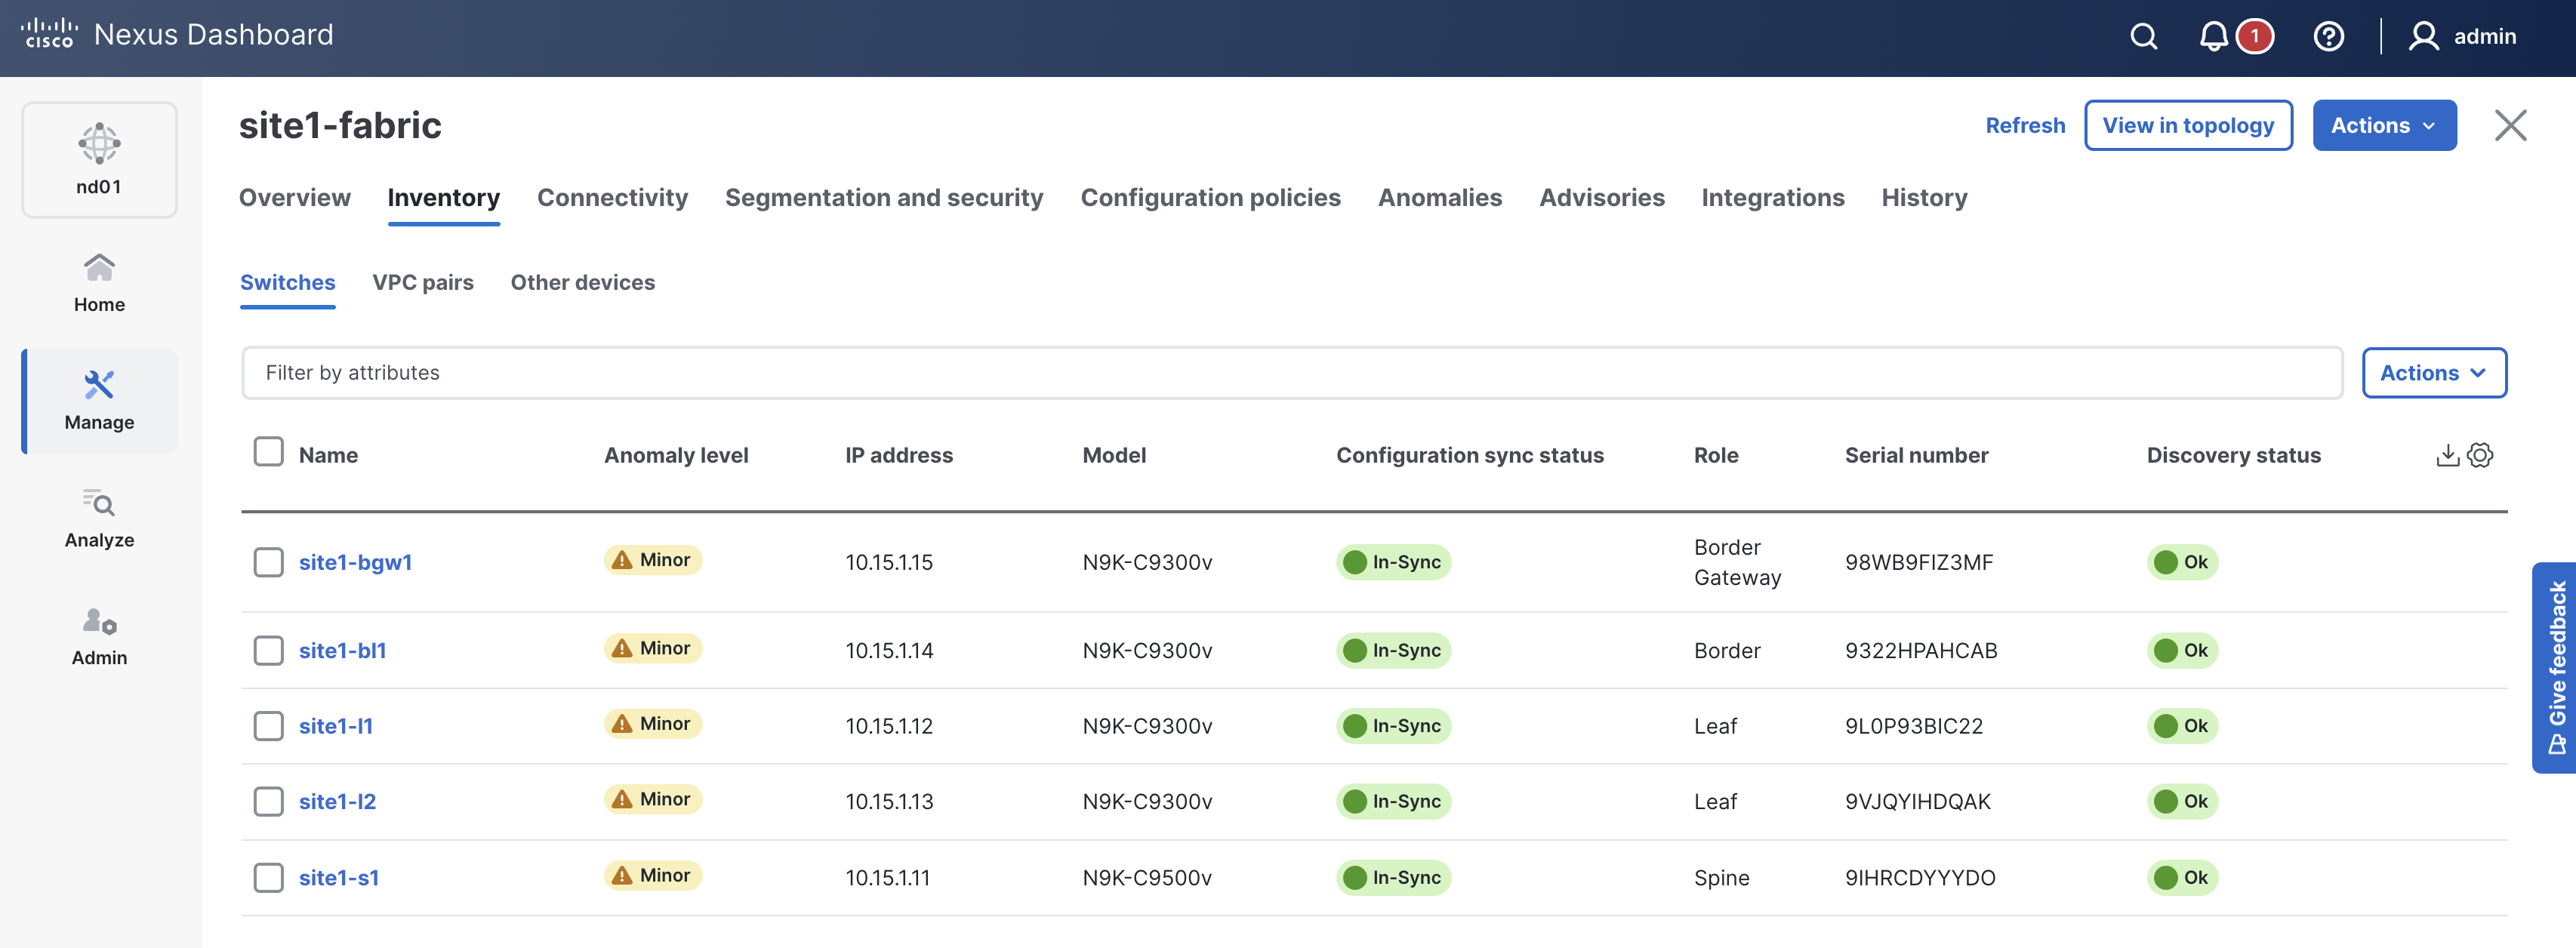
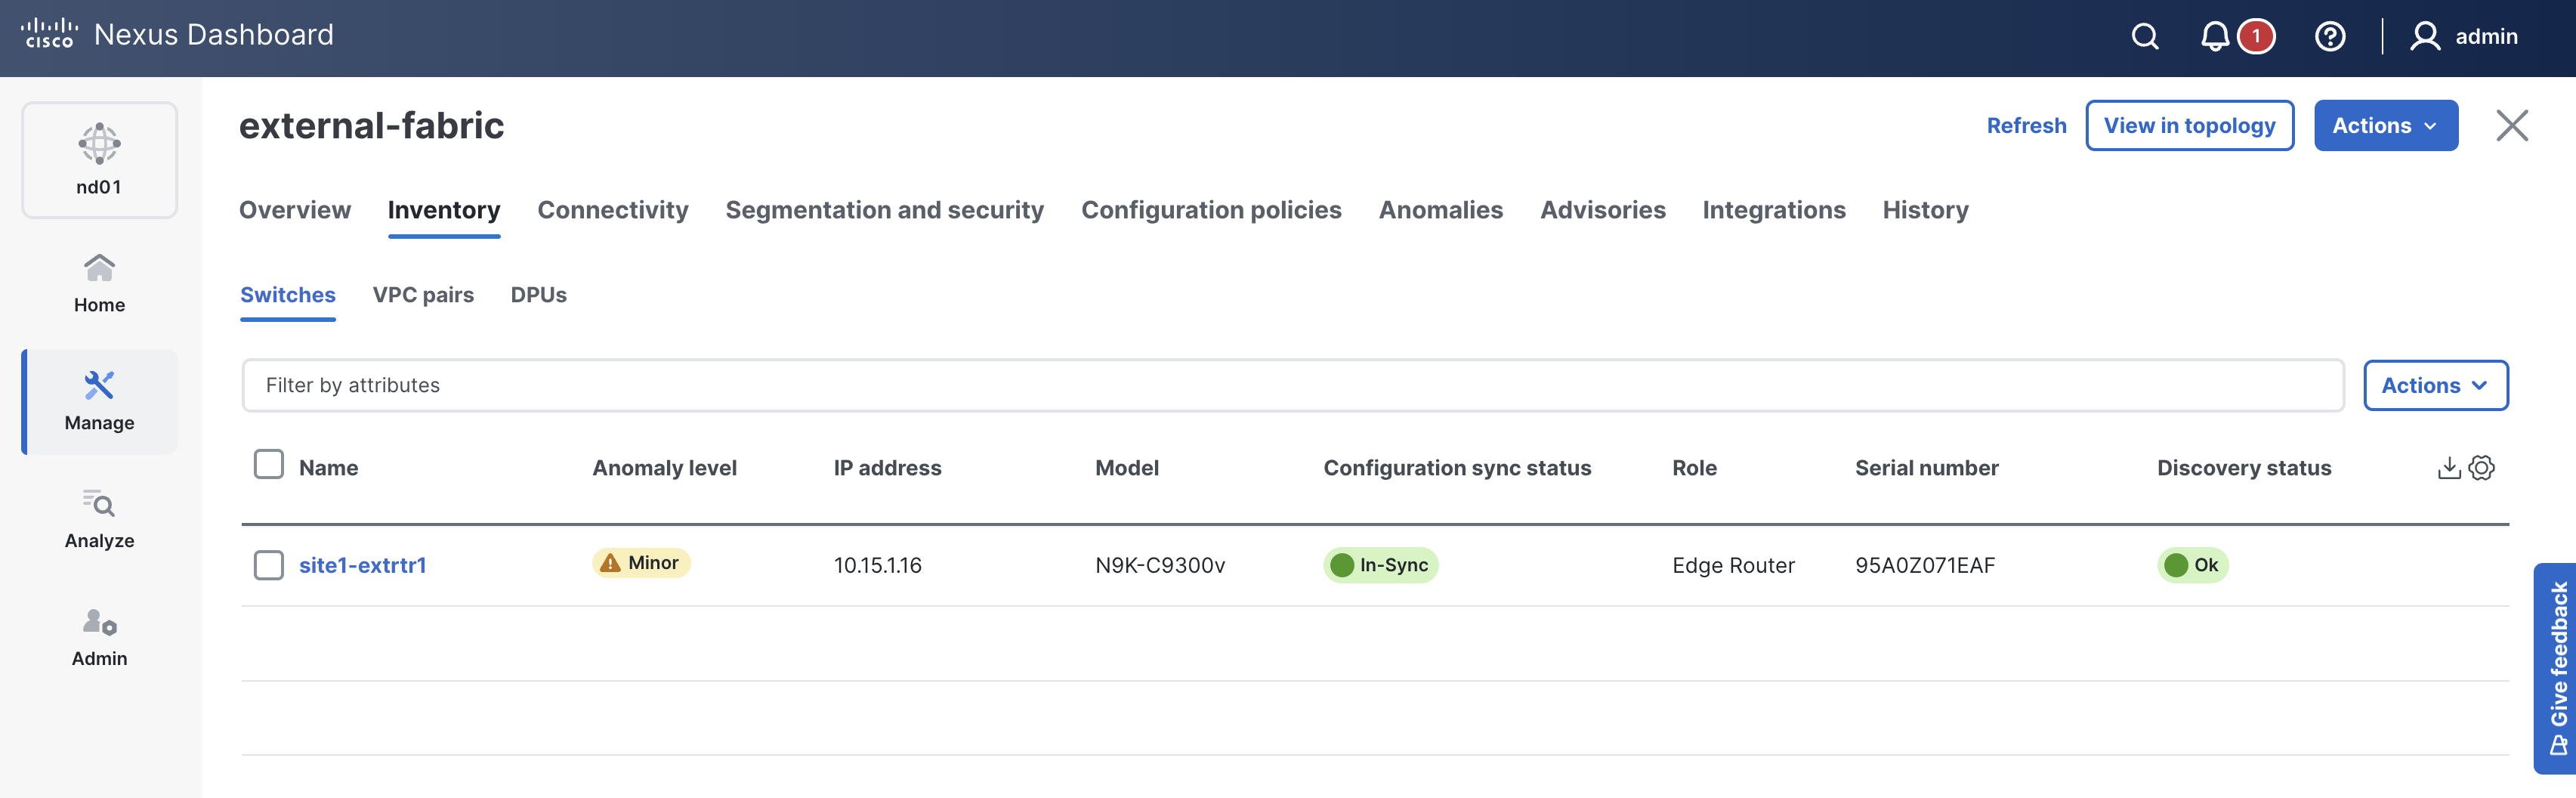
Check ND again and make sure the switch is added. The Mode should show as Normal and the Discovery Status should show as Ok.
Upon a successful run of the playbook your output should look as follows:
  <... SNIP ...>

  PLAY RECAP ****************************************************************************
  site1-fabric               : ok=43   changed=4    unreachable=0    failed=0    skipped=17   rescued=0    ignored=0


  PLAYBOOK RECAP ************************************************************************
  Playbook run took 0 days, 0 hours, 13 minutes, 57 seconds


  TASKS RECAP ***************************************************************************
  Wednesday 03 June 2026  07:08:06 +0000 (0:00:00.076)       0:13:57.213 ********
  ===============================================================================
  cisco.nac_dc_vxlan.create : Execute Create Resources ------------------------- 738.93s
  cisco.nac_dc_vxlan.deploy : Execute Deploy of Resources ----------------------- 81.50s
  cisco.nac_dc_vxlan.common : Build Resources ------------------------------------ 3.50s
  cisco.nac_dc_vxlan.connectivity_check : Get Cisco Nexus Dashboard Fabric Controller Version --- 1.67s
  cisco.nac_dc_vxlan.deploy : Execute Deploy of Resources ------------------------ 1.30s
  cisco.nac_dc_vxlan.validate : Copy Service Model Data to Host ------------------ 0.83s
  cisco.nac_dc_vxlan.connectivity_check : Verify Authorization to Nexus Dashboard --- 0.71s
  cisco.nac_dc_vxlan.validate : Copy Extended Service Model Data to Host --------- 0.63s
  cisco.nac_dc_vxlan.validate : Move Golden Service Model Data Previous ---------- 0.56s
  cisco.nac_dc_vxlan.connectivity_check : Verify Connection to Nexus Dashboard --- 0.54s
  cisco.nac_dc_vxlan.validate : Stat Factory Defaults ---------------------------- 0.54s
  cisco.nac_dc_vxlan.connectivity_check : Get Cisco Nexus Dashboard Version ------ 0.47s
  cisco.nac_dc_vxlan.validate : Stat the Golden Service Model Data --------------- 0.38s
  cisco.nac_dc_vxlan.validate : Stat the Extended Service Model Data ------------- 0.38s
  cisco.nac_dc_vxlan.validate : Move Extended Service Model Data Previous -------- 0.36s
  cisco.nac_dc_vxlan.validate : Prepare Service Model ---------------------------- 0.33s
  cisco.nac_dc_vxlan.common : Create Fact To Store Common Role Path -------------- 0.26s
  cisco.nac_dc_vxlan.common : Display Resource Build Summary --------------------- 0.26s
  cisco.nac_dc_vxlan.create : Display Create Resources Summary ------------------- 0.25s
  cisco.nac_dc_vxlan.common : Display Change Flag Values ------------------------- 0.24s

  ROLES RECAP ***************************************************************************
  Wednesday 03 June 2026  07:08:06 +0000 (0:00:00.077)       0:13:57.212 ********
  ===============================================================================
  create ---------------------------------------------------------------- 739.24s
  deploy ----------------------------------------------------------------- 82.95s
  validate ---------------------------------------------------------------- 6.55s
  common ------------------------------------------------------------------ 4.37s
  connectivity_check ------------------------------------------------------ 3.75s
  common_global ----------------------------------------------------------- 0.05s
  ~~~~~~~~~~~~~~~~~~~~~~~~~~~~~~~~~~~~~~~~~~~~~~~~~~~~~~~~~~~~~~~~~~~~~~~~~~~~~~~
  total ----------------------------------------------------------------- 836.91s
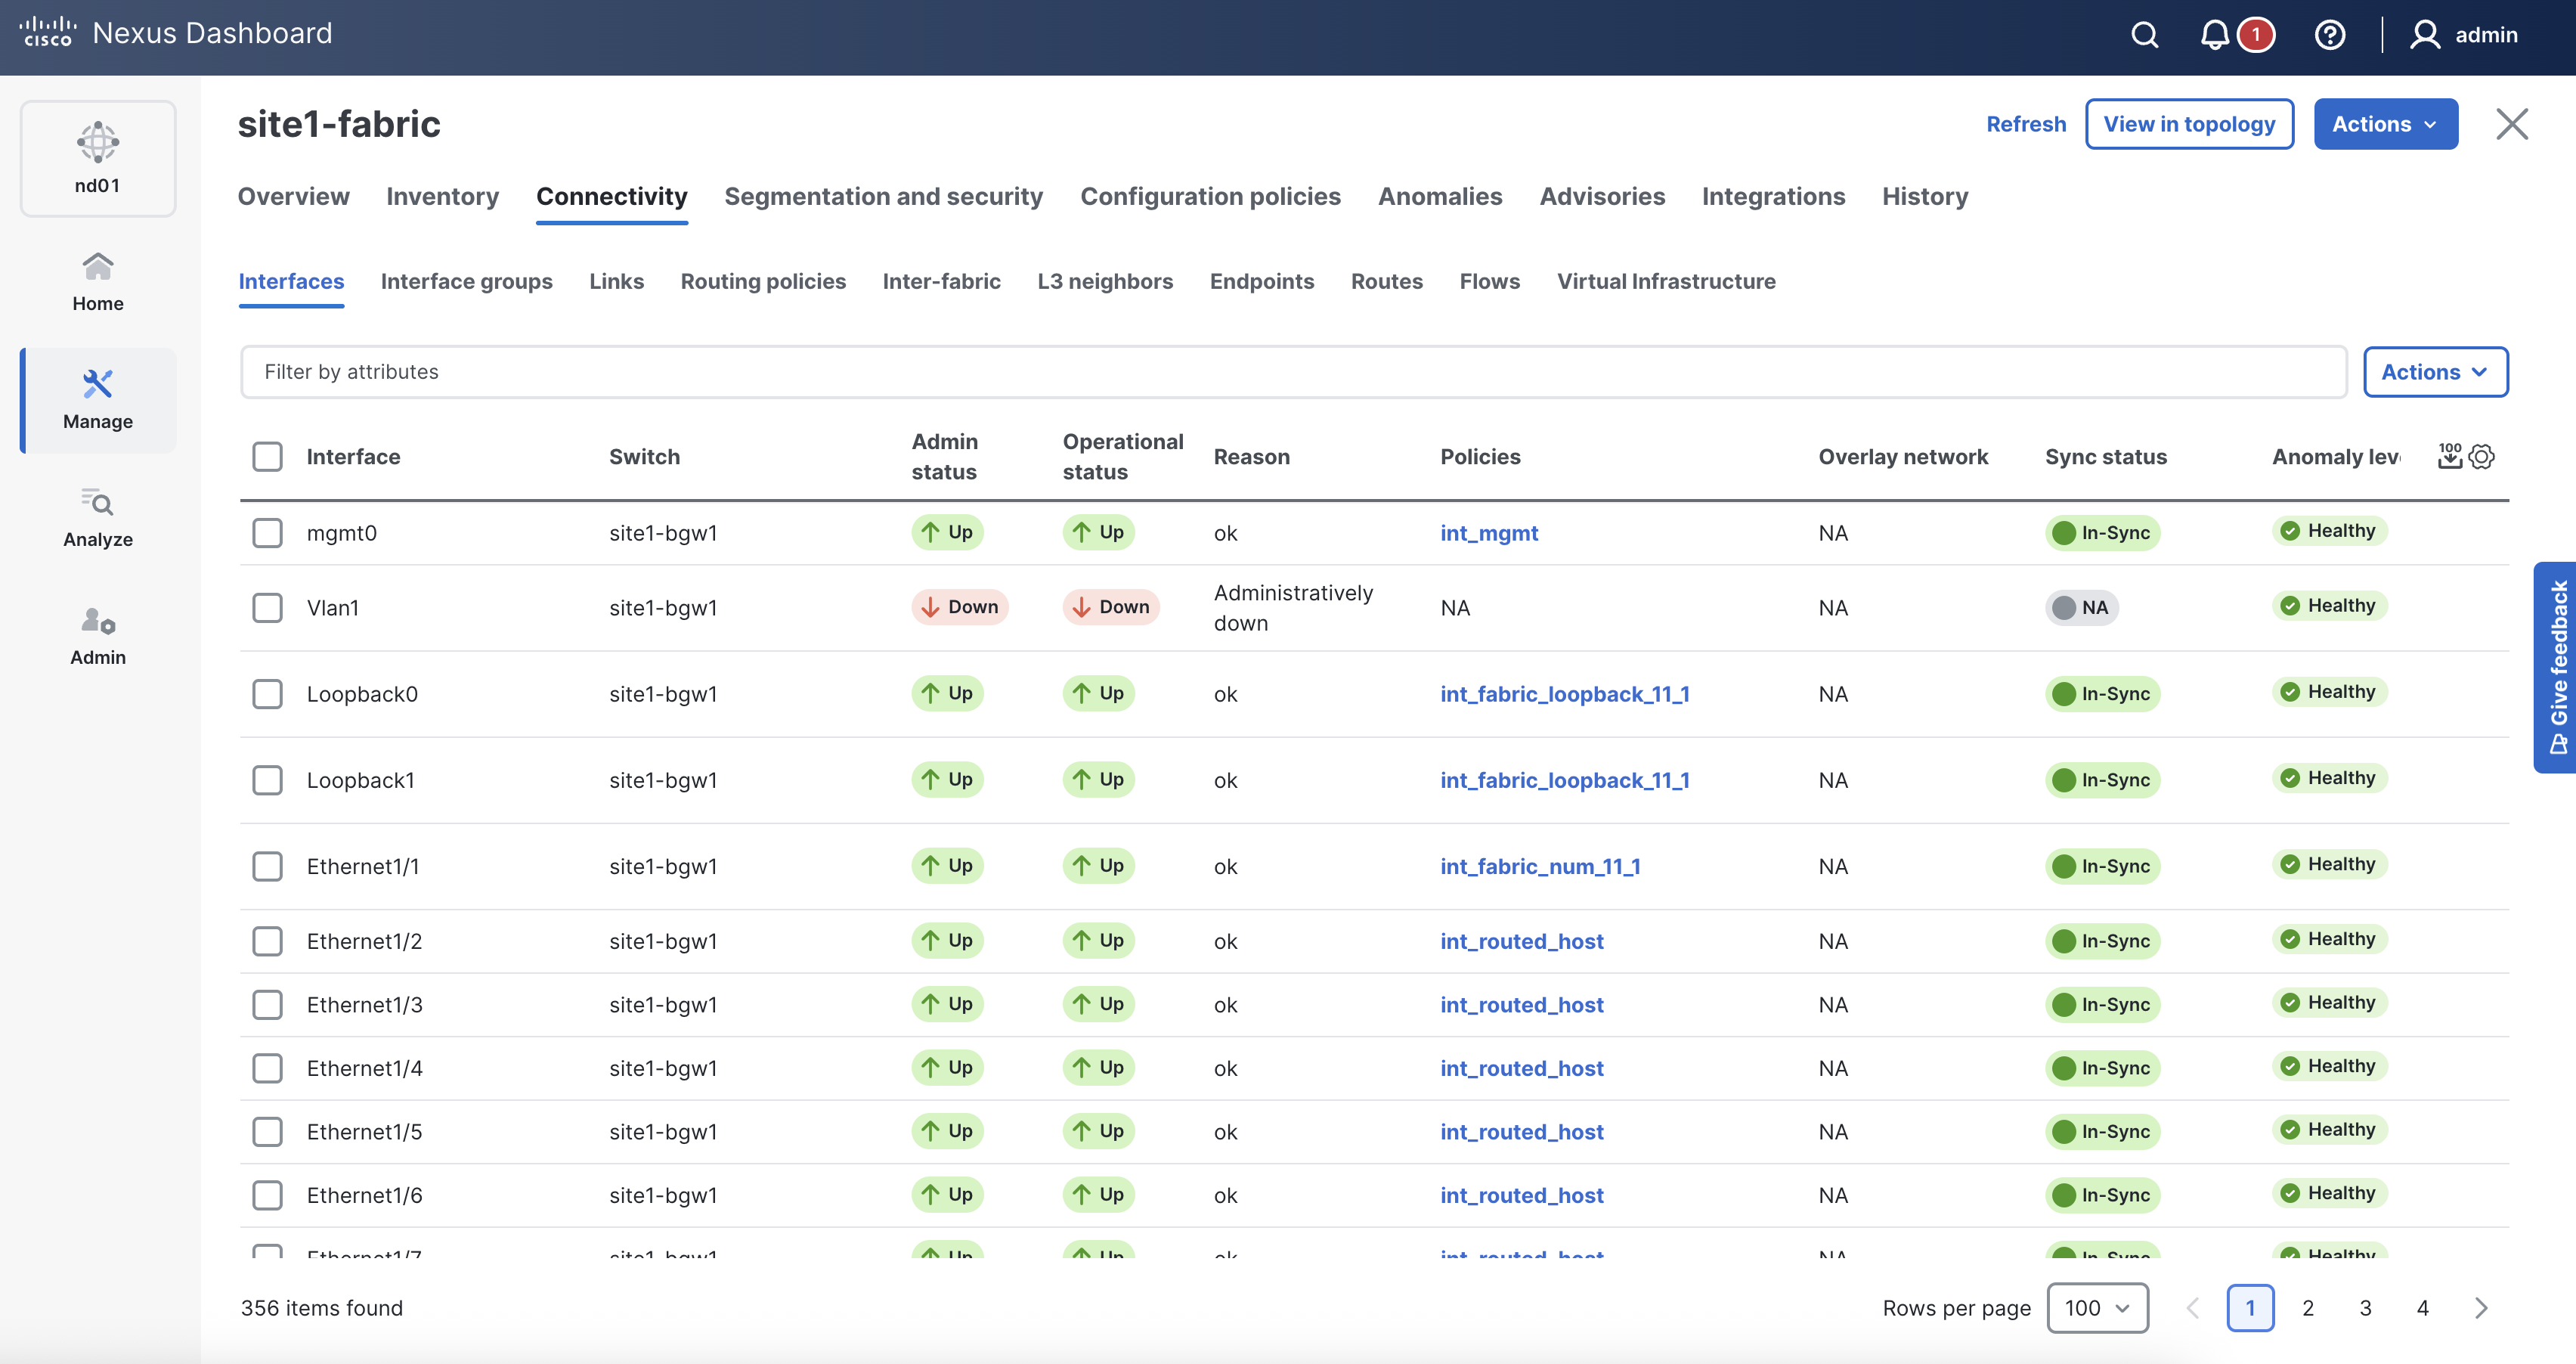
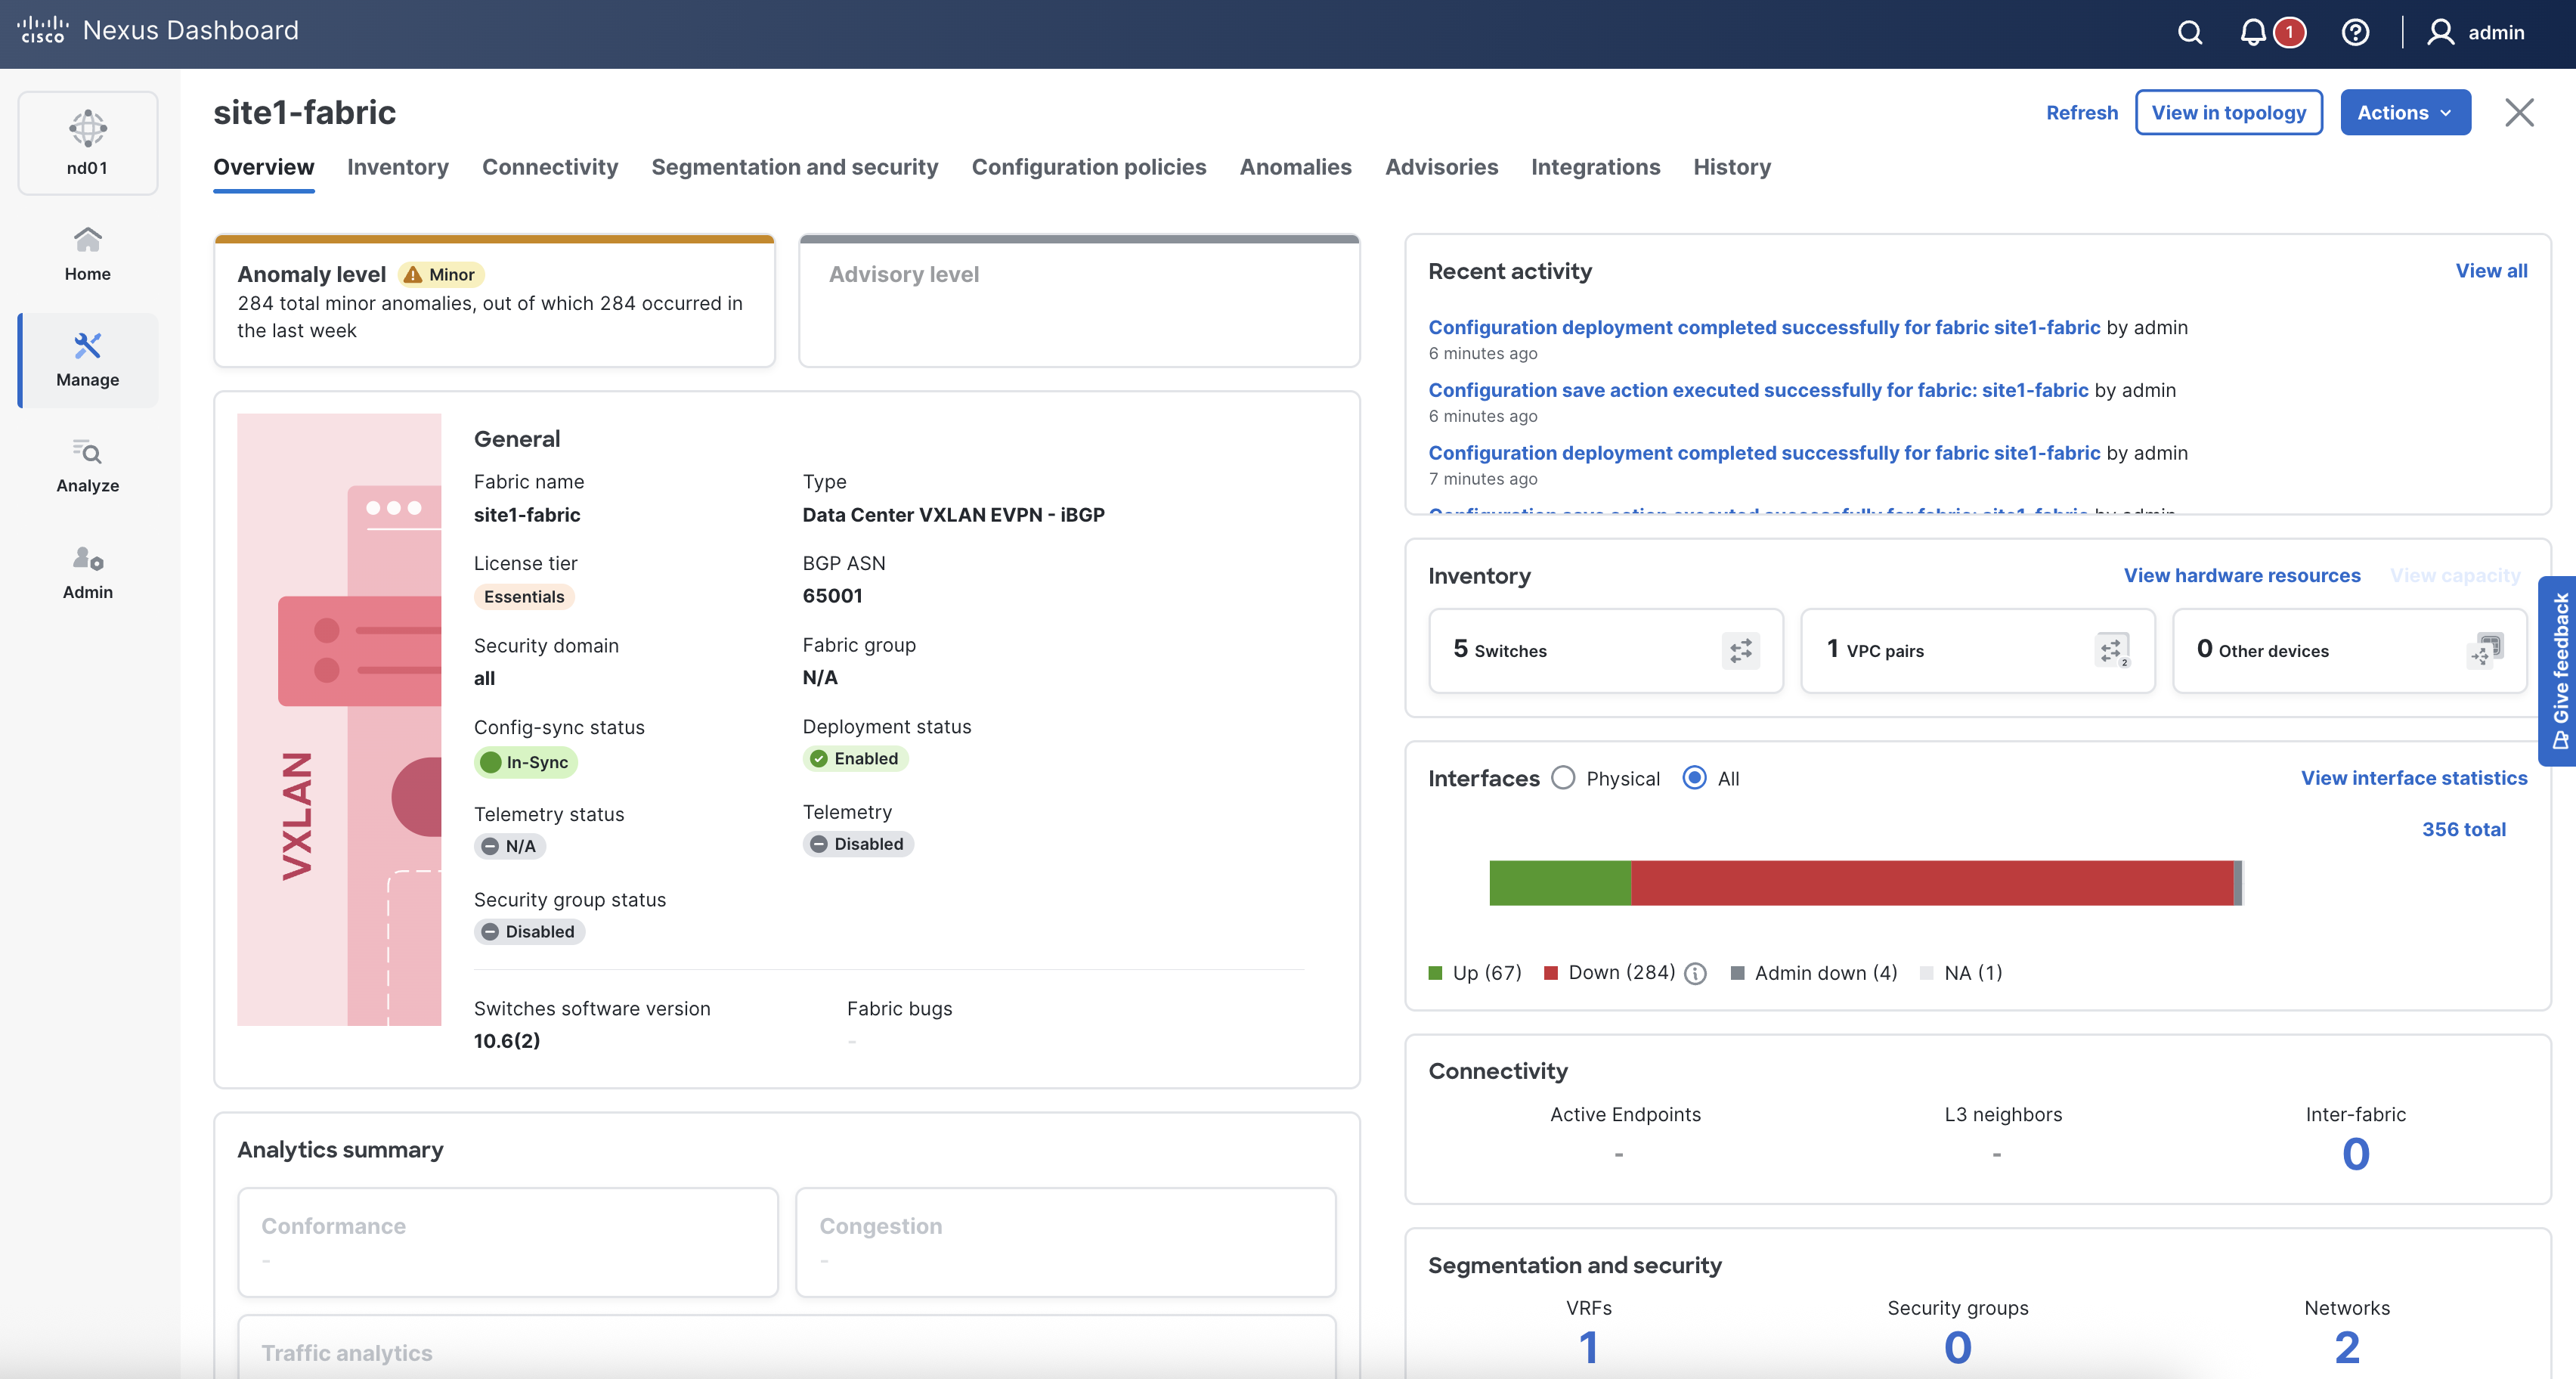
Return to your ND browser where you should be sitting on the Switches tab.
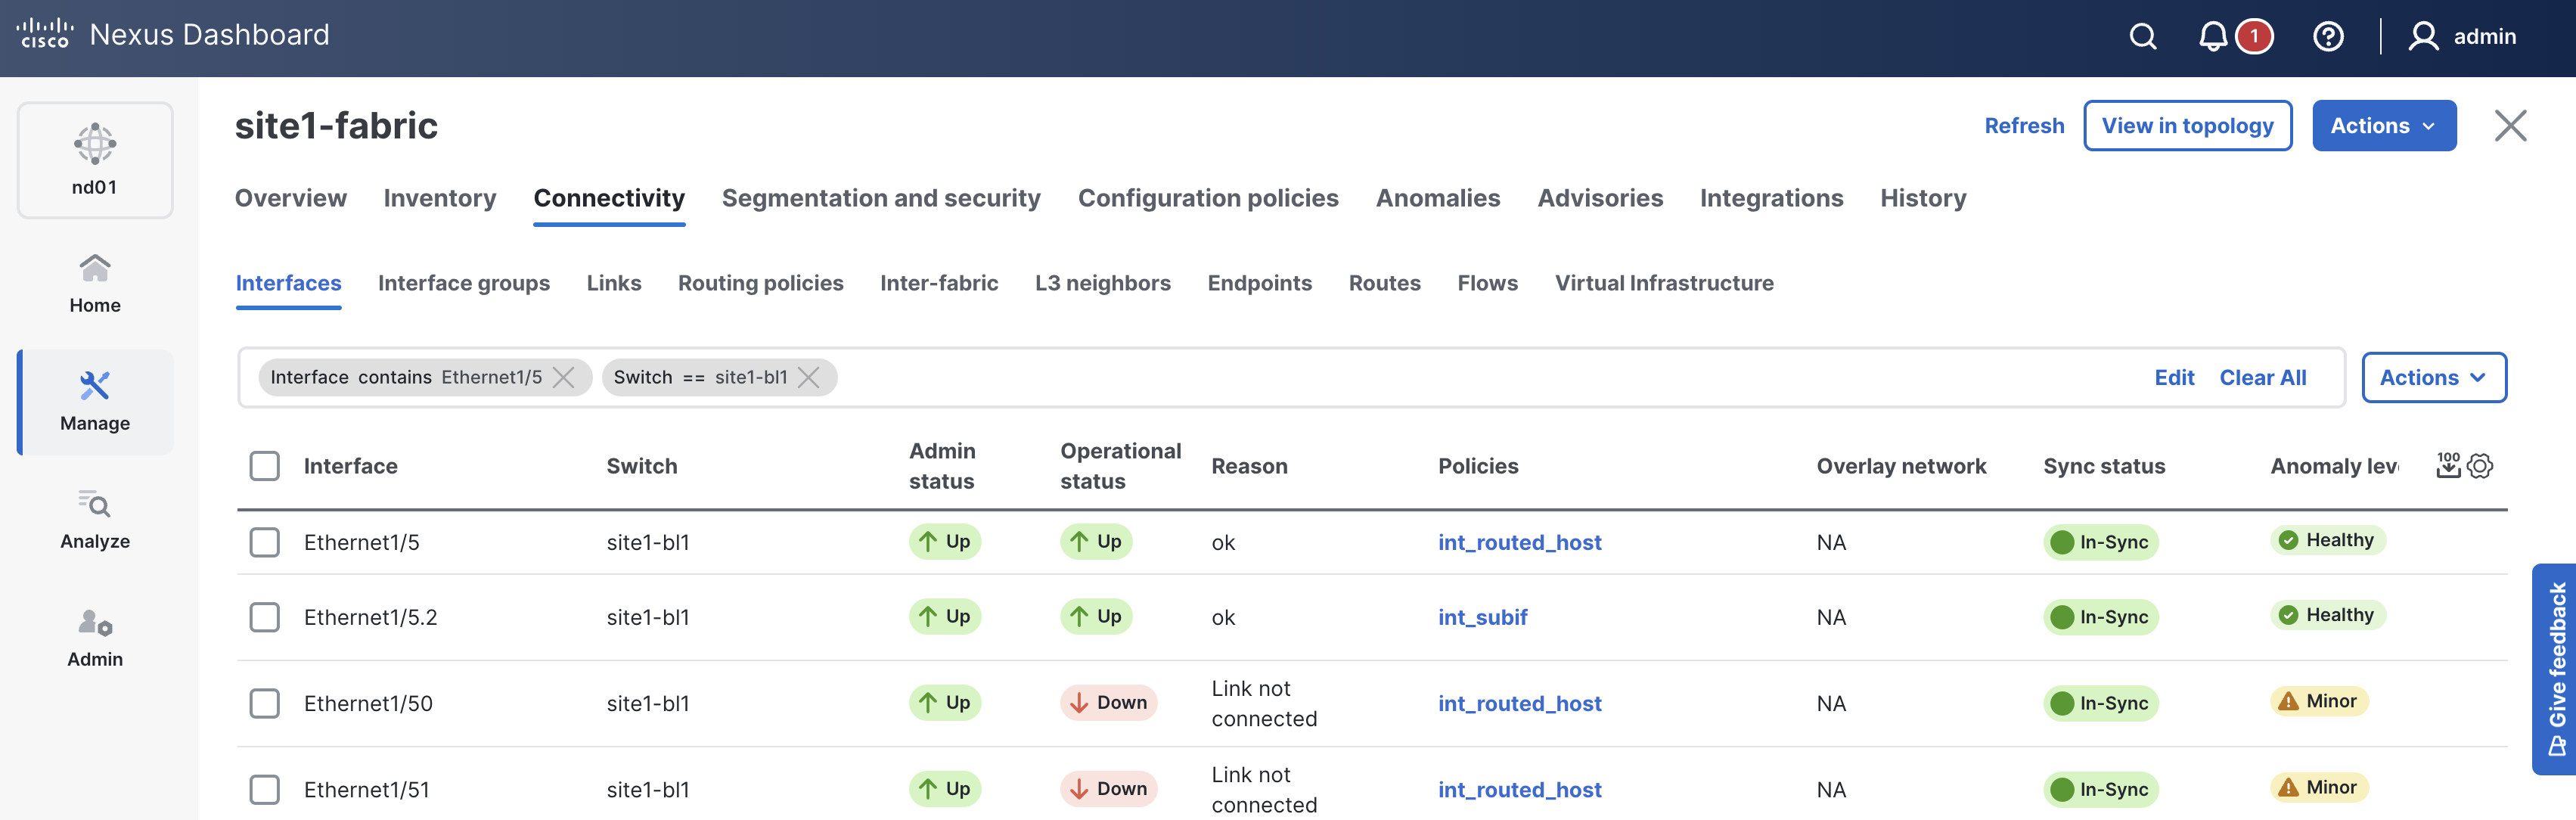
When reviewing the Interfaces tab, it is expected to see the interfaces for site1-bl1 now.
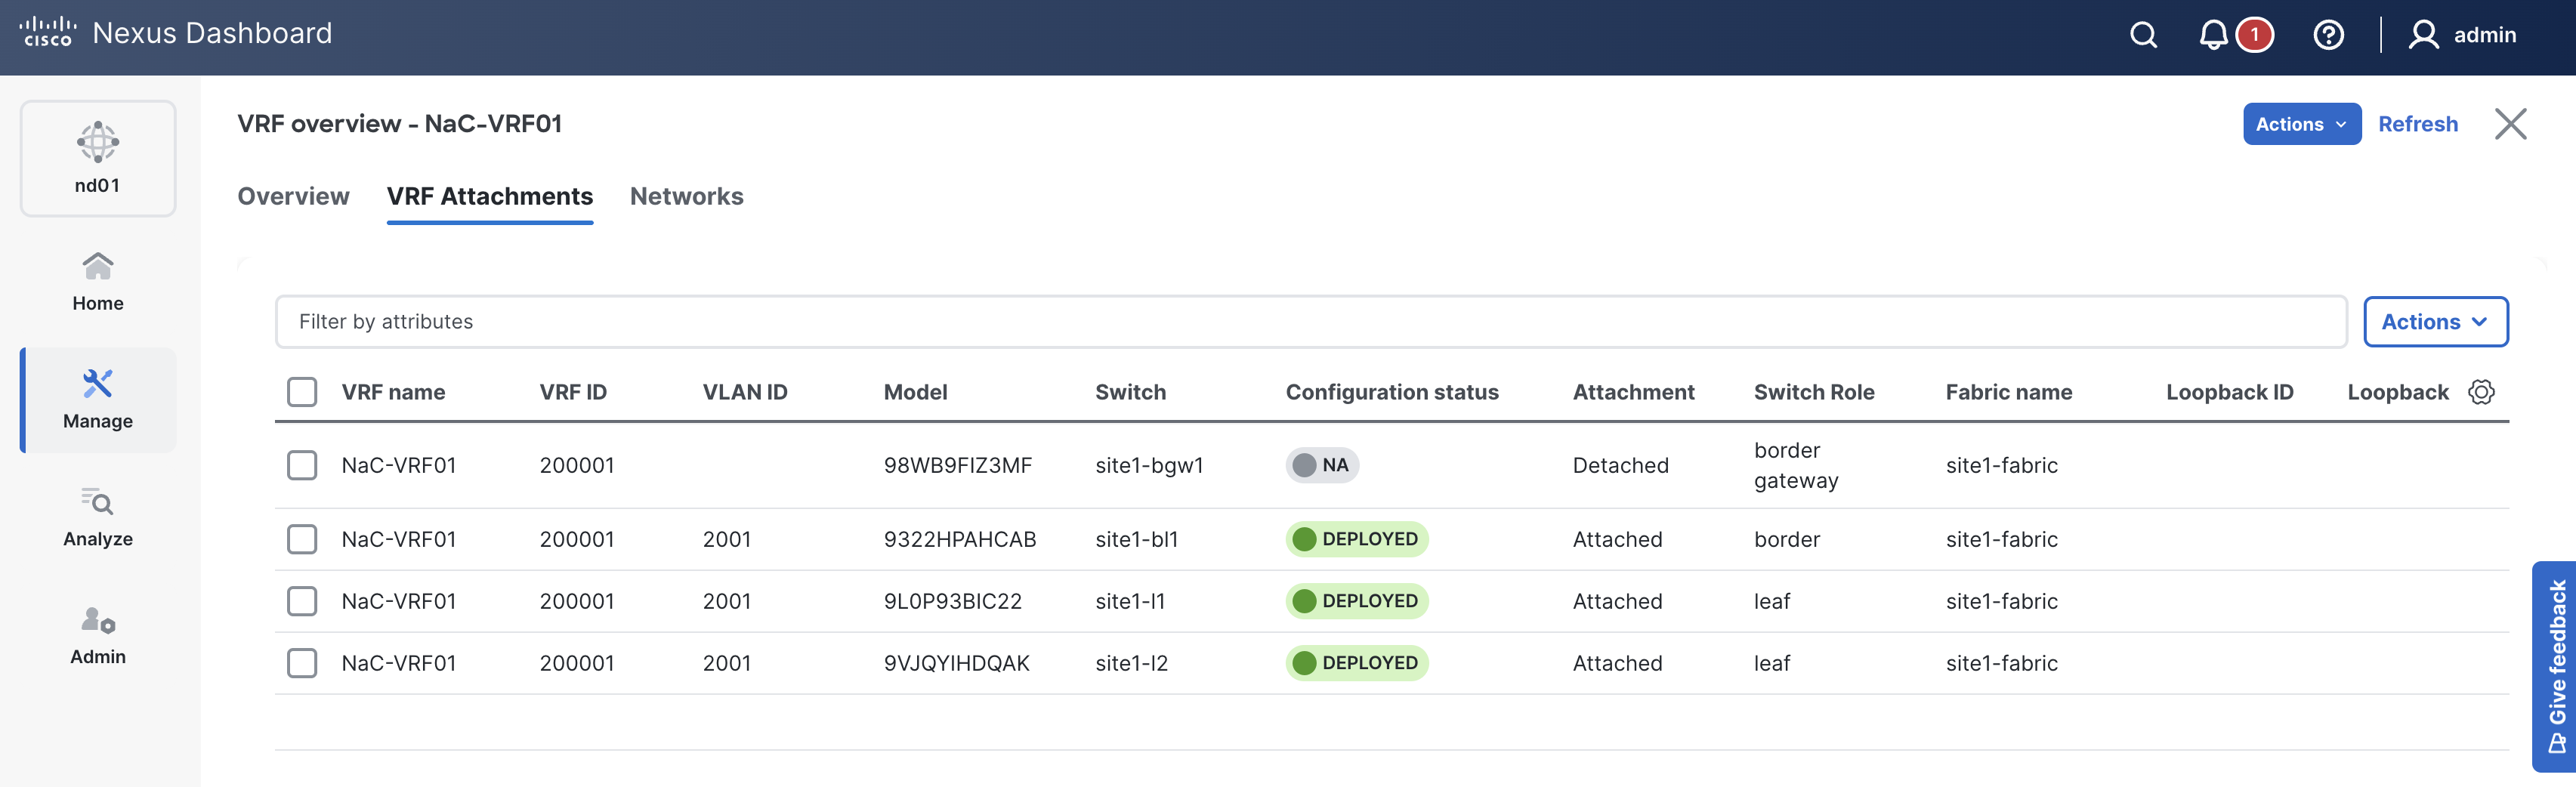
You've previously already verified the deployment. You just need to verify the deployment to your new switch.
Enter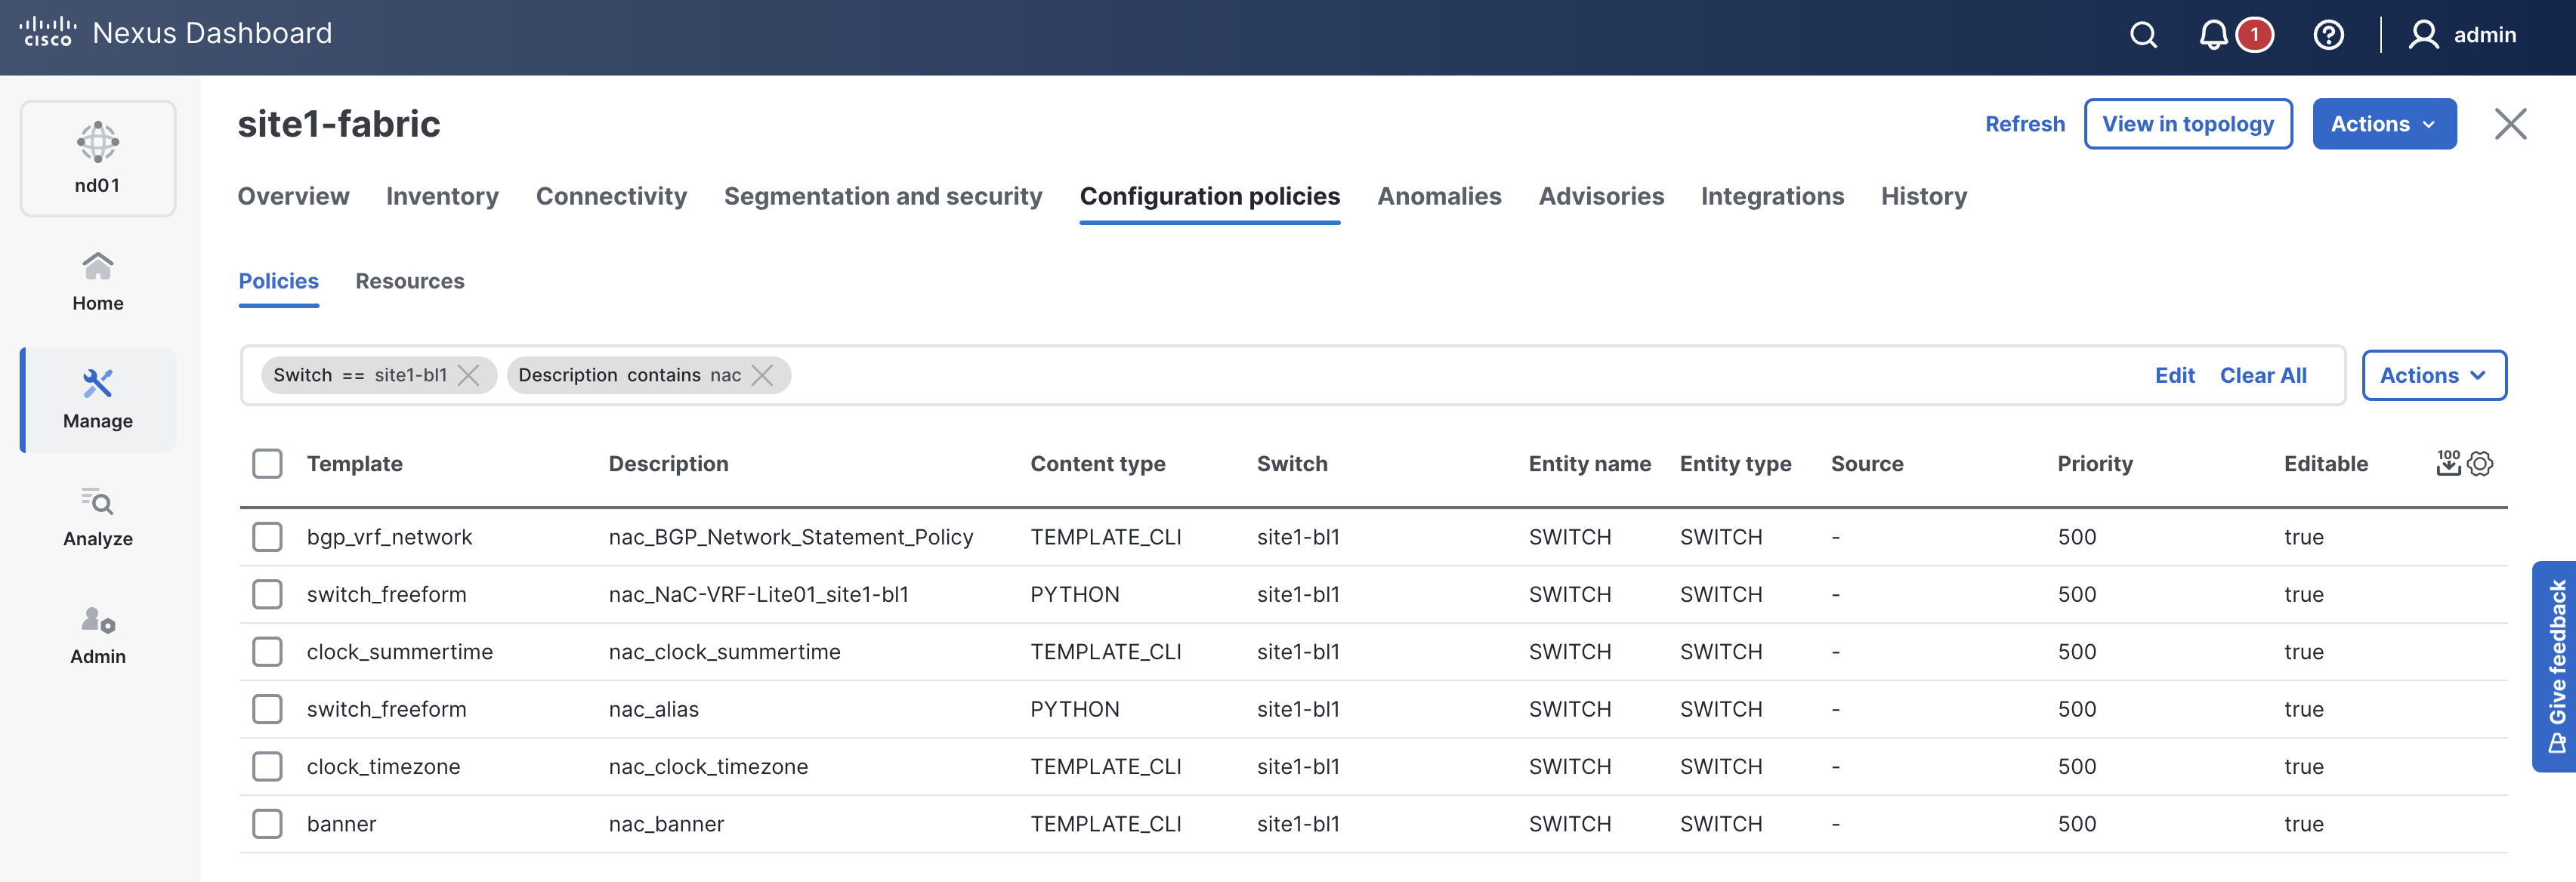
Navigate back to your VSCode application.
As a reminder, the Ansible inventory file defines how Ansible will connect and authenticate with ND in conjunction with the group_vars and host_vars files you have been creating. This inventory file will specifically define the external fabric logically as a host that you will be adding and managing in ND.
touch ~/workspace/ndlab/nac/hosts.external.yml
cat << EOF > ~/workspace/ndlab/nac/hosts.external.yml
---
# Inventory Information For Site1 External Fabric
nd:
  hosts:
    external-fabric:
      ansible_host: 10.15.0.35
EOF
After creating the external fabric inventory file, you need to create the necessary host_vars directory for your data model file(s).
Create a directory named host_vars/external-fabric.
cd ~/workspace/ndlab/nac
mkdir -p host_vars/external-fabric
In the previous sections, you created several YAML files that defined the fabric, global configuration, underlay configuration, topology and
overlay configurations for the site1-fabric fabric by showing you can split out the data model into separate files.
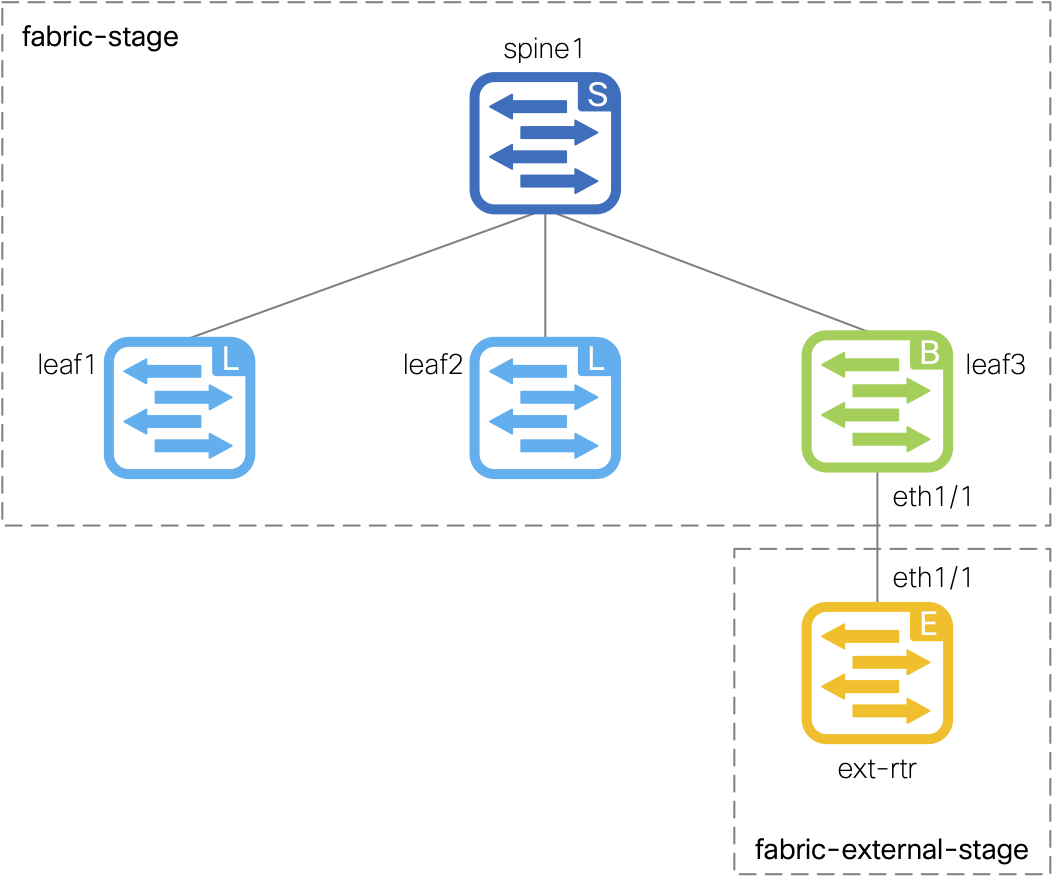
In this section, you are going to create a single YAML file for simplicity that will define the external fabric, which is a separate fabric that connects to the
site1-fabric fabric.
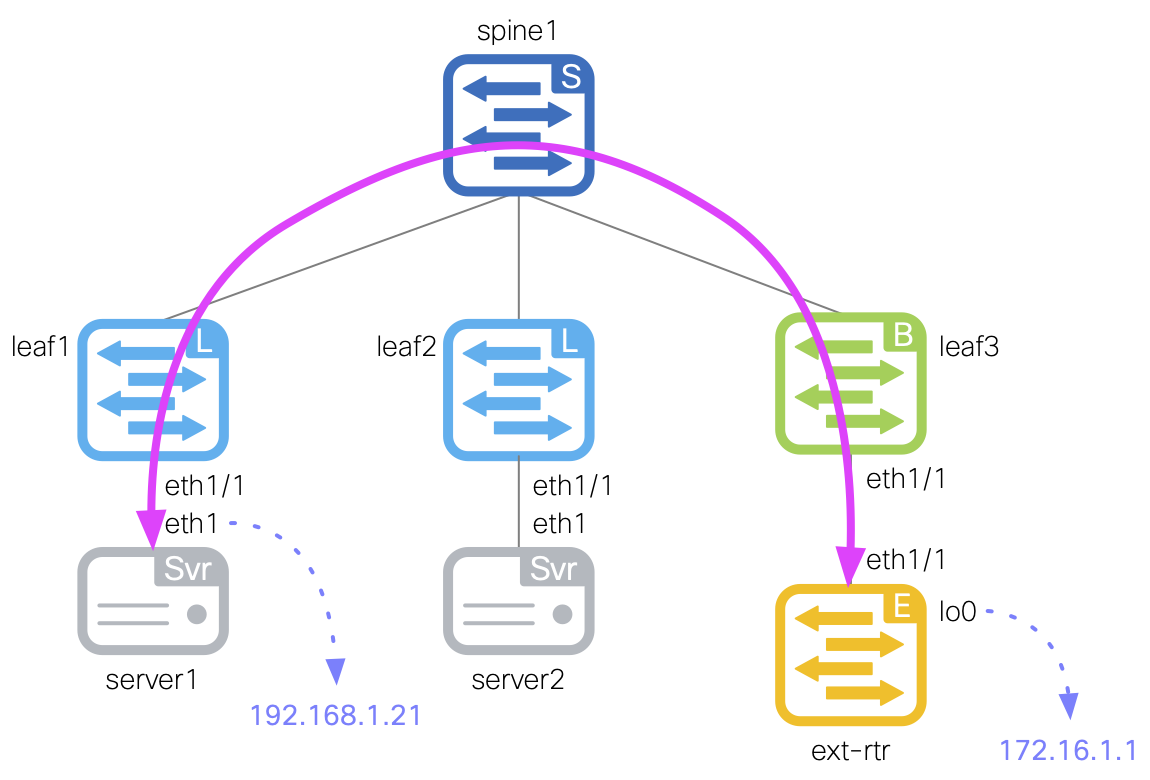
This external fabric will be used to connect an external router, which is represented by the site1-extrtr1 device in the diagram to the right.
The external router will be connected to the site1-bl1 switch in the site1-fabric via a routed interface and a sub-interface.
The end goal is to establish a connection between the site1-fabric and the external router in the external-fabric,
allowing for connectivity in and out of the Site1 fabric. Once both fabrics are established and have VRF-Lite configured between them,
you should be able to send a successful ping from a server located behind leaf1 to the external router's loopback interface.
touch ~/workspace/ndlab/nac/host_vars/external-fabric/fabric.nac.yml
code-server -r ~/workspace/ndlab/nac/host_vars/external-fabric/fabric.nac.yml
---

vxlan:
  fabric:
    name: external-fabric
    type: External
  global:
    external:
      bgp_asn: "65000"
  topology:
    switches:
      - name: site1-extrtr1
        serial_number: 967QR5NFP4H
        role: edge_router
        management:
          management_ipv4_address: 10.15.9.16
          default_gateway_v4: 10.15.9.1
        interfaces:
          - name: Ethernet1/1
            mode: routed
            description: To Border Leaf Eth1/5
            enabled: true
          - name: Ethernet1/1.2
            mode: routed_sub
            description: To Border Leaf Eth1/5.2
            enabled: true
            dot1q_id: 2
            ipv4_address: 10.31.0.2/30
          - name: loopback0
            mode: loopback
            description: Ping Test Loopback
            enabled: true
            ipv4_address: 172.16.1.1
  policy:
    policies:
      - name: BGP Neighbor Policy
        template_name: External_VRF_Lite_eBGP
        template_vars:
          asn: 65000
          vrfName: default
          NEIGHBOR_IP: 10.31.0.1
          NEIGHBOR_ASN: 65001
      - name: BGP Network Statement Policy
        template_name: bgp_network
        template_vars:
          BGP_AS: 65000
          IP_MASK: 172.16.1.1/32
    groups:
      - name: External Router
        policies:
          - name: BGP Neighbor Policy
          - name: BGP Network Statement Policy
    switches:
      - name: site1-extrtr1
        groups:
          - External Router
Make sure you are in your root Ansible directory.
cd ~/workspace/ndlab/nac
From the root Ansible project directory execute the following command:
ansible-playbook -i hosts.external.yml vxlan.yml
Upon a successful run of the playbook your output should look as follows:
  <... SNIP ...>

  PLAY RECAP **************************************************************************************************************************************************************************
  external-fabric            : ok=45   changed=4    unreachable=0    failed=0    skipped=20   rescued=0    ignored=0


  PLAYBOOK RECAP ******************************************************************************************
  Playbook run took 0 days, 0 hours, 1 minutes, 46 seconds


  TASKS RECAP *********************************************************************************************
  Wednesday 03 June 2026  00:22:28 +0000 (0:00:00.062)       0:01:46.684 ********
  ===============================================================================
  cisco.nac_dc_vxlan.create : Execute Create Resources -------------------------------------------- 59.64s
  cisco.nac_dc_vxlan.deploy : Execute Deploy of Resources ----------------------------------------- 30.75s
  cisco.nac_dc_vxlan.common : Build Resources ------------------------------------------------------ 2.33s
  cisco.nac_dc_vxlan.connectivity_check : Get Cisco Nexus Dashboard Fabric Controller Version ------ 1.66s
  cisco.nac_dc_vxlan.remove : Execute Remove Resources --------------------------------------------- 1.38s
  cisco.nac_dc_vxlan.deploy : Execute Deploy of Resources ------------------------------------------ 1.32s
  cisco.nac_dc_vxlan.validate : Copy Service Model Data to Host ------------------------------------ 0.85s
  cisco.nac_dc_vxlan.connectivity_check : Verify Authorization to Nexus Dashboard ------------------ 0.77s
  cisco.nac_dc_vxlan.validate : Copy Extended Service Model Data to Host --------------------------- 0.59s
  cisco.nac_dc_vxlan.validate : Stat Factory Defaults ---------------------------------------------- 0.55s
  cisco.nac_dc_vxlan.connectivity_check : Verify Connection to Nexus Dashboard --------------------- 0.52s
  cisco.nac_dc_vxlan.connectivity_check : Get Cisco Nexus Dashboard Version ------------------------ 0.48s
  cisco.nac_dc_vxlan.validate : Stat the Extended Service Model Data ------------------------------- 0.34s
  cisco.nac_dc_vxlan.validate : Stat the Golden Service Model Data --------------------------------- 0.31s
  cisco.nac_dc_vxlan.remove : Log Deploy During Remove Info Message -------------------------------- 0.27s
  cisco.nac_dc_vxlan.remove : Display Remove Resources Summary ------------------------------------- 0.27s
  cisco.nac_dc_vxlan.create : Display Create Resources Summary ------------------------------------- 0.23s
  cisco.nac_dc_vxlan.connectivity_check : Set Cisco Nexus Dashboard Fabric Controller Version Var --- 0.22s
  cisco.nac_dc_vxlan.validate : Prepare Service Model ---------------------------------------------- 0.21s
  cisco.nac_dc_vxlan.common : Display Change Flag Values ------------------------------------------- 0.21s

  ROLES RECAP *********************************************************************************************
  Wednesday 03 June 2026  00:22:28 +0000 (0:00:00.063)       0:01:46.683 ********
  ===============================================================================
  create ----------------------------------------------------------------- 59.92s
  deploy ----------------------------------------------------------------- 32.18s
  validate ---------------------------------------------------------------- 5.38s
  connectivity_check ------------------------------------------------------ 3.82s
  common ------------------------------------------------------------------ 3.04s
  remove ------------------------------------------------------------------ 1.98s
  common_global ----------------------------------------------------------- 0.04s
  ~~~~~~~~~~~~~~~~~~~~~~~~~~~~~~~~~~~~~~~~~~~~~~~~~~~~~~~~~~~~~~~~~~~~~~~~~~~~~~~
  total ----------------------------------------------------------------- 106.38s
In your browser, return to ND:


Now that you have configured a test loopback interface on site1-extrtr1 and applied a BGP policy to inject the route, you can test connectivity from Server1 to the External Loopback IP.
Log in to Server1 by copying the command below and pasting it into your VSCode Terminal. When prompted, the password is cisco.123 .
ssh -l cisco 10.15.9.101
If prompted to accept the RSA key fingerprint like below, type or copy yes then input the password above.
cisco@10.15.9.101's password:
From Server1, ping the external loopback interface to verify connectivity through the VRF-Lite extension.
ping -c 5 172.16.1.1
Output:
PING 172.16.1.1 (172.16.1.1): 56 data bytes
64 bytes from 172.16.1.1: seq=0 ttl=253 time=11.631 ms
64 bytes from 172.16.1.1: seq=1 ttl=253 time=10.717 ms
64 bytes from 172.16.1.1: seq=2 ttl=253 time=11.234 ms
64 bytes from 172.16.1.1: seq=3 ttl=253 time=10.291 ms
64 bytes from 172.16.1.1: seq=4 ttl=253 time=11.116 ms

--- 172.16.1.1 ping statistics ---
5 packets transmitted, 5 packets received, 0% packet loss
round-trip min/avg/max = 10.291/10.997/11.631 ms
Log out of Server1 to return to your development server terminal.
exit
Connection to 10.15.9.101 closed.
Navigate back to your VSCode application.
In the next section, you will build a simple Site2 fabric in preparation for extending your network via Multi-Site (MSD).